
Discover the Secrets of the Spring Framework!
Dive into the worlds of IOC (Inversion of Control), DI (Dependency Injection), and Application Context, and explore Spring Boot, AOP, JDBC, and JPA. Prepare yourself for an exciting journey through one of the most powerful and widely used Java frameworks.
Even after more than a decade, the Spring Framework remains as popular today as it was 12 years ago when I first started using it.
How is this feasible in a very dynamic environment where designs have altered dramatically?
Course Link

What You Will Learn
- Spring Framework fundamentals, including Dependency Injection, IOC Container, Application Context, and BeanFactory.
- How to use essential Spring annotations such as
@Autowired,@Component,@Service,@Repository,@Configuration, and@Primary. - A thorough understanding of Spring MVC, including DispatcherServlet, Model, Controllers, and ViewResolver.
- How to work with Spring Boot Starters, including Spring Boot Starter Web, Starter Data JPA, and Starter Test.
- Fundamentals of Spring Boot, Spring AOP, Spring JDBC, and JPA.
- Basics of development tools such as Eclipse, Maven, JUnit, and Mockito.
- Step-by-step guidance to create a simple web application using JSP, Servlets, and Spring MVC.
- How to construct unit tests using XML, Java Application Contexts, and Mockito.
Getting Started
Installing Tools
- Installation Resources
- Video: Installation Guide Video
- PDF: Installation Guide PDF
- More Details: Getting Started in 5 Steps
- Troubleshooting
Running Examples
- Clone the Git repository or download the ZIP file.
- Unzip the archive (if you downloaded a ZIP).
- Open Command Prompt and navigate to the folder containing
pom.xml. - Open Eclipse:
- Go to File → Import → Existing Maven Project
- Navigate to the folder where you unzipped the project
- Select the correct project and finish the import
- Locate the Spring Boot Application file annotated with
@SpringBootApplication. - Right-click the file and select Run as Java Program.
- You are all set!
- For further help, refer to the Installation Guide Video.
Spring Level 1 through Level 6 Section Overview
| Title | Category | GitHub |
|---|---|---|
| Spring Framework in 10 Steps | Spring - Level 1 | Project Folder on GitHub |
| Spring in Depth | Spring - Level 2 | Project Folder on GitHub |
| Unit Testing with Spring Framework | Spring - Level 3 | Project Folder on GitHub |
| Spring Boot in 10 Steps | Spring - Level 4 | Project Folder on GitHub |
| Spring AOP | Spring - Level 5 | Project Folder on GitHub |
| Spring JDBC and JPA | Spring - Level 6 | Project Folder on GitHub |
5 Bonus Sections - Introduction to Tools and Frameworks
| Title | Category | GitHub |
|---|---|---|
| Eclipse in 5 Steps | Introduction | Project Folder on GitHub |
| Maven in 5 Steps | Introduction | Project Folder on GitHub |
| JUnit in 5 Steps | Introduction | Project Folder on GitHub |
| Mockito in 5 Steps | Introduction | Project Folder on GitHub |
| Basic Web Application with Spring MVC | Introduction | Project Folder on GitHub |
Section Details
Spring Level 1 - First 10 Steps in Spring
| Title | Category | GitHub |
|---|---|---|
| Spring Framework in 10 Steps | Spring - Level 1 | Project Folder on GitHub |
Steps Covered:
- Setting up a Spring Project using start.spring.io
- Understanding Tight Coupling using the Binary Search Algorithm example
- Making the Binary Search Algorithm example loosely coupled
- Using Spring to manage dependencies -
@Component,@Autowired - Understanding what happens in the background
- Dynamic autowiring and troubleshooting -
@Primary - Constructor and Setter Injection
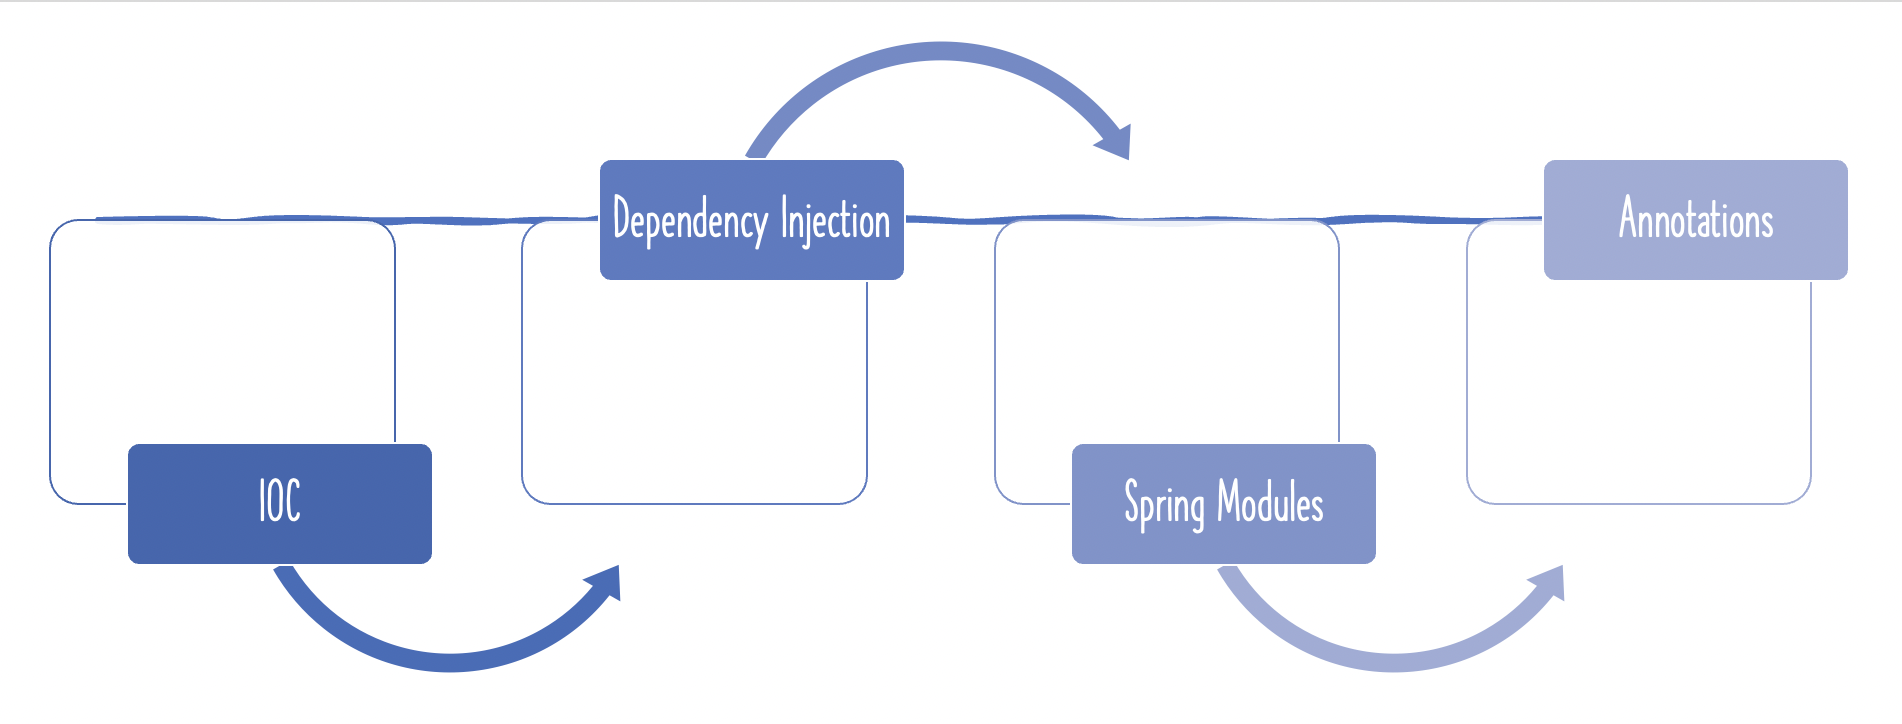
- Overview of Spring Modules
- Overview of Spring Projects
- Why is Spring popular?
Step 1: Setting up a Spring Project using start.spring.io
Dependency Injection (DI) is a crucial element of the Spring Framework. Spring helps in developing loosely coupled applications, which makes your code easier to maintain and test.
To understand dependency injection, you first need to grasp the concept of tight coupling and how to build loosely coupled programs. We’ll start with a simple example to illustrate tight coupling and the benefits of DI.
Creating a Spring project using Spring Initializr is straightforward and quick.
Spring Initializr (http://start.spring.io/) is a powerful tool to bootstrap your Spring Boot projects with the required dependencies and project structure.

As shown in the image above, follow these steps to set up your Spring project:
- Launch Spring Initializr and configure the project:
- Group:
com.in28minutes.spring.basics - Artifact:
spring-in-5-steps - Dependencies: Do not select any dependencies
- By default, the Basic Starter is included, which contains the core Spring Framework and the Spring Test starter.
- Group:
-
Click “Generate Project” to download the project archive.
- Import the project into Eclipse or IntelliJ IDE:
- Go to File → Import → Existing Maven Project
- Navigate to the folder where you downloaded/extracted the project
- Select the project and finish the import.
- Optional: If you want to understand all the files included in the project, refer to the detailed guide here.
Step 2: Understanding Tight Coupling using the Binary Search Algorithm Example
To illustrate tight coupling, we will create an example using the Binary Search and Bubble Sort algorithms.
In a tightly coupled design, the Binary Search class directly depends on a specific implementation of the Bubble Sort algorithm, making it difficult to change or test the sorting logic independently.
This example will help you understand why tight coupling is undesirable and how Dependency Injection in Spring can help decouple components.

Unfortunately, the above implementation has a limitation: if we want to use Binary Search with a different sorting algorithm, we would need to update the code.
Our goal is to loosely couple the Binary Search algorithm so that it can work with any sorting algorithm without modifying the Binary Search class itself.
Consider the solution before advancing to next stage!
Step 3: Making the Binary Search Algorithm Example Loosely Coupled
To loosen the coupling between the Binary Search and the sorting algorithm, we introduce an interface for the sorting behavior.
By programming to an interface instead of a concrete class, the Binary Search class can now work with any sorting algorithm that implements this interface.
This is the foundation of Dependency Injection in Spring, allowing components to be easily replaced or tested independently.
package com.in28minutes.spring.basics.springin5steps;

public interface SortAlgorithm {
	int[] sort(int[] numbers);
}
public class BinarySearchImpl {

    private SortAlgorithm sortAlgorithm;
}
Step 4 : Using Spring to Manage Dependencies - @Component, @Autowired
We developed code to construct objects for the bubble sort algorithm and binary search in the previous phases. We also took care of the dependencies. It would be wonderful indeed if some framework can take charge of generation of the beans and autowiring the dependencies.
This is where Spring Framework comes into play!
Let’s get started with autowiring using Spring.
Notes
- Sort algorithm is a dependency of the binary search.
@Component
public class BinarySearchImpl {

    @Autowired
    private SortAlgorithm sortAlgorithm;
}
@Component
public class BubbleSortAlgorithm implements SortAlgorithm {
	public int[] sort(int[] numbers) {
		// Logic for Bubble Sort
		return numbers;
	}
}
Step 5: What is Happening in the Background?
You can activate debug logging to understand what Spring is doing behind the scenes.
Add the following to your /src/main/resources/application.properties:
logging.level.org.springframework=debug
- Spring performs a component scan on the parent package
com.in28minutes.spring.basics.springin5stepsto locate all components — classes annotated with@Component. - It identifies all components and their dependencies.
- It detects that
BinarySearchImplhas a dependency onSortAlgorithm. - Since
SortAlgorithmhas no further dependencies, Spring creates an instance of it and autowires it intoBinarySearchImplautomatically.
Step 6 : Dynamic auto wiring and Troubleshooting - @Primary
What if we add one more SortAlgorithm?
package com.in28minutes.spring.basics.springin5steps;

import org.springframework.stereotype.Component;

@Component
public class QuickSortAlgorithm implements SortAlgorithm {
	public int[] sort(int[] numbers) {
		// Logic for Quick Sort
		return numbers;
	}
}
There are now two SortAlgorithm implementations available. Spring throws an exception because it doesn’t know which one to use.
We can use the @Primary annotation to tell Spring which SortAlgorithm implementation should be preferred when multiple options exist.
package com.in28minutes.spring.basics.springin5steps;

import org.springframework.context.annotation.Primary;
import org.springframework.stereotype.Component;

@Component
@Primary
public class BubbleSortAlgorithm implements SortAlgorithm {
	public int[] sort(int[] numbers) {
		// Logic for Bubble Sort
		return numbers;
	}
}
Step 7 : Constructor and Setter Injection
Constructor Injection

Setter Injection

Step 8 : Spring Modules
Spring’s modular design lets us use only the modules we need, without depending on the rest.

Step 9 : Spring Projects
The Spring projects offer comprehensive solutions to common problems encountered in enterprise application development.

We’re looking at just seven Spring projects — that’s only the tip of the iceberg! There are many others like Spring Web Services, Spring Session, Spring Social, Spring Mobile, and Spring Android, each solving different kinds of problems.
Spring has evolved beyond the core framework and now encompasses a wide range of projects addressing different aspects of application development.
Step 10 : Why is Spring Popular?
 Spring is one of the very few frameworks that remains as popular today as it was 15 years back.
Spring Level 2 - Spring in Depth
| Title | Category | GitHub |
|---|---|---|
| Spring in Depth | Spring - Level 2 | Project Folder on GitHub |
Topics Covered
- Step 11 – Dependency Injection: More Examples
- Step 12 – Autowiring in Depth: by Name and
@Primary - Step 13 – Autowiring in Depth: Using
@QualifierAnnotation - Step 14 – Scope of a Bean: Prototype and Singleton
- Step 15 – Complex Scenarios with Bean Scopes: Mixing Prototype and Singleton
- Step 15B – Difference Between Spring Singleton and GoF Singleton
- Step 16 – Using Component Scan to Detect and Register Beans
- Step 17 – Lifecycle of a Bean:
@PostConstructand@PreDestroy - Step 18 – Container and Dependency Injection (CDI):
@Named,@Inject - Step 19 – Removing Spring Boot from a Basic Application
- Step 20 – Fixing Minor Issues: Add Logback and Close Application Context
- Step 21 – Defining Spring Application Context Using XML – Part 1
- Step 22 – Defining Spring Application Context Using XML – Part 2
- Step 23 – Mixing XML Configuration with Component Scan for Annotation-Based Beans
- Step 24 – IoC Container vs ApplicationContext vs BeanFactory
- Step 25 –
@Componentvs@Servicevs@Repositoryvs@Controller - Step 26 – Reading Values from an External Properties File
Step 11 - Dependency Injection - A few more examples
Step 12 - Autowiring in Depth - by Name and @Primary
Step 13 - Autowiring in Depth - @Qualifier annotation
@Component
@Scope(ConfigurableBeanFactory.SCOPE_SINGLETON)
public class BinarySearchImpl {

	@Autowired
	@Qualifier("bubble")
	private SortAlgorithm sortAlgorithm;
@Component
@Qualifier("bubble")
public class BubbleSortAlgorithm implements SortAlgorithm {
@Component
@Qualifier("quick")
public class QuickSortAlgorithm implements SortAlgorithm {
Step 14 - Scope of a Bean - Prototype and Singleton
Step 15 - Complex scenarios with Scope of a Spring Bean - Mix of Prototype and Singleton
package com.in28minutes.spring.basics.springin5steps.scope;

import org.springframework.beans.factory.config.ConfigurableBeanFactory;
import org.springframework.context.annotation.Scope;
import org.springframework.context.annotation.ScopedProxyMode;
import org.springframework.stereotype.Component;

@Component
@Scope(value=ConfigurableBeanFactory.SCOPE_PROTOTYPE,
		proxyMode = ScopedProxyMode.TARGET_CLASS)
public class JdbcConnection {
	public JdbcConnection() {
		System.out.println("JDBC Connection");
	}
}
package com.in28minutes.spring.basics.springin5steps.scope;

import org.springframework.beans.factory.annotation.Autowired;
import org.springframework.stereotype.Component;

@Component
public class PersonDAO {

	@Autowired
	JdbcConnection jdbcConnection;

	public JdbcConnection getJdbcConnection() {
		return jdbcConnection;
	}

	public void setJdbcConnection(JdbcConnection jdbcConnection) {
		this.jdbcConnection = jdbcConnection;
	}
}
package com.in28minutes.spring.basics.springin5steps;

import org.slf4j.Logger;
import org.slf4j.LoggerFactory;
import org.springframework.boot.SpringApplication;
import org.springframework.boot.autoconfigure.SpringBootApplication;
import org.springframework.context.ApplicationContext;

import com.in28minutes.spring.basics.springin5steps.scope.PersonDAO;

@SpringBootApplication
public class SpringIn5StepsScopeApplication {

	private static final Logger LOGGER = LoggerFactory.getLogger(SpringIn5StepsScopeApplication.class);

	public static void main(String[] args) {

		var applicationContext =
				SpringApplication.run(SpringIn5StepsScopeApplication.class, args);

		var personDao =
				applicationContext.getBean(PersonDAO.class);

		var personDao2 =
				applicationContext.getBean(PersonDAO.class);

		LOGGER.info("{}", personDao);
		LOGGER.info("{}", personDao.getJdbcConnection());

		LOGGER.info("{}", personDao2);
		LOGGER.info("{}", personDao.getJdbcConnection());

	}
}
Step 15B - Difference Between Spring Singleton and GOF Singleton
Step 16 - Using Component Scan to scan for beans
package com.in28minutes.spring.basics.componentscan;

import org.springframework.beans.factory.annotation.Autowired;
import org.springframework.stereotype.Component;

@Component
public class ComponentDAO {

	@Autowired
	ComponentJdbcConnection jdbcConnection;

	public ComponentJdbcConnection getJdbcConnection() {
		return jdbcConnection;
	}

	public void setComponentJdbcConnection(ComponentJdbcConnection jdbcConnection) {
		this.jdbcConnection = jdbcConnection;
	}
}
package com.in28minutes.spring.basics.componentscan;

import org.springframework.beans.factory.config.ConfigurableBeanFactory;
import org.springframework.context.annotation.Scope;
import org.springframework.context.annotation.ScopedProxyMode;
import org.springframework.stereotype.Component;

@Component
@Scope(value=ConfigurableBeanFactory.SCOPE_PROTOTYPE,
		proxyMode = ScopedProxyMode.TARGET_CLASS)
public class ComponentJdbcConnection {
	public ComponentJdbcConnection() {
		System.out.println("JDBC Connection");
	}
}
package com.in28minutes.spring.basics.springin5steps;

import org.slf4j.Logger;
import org.slf4j.LoggerFactory;
import org.springframework.boot.SpringApplication;
import org.springframework.boot.autoconfigure.SpringBootApplication;
import org.springframework.context.ApplicationContext;
import org.springframework.context.annotation.ComponentScan;

import com.in28minutes.spring.basics.componentscan.ComponentDAO;

@SpringBootApplication
@ComponentScan("com.in28minutes.spring.basics.componentscan")
public class SpringIn5StepsComponentScanApplication {

	private static Logger LOGGER =
			LoggerFactory.getLogger(SpringIn5StepsComponentScanApplication.class);

	public static void main(String[] args) {

		var applicationContext = SpringApplication.run(SpringIn5StepsComponentScanApplication.class, args);

		var componentDAO = applicationContext.getBean(ComponentDAO.class);

		LOGGER.info("{}", componentDAO);

	}
}
Step 17 - Lifecycle of a Bean - @PostConstruct and @PreDestroy
BinarySearchImpl.java
	@PostConstruct
	public void postConstruct() {
		logger.info("postConstruct");
	}

	@PreDestroy
	public void preDestroy() {
		logger.info("preDestroy");
	}
Step 18 - Container and Dependency Injection (CDI) - @Named, @Inject
/pom.xml
<dependency>
    <groupId>jakarta.inject</groupId>
    <artifactId>jakarta.inject-api</artifactId>
    <version>2.0.1</version>
</dependency>
package com.in28minutes.spring.basics.springin5steps;

import org.slf4j.Logger;
import org.slf4j.LoggerFactory;
import org.springframework.boot.SpringApplication;
import org.springframework.boot.autoconfigure.SpringBootApplication;
import org.springframework.context.ApplicationContext;

import com.in28minutes.spring.basics.springin5steps.cdi.SomeCdiBusiness;

@SpringBootApplication
public class SpringIn5StepsCdiApplication {

	private static Logger LOGGER =
			LoggerFactory.getLogger(SpringIn5StepsCdiApplication.class);

	public static void main(String[] args) {

		var applicationContext =
				SpringApplication.run(SpringIn5StepsCdiApplication.class, args);

		var business =
				applicationContext.getBean(SomeCdiBusiness.class);

		LOGGER.info("{} dao-{}", business, business.getSomeCDIDAO());
	}
}
package com.in28minutes.spring.basics.springin5steps.cdi;

import jakarta.inject.Inject;
import jakarta.inject.Named;

@Named
public class SomeCdiBusiness {

	@Inject
	SomeCdiDao someCdiDao;

	public SomeCdiDao getSomeCDIDAO() {
		return someCdiDao;
	}

	public void setSomeCDIDAO(SomeCdiDao someCdiDao) {
		this.someCdiDao = someCdiDao;
	}
}
package com.in28minutes.spring.basics.springin5steps.cdi;

import jakarta.inject.Named;

@Named
public class SomeCdiDao {

}
Step 19 - Removing Spring Boot in Basic Application
pom.xml
<dependency>
	<groupId>org.springframework</groupId>
	<artifactId>spring-core</artifactId>
</dependency>
<dependency>
	<groupId>org.springframework</groupId>
	<artifactId>spring-context</artifactId>
</dependency>
<dependency>
	<groupId>org.slf4j</groupId>
	<artifactId>slf4j-api</artifactId>
</dependency>
<dependency>
	<groupId>ch.qos.logback</groupId>
	<artifactId>logback-classic</artifactId>
</dependency>
package com.in28minutes.spring.basics.springin5steps;

import org.springframework.context.ApplicationContext;
import org.springframework.context.annotation.AnnotationConfigApplicationContext;
import org.springframework.context.annotation.ComponentScan;
import org.springframework.context.annotation.Configuration;

import com.in28minutes.spring.basics.springin5steps.basic.BinarySearchImpl;

@Configuration
@ComponentScan
public class SpringIn5StepsBasicApplication {

	public static void main(String[] args) {

		var applicationContext =
				new AnnotationConfigApplicationContext(SpringIn5StepsBasicApplication.class);
Step 20 - Fixing minor stuff - Add Logback and Close Application Context
<dependency>
	<groupId>ch.qos.logback</groupId>
	<artifactId>logback-classic</artifactId>
</dependency>
@Configuration
@ComponentScan
public class SpringIn5StepsBasicApplication {

	public static void main(String[] args) {

		try (var applicationContext =
				new AnnotationConfigApplicationContext(
				SpringIn5StepsBasicApplication.class)) {
			//No change in code
		}
	}
}
Same changes in
- SpringIn5StepsCdiApplication
- SpringIn5StepsComponentScanApplication
- SpringIn5StepsScopeApplication
Step 21 - Defining Spring Application Context using XML - Part 1
Step 22 - Defining Spring Application Context using XML - Part 2
package com.in28minutes.spring.basics.springin5steps;

import org.springframework.context.annotation.ComponentScan;
import org.springframework.context.annotation.Configuration;
import org.springframework.context.support.ClassPathXmlApplicationContext;

import com.in28minutes.spring.basics.springin5steps.xml.XmlPersonDAO;

@Configuration
@ComponentScan
public class SpringIn5StepsXMLContextApplication {

	public static void main(String[] args) {

		try (var applicationContext = new ClassPathXmlApplicationContext(
				"applicationContext.xml")) {

			var personDao = applicationContext.getBean(XmlPersonDAO.class);
			System.out.println(personDao);
			System.out.println(personDao.getXmlJdbcConnection());
		}
	}
}
package com.in28minutes.spring.basics.springin5steps.xml;

public class XmlJdbcConnection {
	public XmlJdbcConnection() {
		System.out.println("JDBC Connection");
	}
}
package com.in28minutes.spring.basics.springin5steps.xml;

public class XmlPersonDAO {

	XmlJdbcConnection xmlJdbcConnection;

	public XmlJdbcConnection getXmlJdbcConnection() {
		return xmlJdbcConnection;
	}

	public void setXmlJdbcConnection(XmlJdbcConnection jdbcConnection) {
		this.xmlJdbcConnection = jdbcConnection;
	}
}
<?xml version="1.0" encoding="UTF-8"?>
<beans xmlns="http://www.springframework.org/schema/beans"
    xmlns:xsi="http://www.w3.org/2001/XMLSchema-instance"
    xsi:schemaLocation="http://www.springframework.org/schema/beans
        http://www.springframework.org/schema/beans/spring-beans.xsd">

    <bean id="xmlJdbcConnection"
    	class="com.in28minutes.spring.basics.springin5steps.xml.XmlJdbcConnection">
    </bean>

    <bean id="xmlPersonDAO" class="com.in28minutes.spring.basics.springin5steps.xml.XmlPersonDAO">
    		<property name="xmlJdbcConnection" ref="xmlJdbcConnection"/>
    </bean>

</beans>
Step 23 - Mixing XML Context with Component Scan for Beans defined with Annotations
public class SpringIn5StepsXMLContextApplication {

	private static final Logger LOGGER = LoggerFactory.getLogger(SpringIn5StepsScopeApplication.class);

	public static void main(String[] args) {

		try (var applicationContext = new ClassPathXmlApplicationContext(
				"applicationContext.xml")) {

			LOGGER.info("Beans Loaded -> {}", (Object) applicationContext.getBeanDefinitionNames());
			// [xmlJdbcConnection, xmlPersonDAO]
<context:component-scan base-package="com.in28minutes.spring.basics"/>
Step 24 - IOC Container vs Application Context vs Bean Factory
Step 25 - @Component vs @Service vs @Repository vs @Controller
@Repository
public class ComponentDAO { }
@Service
@Scope(ConfigurableBeanFactory.SCOPE_SINGLETON)
public class BinarySearchImpl { }
@Service
@Qualifier("bubble")
public class BubbleSortAlgorithm implements SortAlgorithm { }
@Service
@Qualifier("quick")
public class QuickSortAlgorithm implements SortAlgorithm { }
@Repository
public class PersonDAO { }
Step 26 - Read values from external properties file
package com.in28minutes.spring.basics.springin5steps;

import org.springframework.context.annotation.AnnotationConfigApplicationContext;
import org.springframework.context.annotation.ComponentScan;
import org.springframework.context.annotation.Configuration;
import org.springframework.context.annotation.PropertySource;

import com.in28minutes.spring.basics.springin5steps.properties.SomeExternalService;

@Configuration
@ComponentScan
//
@PropertySource("classpath:app.properties")
public class SpringIn5StepsPropertiesApplication {

	public static void main(String[] args) {

		try (var applicationContext = new AnnotationConfigApplicationContext(
				SpringIn5StepsPropertiesApplication.class)) {

			var service = applicationContext.getBean(SomeExternalService.class);
			System.out.println(service.returnServiceURL());
		}
	}
}
package com.in28minutes.spring.basics.springin5steps.properties;

import org.springframework.beans.factory.annotation.Value;
import org.springframework.stereotype.Component;

@Component
public class SomeExternalService {

	@Value("${external.service.url}")
	private String url;

	public String returnServiceURL(){
		return url;
	}

}
/src/main/resources/app.properties
external.service.url=http://someserver.dev.com/service
Spring Level 3 - Unit Testing with Spring Framework
Spring Level 3 - Unit Testing with Spring Framework
| Title | Category | GitHub |
|---|---|---|
| Unit Testing with Spring Framework | Spring - Level 3 | Project Folder on GitHub |
Topics Covered
- Step 27 – Spring Unit Testing with Java-Based Configuration
- Step 28 – Spring Unit Testing with XML-Based Configuration
- Step 29 – Spring Unit Testing with Mockito
Step 27 - Spring Unit Testing with a Java Context
<dependency>
	<groupId>org.springframework</groupId>
	<artifactId>spring-test</artifactId>
</dependency>
<dependency>
	<groupId>junit</groupId>
	<artifactId>junit</artifactId>
</dependency>
@RunWith(SpringRunner.class)
//@SpringBootTest
public class SpringIn5StepsBasicApplicationTests {
package com.in28minutes.spring.basics.springin5steps.basic;

import static org.junit.jupiter.api.Assertions.assertEquals;

import com.in28minutes.spring.basics.springin5steps.SpringIn5StepsBasicApplication;
import org.junit.jupiter.api.Test;
import org.junit.jupiter.api.extension.ExtendWith;
import org.springframework.beans.factory.annotation.Autowired;
import org.springframework.test.context.ContextConfiguration;
import org.springframework.test.context.junit.jupiter.SpringExtension;

// Load the context
// replaced @RunWith with @ExtendWith
// replaced SpringRunner.class with SpringExtension.class
@ExtendWith(SpringExtension.class)
@ContextConfiguration(classes = SpringIn5StepsBasicApplication.class)
public class BinarySearchTest {

    // Get this bean from the context
    @Autowired
    BinarySearchImpl binarySearch;

    @Test
    public void testBasicScenario() {

        // call method on binarySearch
        int actualResult = binarySearch.binarySearch(new int[]{}, 5);

        // check if the value is correct
        assertEquals(3, actualResult);

    }

}
Step 28 - Spring Unit Testing with an XML Context
/src/test/resources/testContext.xml
<?xml version="1.0" encoding="UTF-8"?>
<beans xmlns="http://www.springframework.org/schema/beans"
    xmlns:xsi="http://www.w3.org/2001/XMLSchema-instance"
    xmlns:context="http://www.springframework.org/schema/context"
    xsi:schemaLocation="http://www.springframework.org/schema/beans
        http://www.springframework.org/schema/beans/spring-beans.xsd
        http://www.springframework.org/schema/context
        http://www.springframework.org/schema/context/spring-context.xsd">

	<import resource="classpath:applicationContext.xml"/>

</beans>
package com.in28minutes.spring.basics.springin5steps.basic;

import static org.junit.jupiter.api.Assertions.assertEquals;

import org.junit.jupiter.api.Test;
import org.junit.jupiter.api.extension.ExtendWith;
import org.springframework.beans.factory.annotation.Autowired;
import org.springframework.test.context.ContextConfiguration;
import org.springframework.test.context.junit.jupiter.SpringExtension;

// Load the context
// replaced @RunWith with @ExtendWith
// replaced SpringRunner.class with SpringExtension.class
@ExtendWith(SpringExtension.class)
@ContextConfiguration(locations = "/testContext.xml")
public class BinarySearchXMLConfigurationTest {

    // Get this bean from the context
    @Autowired
    BinarySearchImpl binarySearch;

    @Test
    public void testBasicScenario() {

        // call method on binarySearch
        int actualResult = binarySearch.binarySearch(new int[]{}, 5);

        // check if the value is correct
        assertEquals(3, actualResult);

    }

}
Step 29 - Spring Unit Testing with Mockito
public class SomeCdiBusiness {

	// SAME OLD CODE

	public int findGreatest() {
		int greatest = Integer.MIN_VALUE;
        int[] data = someCdiDao.getData();
        var result = Arrays.stream(data).max();

        if (result.isPresent()) {
            greatest = result.getAsInt();
        }

        return greatest;
	}

}
Add a new method
package com.in28minutes.spring.basics.springin5steps.cdi;

import jakarta.inject.Named;

@Named
public class SomeCdiDao {

	public int[] getData() {
		return new int[] {5, 89,100};
	}

}
package com.in28minutes.spring.basics.springin5steps.cdi;

import static org.junit.jupiter.api.Assertions.assertEquals;

import org.junit.jupiter.api.Test;
import org.junit.jupiter.api.extension.ExtendWith;
import org.mockito.InjectMocks;
import org.mockito.Mock;
import org.mockito.Mockito;
import org.mockito.junit.jupiter.MockitoExtension;

// replaced @RunWith with @ExtendWith
// replaced MockitoJUnitRunner.class with MockitoExtension.class
@ExtendWith(MockitoExtension.class)
public class SomeCdiBusinessTest {

    // Inject Mock
    @InjectMocks
    SomeCdiBusiness business;

    // Create Mock
    @Mock
    SomeCdiDao daoMock;

    @Test
    public void testBasicScenario() {
        Mockito.when(daoMock.getData()).thenReturn(new int[]{2, 4});
        assertEquals(4, business.findGreatest());
    }

    @Test
    public void testBasicScenario_NoElements() {
        Mockito.when(daoMock.getData()).thenReturn(new int[]{});
        assertEquals(Integer.MIN_VALUE, business.findGreatest());
    }

    @Test
    public void testBasicScenario_EqualElements() {
        Mockito.when(daoMock.getData()).thenReturn(new int[]{2, 2});
        assertEquals(2, business.findGreatest());
    }

}
<dependency>
	<groupId>org.mockito</groupId>
	<artifactId>mockito-core</artifactId>
</dependency>
Spring Level 4 - Introduction To Spring Boot
Spring Level 4 - Spring Boot in 10 Steps
| Title | Category | GitHub |
|---|---|---|
| Spring Boot in 10 Steps | Spring - Level 4 | Project Folder on GitHub |
Topics Covered
- Step 1 – Introduction to Spring Boot: Goals and Key Features
- Step 2 – Developing Spring Applications Before Spring Boot
- Step 3 – Using Spring Initializr to Create a Spring Boot Application
- Step 4 – Creating a Simple REST Controller
- Step 5 – Understanding Spring Boot Auto-Configuration
- Step 6 – Spring Boot vs Spring MVC
- Step 7 – Spring Boot Starter Projects: Starter Web and Starter JPA
- Step 8 – Overview of Different Spring Boot Starter Projects
- Step 9 – Exploring Spring Boot Actuator
- Step 10 – Using Spring Boot Developer Tools
Step 1 : Introduction to Spring Boot - Goals and Important Features
Spring Boot Overview
Goals
- Enable building production-ready applications quickly
- Provide common non-functional features:
- Embedded servers
- Metrics
- Health checks
- Externalized configuration
What Spring Boot is NOT
- ZERO code generation
- Neither an application server nor a web server
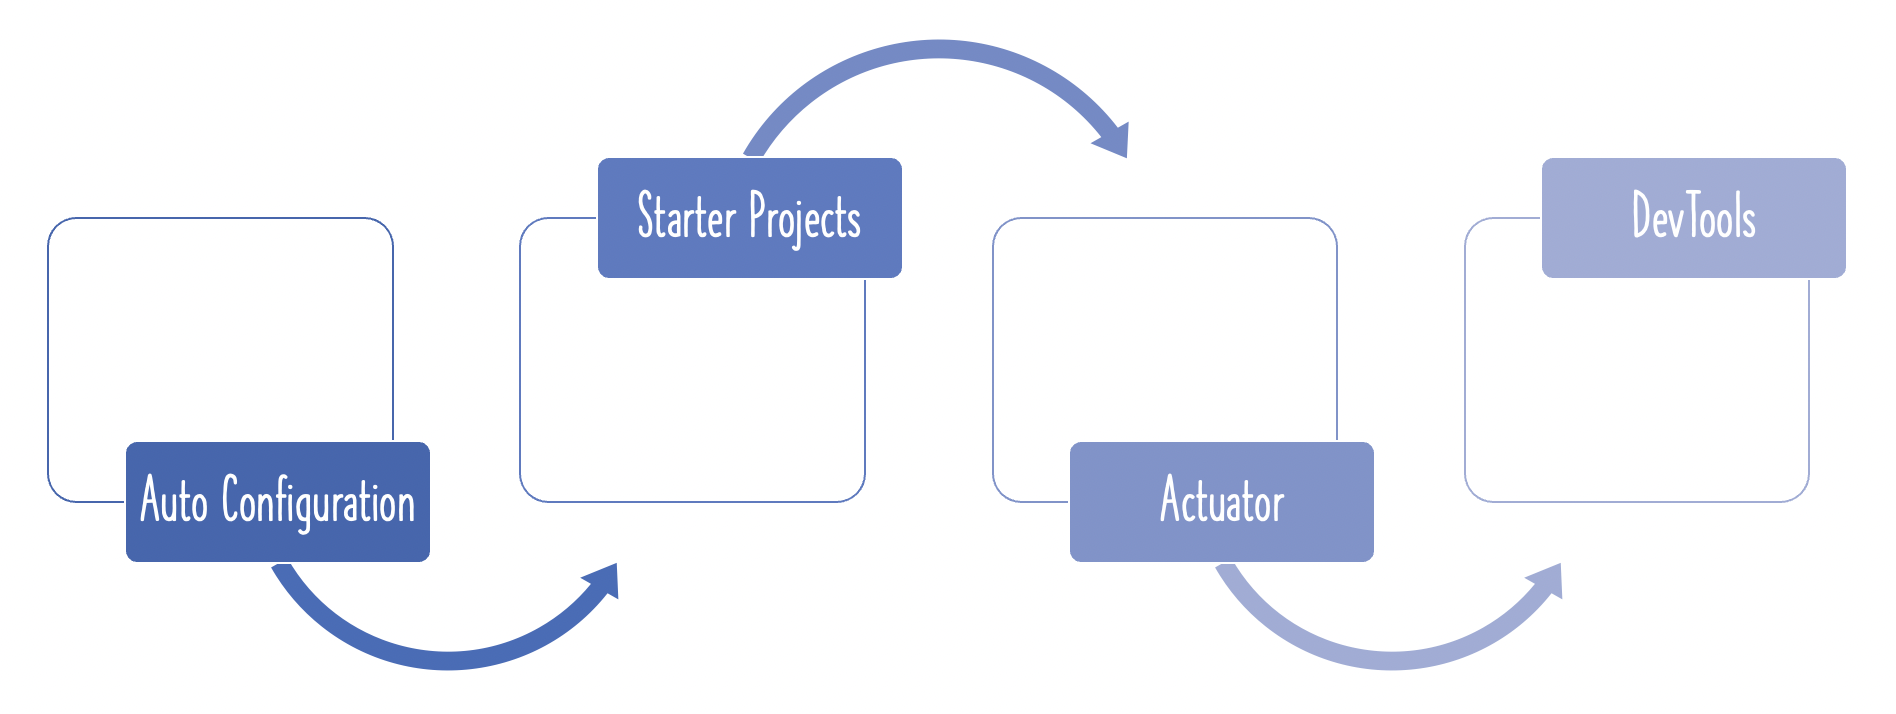
Key Features
- Quick Starter Projects with Auto-Configuration
- Web
- JPA
- Embedded Servers
- Tomcat, Jetty, or Undertow
- Production-Ready Features
- Metrics and health checks
- Externalized configuration
Step 2 : Developing Spring Applications before Spring Boot
Recommended Reading - http://www.springboottutorial.com/spring-boot-vs-spring-mvc-vs-spring
Step 3 : Using Spring Initializr to create a Spring Boot Application
https://start.spring.io
Step 4 : Creating a Simple REST Controller
/src/main/java/com/in28minutes/springboot/basics/springbootin10steps/BooksController.java
package com.in28minutes.springboot.basics.springbootin10steps;

import java.util.List;

import org.springframework.web.bind.annotation.GetMapping;
import org.springframework.web.bind.annotation.RestController;

@RestController
public class BooksController {
	@GetMapping("/books")
	public List<Book> getAllBooks() {
		return List.of(
				new Book(1L, "Mastering Spring 5.2", "Ranga Karanam"));
	}
}
Step 5 : What is Spring Boot Auto Configuration?
Recommended Reading - http://www.springboottutorial.com/spring-boot-auto-configuration
Spring-based applications often require extensive configuration. For example:
When using Spring MVC, we need to configure: component scanning, DispatcherServlet, a view resolver, WebJars (for serving static content), and other components.
When using Hibernate/JPA, we need to configure: a datasource, an EntityManagerFactory, a TransactionManager, among several other things.
Spring Boot introduces a new approach to simplify this process. It asks: Can we make configuration smarter? For instance, when a Spring MVC jar is added to an application, can some beans be auto-configured automatically? Spring Boot provides exactly this capability, reducing the need for manual configuration.
Step 6 : Spring Boot vs Spring MVC
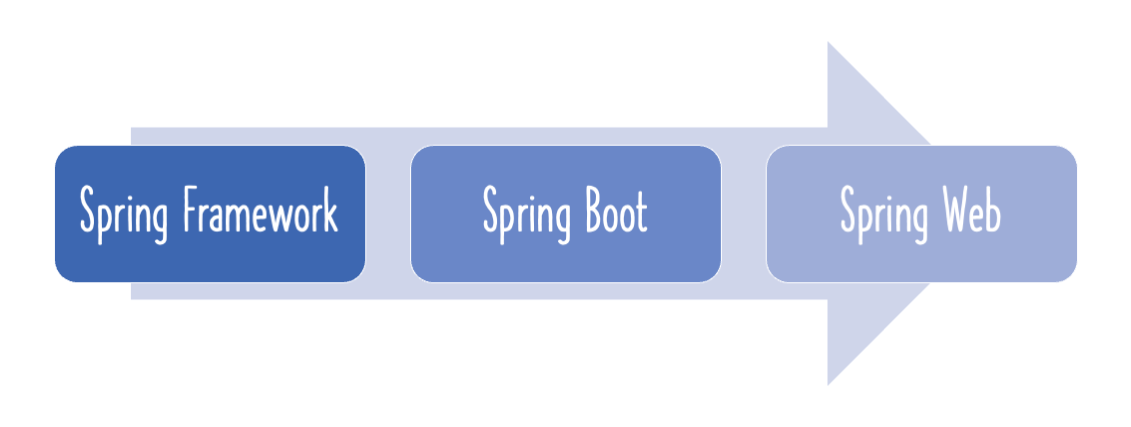
Recommended Reading - http://www.springboottutorial.com/spring-boot-vs-spring-mvc-vs-spring
Spring, Spring MVC, and Spring Boot Overview
- Spring is all about Dependency Injection.
- It makes it easy to develop loosely coupled applications.
- It improves testability of applications.
- Spring MVC brings loose coupling to web application development with features like:
- DispatcherServlet
- View Resolver
- And other components
- Spring Boot eliminates the need for extensive manual configuration with Spring and Spring MVC.
- You can use Spring and Spring MVC without writing a lot of boilerplate configuration.
- Goal: Enable production-ready applications quickly
Key features of Spring Boot:
- Actuator – Enables advanced monitoring and tracing of applications
- Embedded Server Integrations – Since the server is integrated into the application, there’s no need for a separate application server
- Default Error Handling – Provides standard error pages and exception handling
Step 7 : Spring Boot Starter Projects - Starter Web and Starter JPA
Recommended Reading - http://www.springboottutorial.com/spring-boot-starter-projects
Spring Boot Starters
Starters are convenient sets of dependency descriptors that you can include in your application. They provide a one-stop-shop for all the Spring and related technologies you need, without having to hunt through sample code or manually copy multiple dependency descriptors.
For example, if you want to get started with Spring and JPA for database access, simply include the spring-boot-starter-data-jpa dependency in your project — and you’re ready to go.
Step 8: Overview of Different Spring Boot Starter Projects
Spring Boot starter projects help you quickly get started with developing specific types of applications.
Examples of Spring Boot Starters:
spring-boot-starter-web-services– SOAP Web Servicesspring-boot-starter-web– Web & RESTful applicationsspring-boot-starter-test– Unit testing and integration testingspring-boot-starter-jdbc– Traditional JDBCspring-boot-starter-hateoas– Add HATEOAS features to your servicesspring-boot-starter-security– Authentication and authorization using Spring Securityspring-boot-starter-data-jpa– Spring Data JPA with Hibernatespring-boot-starter-cache– Enable Spring Framework’s caching supportspring-boot-starter-data-rest– Expose simple REST services using Spring Data RESTspring-boot-starter-actuator– Add monitoring and tracing capabilities out-of-the-boxspring-boot-starter-undertow,spring-boot-starter-jetty,spring-boot-starter-tomcat– Choose your embedded servlet containerspring-boot-starter-logging– Logging using Logbackspring-boot-starter-log4j2– Logging using Log4j2
Step 9: Spring Boot Actuator
Spring Boot Actuator provides a wide range of REST endpoints, all compatible with the HAL specification. You can use a HAL browser to explore the data offered by these services.
Actuator exposes various data about your application, including:
application info, metrics, dump, beans, environment properties, configuration properties, audit events, heap dump, loggers, trace, health mappings, and auto-configuration.
In short, Actuator provides rich metadata to monitor and manage your Spring Boot application.
Step 10: Spring Boot Developer Tools
- Normally, you need to restart your server for every Java or JSP change.
- Spring Boot Developer Tools enables automatic reloading of modified changes, improving development productivity.
Spring Level 5 - Spring AOP
Spring Level 5 - Spring AOP
| Title | Category | GitHub |
|---|---|---|
| Spring AOP | Spring - Level 5 | Project Folder on GitHub |
Steps Covered
- Step 01 – Setting up AOP Example: Part 1
- Step 02 – Setting up AOP Example: Part 2
- Step 03 – Defining a
@BeforeAdvice - Step 04 – Understanding AOP Terminology: Pointcut, Advice, Aspect, Join Point, Weaving, and Weaver
- Step 05 – Using
@After,@AfterReturning,@AfterThrowingAdvices - Step 06 – Using
@AroundAdvice to Implement Performance Tracing - Step 07 – Best Practice: Use a Common Pointcut Configuration
- Step 08 – Quick Summary of Other Pointcuts
- Step 09 – Creating Custom Annotation and an Aspect for Tracking Execution Time
Step 01 – Setting up AOP Example: Part 1
Creating a Spring AOP project with Spring Initializr is straightforward.
Spring Initializr: http://start.spring.io/ is a great tool to bootstrap your Spring Boot projects.
Steps
- Launch Spring Initializr and configure the project:
- Group:
com.in28minutes.spring.aop - Artifact:
spring-aop - Dependencies:
- AOP
- Group:
- Click Generate Project.
- Import the generated project into Eclipse.
- (Optional) To understand all the files included in the project, refer to the Spring Initializr project structure.
Step 02 - Setting up AOP Example - Part 2
package com.in28minutes.spring.aop.springaop;

import org.springframework.beans.factory.annotation.Autowired;
import org.springframework.stereotype.Service;

@Service
public class Business1 {

	private final Logger logger = LoggerFactory.getLogger(this.getClass());

	@Autowired
	private Dao1 dao1;

	public String calculateSomething(){
		String value = dao1.retrieveSomething();
		logger.info("In Business - {}", value);
		return value;
	}
}
package com.in28minutes.spring.aop.springaop;

import org.springframework.beans.factory.annotation.Autowired;
import org.springframework.stereotype.Service;

@Service
public class Business2 {

	@Autowired
	private Dao2 dao2;

	public String calculateSomething(){
		//Business Logic
		return dao2.retrieveSomething();
	}
}
package com.in28minutes.spring.aop.springaop;

import org.springframework.stereotype.Repository;

@Repository
public class Dao1 {

	public String retrieveSomething(){
		return "Dao1";
	}

}
package com.in28minutes.spring.aop.springaop;

import org.springframework.stereotype.Repository;

@Repository
public class Dao2 {

	public String retrieveSomething(){
		return "Dao2";
	}

}
Step 03 - Defining an @Before advice
public class SpringAopApplication implements CommandLineRunner {

    private final Logger logger = LoggerFactory.getLogger(this.getClass());

    @Autowired
    private Business1 business1;

    @Autowired
    private Business2 business2;

    @Override
    public void run(String... args) throws Exception {
        logger.info(business1.calculateSomething());
        logger.info(business2.calculateSomething());
    }
}
package com.in28minutes.spring.aop.springaop.aspect;

import org.aspectj.lang.JoinPoint;
import org.aspectj.lang.annotation.Aspect;
import org.aspectj.lang.annotation.Before;
import org.slf4j.Logger;
import org.slf4j.LoggerFactory;
import org.springframework.context.annotation.Configuration;

//AOP
//Configuration
@Aspect
@Configuration
public class UseAccessAspect {

	private final Logger logger = LoggerFactory.getLogger(this.getClass());

	//What kind of method calls I would intercept
	//execution(* PACKAGE.*.*(..))

	@Before("execution(* com.in28minutes.spring.aop.springaop.business.*.*(..))")
	public void before(JoinPoint joinPoint){
		logger.info(" Check for user access ");
		logger.info(" Allowed execution for {}", joinPoint);
	}
}
Step 04 - Understand AOP Terminology - Pointcut, Advice, Aspect, Join Point, Weaving and Weaver
Step 05 - Using @After, @AfterReturning, @AfterThrowing advices
Step 06 - Using @Around advice to implement performance tracing
package com.in28minutes.spring.aop.springaop.aspect;

import org.aspectj.lang.JoinPoint;
import org.aspectj.lang.annotation.After;
import org.aspectj.lang.annotation.AfterReturning;
import org.aspectj.lang.annotation.AfterThrowing;
import org.aspectj.lang.annotation.Aspect;
import org.aspectj.lang.annotation.Before;
import org.slf4j.Logger;
import org.slf4j.LoggerFactory;
import org.springframework.context.annotation.Configuration;

//AOP
//Configuration
@Aspect
@Configuration
public class AfterAopAspect {

	private final Logger logger = LoggerFactory.getLogger(this.getClass());

	@AfterReturning(value = "execution(* com.in28minutes.spring.aop.springaop.business.*.*(..))",
			returning = "result")
	public void afterReturning(JoinPoint joinPoint, Object result) {
		logger.info("{} returned with value {}", joinPoint, result);
	}

	@After(value = "execution(* com.in28minutes.spring.aop.springaop.business.*.*(..))")
	public void after(JoinPoint joinPoint) {
		logger.info("after execution of {}", joinPoint);
	}
}
package com.in28minutes.spring.aop.springaop.aspect;

import org.aspectj.lang.ProceedingJoinPoint;
import org.aspectj.lang.annotation.Around;
import org.aspectj.lang.annotation.Aspect;
import org.slf4j.Logger;
import org.slf4j.LoggerFactory;
import org.springframework.context.annotation.Configuration;

@Aspect
@Configuration
public class MethodExecutionCalculationAspect {

	private final Logger logger = LoggerFactory.getLogger(this.getClass());

	@Around("execution(* com.in28minutes.spring.aop.springaop.business.*.*(..))")
	public void around(ProceedingJoinPoint joinPoint) throws Throwable {
		long startTime = System.currentTimeMillis();

		joinPoint.proceed();

		long timeTaken = System.currentTimeMillis() - startTime;
		logger.info("Time Taken by {} is {}", joinPoint, timeTaken);
	}
}
package com.in28minutes.spring.aop.springaop.aspect;

import org.aspectj.lang.JoinPoint;
import org.aspectj.lang.annotation.Aspect;
import org.aspectj.lang.annotation.Before;
import org.slf4j.Logger;
import org.slf4j.LoggerFactory;
import org.springframework.context.annotation.Configuration;

//AOP
//Configuration
@Aspect
@Configuration
public class UserAccessAspect {

	private final Logger logger = LoggerFactory.getLogger(this.getClass());

	//What kind of method calls I would intercept
	//execution(* PACKAGE.*.*(..))
	//Weaving & Weaver
	@Before("execution(* com.in28minutes.spring.aop.springaop.data.*.*(..))")
	public void before(JoinPoint joinPoint){
		//Advice
		logger.info(" Check for user access ");
		logger.info(" Allowed execution for {}", joinPoint);
	}
}
Step 07 - Best Practice : Use common Pointcut Configuration
package com.in28minutes.spring.aop.springaop.aspect;

import org.aspectj.lang.annotation.Pointcut;

public class CommonJoinPointConfig {

	@Pointcut("execution(* com.in28minutes.spring.aop.springaop.data.*.*(..))")
	public void dataLayerExecution(){}

	@Pointcut("execution(* com.in28minutes.spring.aop.springaop.business.*.*(..))")
	public void businessLayerExecution(){}

}
public class MethodExecutionCalculationAspect {

    private Logger logger = LoggerFactory.getLogger(this.getClass());

    @Around("com.in28minutes.spring.aop.springaop.aspect.CommonJoinPointConfig.businessLayerExecution()")
}
public class AfterAopAspect
	@AfterReturning(value = "com.in28minutes.spring.aop.springaop.aspect.CommonJoinPointConfig.businessLayerExecution()", returning = "result")
	@After(value = "com.in28minutes.spring.aop.springaop.aspect.CommonJoinPointConfig.businessLayerExecution()")
public class UserAccessAspect {

    @Before("com.in28minutes.spring.aop.springaop.aspect.CommonJoinPointConfig.dataLayerExecution()")
}
Step 08 - Quick summary of other Pointcuts
Step 09 - Creating Custom Annotation and an Aspect for Tracking Time
package com.in28minutes.spring.aop.springaop.aspect;

import org.aspectj.lang.annotation.Pointcut;

public class CommonJoinPointConfig {

	@Pointcut("execution(* com.in28minutes.spring.aop.springaop.data.*.*(..))")
	public void dataLayerExecution(){}

	@Pointcut("execution(* com.in28minutes.spring.aop.springaop.business.*.*(..))")
	public void businessLayerExecution(){}

	@Pointcut("dataLayerExecution() && businessLayerExecution()")
	public void allLayerExecution(){}

	@Pointcut("bean(*dao*)")
	public void beanContainingDao(){}

	@Pointcut("within(com.in28minutes.spring.aop.springaop.data..*)")
	public void dataLayerExecutionWithWithin(){}

	@Pointcut("@annotation(com.in28minutes.spring.aop.springaop.aspect.TrackTime)")
	public void trackTimeAnnotation(){}

}
package com.in28minutes.spring.aop.springaop.aspect;

import java.lang.annotation.ElementType;
import java.lang.annotation.Retention;
import java.lang.annotation.RetentionPolicy;
import java.lang.annotation.Target;

@Target(ElementType.METHOD)
@Retention(RetentionPolicy.RUNTIME)
public @interface TrackTime {

}
@Aspect
@Configuration
public class MethodExecutionCalculationAspect {

	@Around("com.in28minutes.spring.aop.springaop.aspect.CommonJoinPointConfig.trackTimeAnnotation()")
	public void around(ProceedingJoinPoint joinPoint) throws Throwable {
public class Business1 {

	@TrackTime
	public String calculateSomething(){
@Repository
public class Dao1 {

    @TrackTime
    public String retrieveSomething() {
    }
}
Spring Level 6 - Spring JDBC and JPA
Spring Level 6 – Spring JDBC and JPA
| Title | Category | GitHub |
|---|---|---|
| Spring JDBC and JPA | Spring - Level 6 | Project Folder on GitHub |
Steps Covered
- Step 01 – Setting up a project with JDBC, JPA, H2, and Web dependencies
- Step 02 – Launching the H2 Console
- Step 03 – Creating a database table in H2
- Step 04 – Populating data into the
Persontable - Step 05 – Implementing
findAllpersons Spring JDBC query method - Step 06 – Executing the
findAllmethod usingCommandLineRunner - Step 07 – Quick Review: JDBC vs Spring JDBC
- Step 08 – Understanding Spring Boot auto-configuration (What’s in the background?)
- Step 09 – Implementing
findByIdSpring JDBC query method - Step 10 – Implementing
deleteByIdSpring JDBC update method - Step 11 – Implementing
insertandupdateSpring JDBC update methods - Step 12 – Creating a custom Spring JDBC
RowMapper - Step 13 – Quick introduction to JPA
- Step 14 – Defining the
Personentity - Step 15 – Implementing
findByIdJPA repository method - Step 16 – Implementing
insertandupdateJPA repository methods - Step 17 – Implementing
deleteByIdJPA repository method - Step 18 – Implementing
findAllusing JPQL Named Query - Step 19 – Introduction to Spring Data JPA
- Step 20 – Connecting to other databases
Step 01 – Setting up a Project with JDBC, JPA, H2, and Web Dependencies
Creating a Spring JDBC project with Spring Initializr is straightforward.
Spring Initializr: http://start.spring.io/ is a great tool to bootstrap Spring Boot projects.
Steps
- Launch Spring Initializr and configure the project:
- Group:
com.in28minutes.database - Artifact:
database-demo - Dependencies:
- Web
- JDBC
- JPA
- H2
- Group:
- Click Generate Project.
- Import the generated project into Eclipse.
- (Optional) To understand all the files included in the project, refer to the Spring Initializr project structure.
Step 02 - Launching up H2 Console
/src/main/resources/application.properties
spring.h2.console.enabled=true
Launching H2
- URL - http://localhost:8080/h2-console
- Make sure to check the db url - jdbc:h2:mem:testdb
Step 03 - Creating a Database Table in H2
/src/main/resources/data.sql
create table person
(
   id integer not null,
   name varchar(255) not null,
   location varchar(255),
   birth_date timestamp,
   primary key(id)
);
Step 04 - Populate data into Person Table
Step 05 - Implement findAll persons Spring JDBC Query Method
package com.in28minutes.database.databasedemo.entity;

import java.util.Date;

public class Person {
	private int id;
	private String name;
	private String location;
	private Date birthDate;

	public Person(int id, String name, String location, Date birthDate) {
		super();
		this.id = id;
		this.name = name;
		this.location = location;
		this.birthDate = birthDate;
	}

	public int getId() {
		return id;
	}

	public void setId(int id) {
		this.id = id;
	}

	public String getName() {
		return name;
	}

	public void setName(String name) {
		this.name = name;
	}

	public String getLocation() {
		return location;
	}

	public void setLocation(String location) {
		this.location = location;
	}

	public Date getBirthDate() {
		return birthDate;
	}

	public void setBirthDate(Date birthDate) {
		this.birthDate = birthDate;
	}

}
/src/main/java/com/in28minutes/database/databasedemo/jdbc/PersonJbdcDao.java
package com.in28minutes.database.databasedemo.jdbc;

import java.util.List;

import org.springframework.beans.factory.annotation.Autowired;
import org.springframework.jdbc.core.BeanPropertyRowMapper;
import org.springframework.jdbc.core.JdbcTemplate;
import org.springframework.stereotype.Repository;

import com.in28minutes.database.databasedemo.entity.Person;

@Repository
public class PersonJbdcDao {
	@Autowired
	JdbcTemplate jdbcTemplate;

	public List<Person> findAll() {
		return jdbcTemplate.query("select * from person",
				new BeanPropertyRowMapper(Person.class));
	}
}
Add insert statements into data.sql /src/main/resources/data.sql
INSERT INTO PERSON (ID, NAME, LOCATION, BIRTH_DATE )
VALUES(10001,  'Ranga', 'Hyderabad',CURRENT_DATE());
INSERT INTO PERSON (ID, NAME, LOCATION, BIRTH_DATE )
VALUES(10002,  'James', 'New York',CURRENT_DATE());
INSERT INTO PERSON (ID, NAME, LOCATION, BIRTH_DATE )
VALUES(10003,  'Pieter', 'Amsterdam',CURRENT_DATE());
Step 06 - Execute the findAll method using CommandLineRunner
public class DatabaseDemoApplication implements CommandLineRunner {

	private final Logger logger = LoggerFactory.getLogger(this.getClass());

	@Autowired
	PersonJbdcDao dao;

	@Override
	public void run(String... args) throws Exception {
		logger.info("All users -> {}", dao.findAll());
Modified
@Repository
public class PersonJbdcDao {
	@Autowired
	JdbcTemplate jdbcTemplate;

	public List<Person> findAll() {
		return jdbcTemplate.query("select * from person",
				new BeanPropertyRowMapper<Person>(Person.class));
	}
}
Step 07 - A Quick Review - JDBC vs Spring JDBC
Step 08 - What’s in the background? Understanding Spring Boot Autoconfiguration
Step 09 - Implementing findById Spring JDBC Query Method
Step 10 - Implementing deleteById Spring JDBC Update Method
Modified
package com.in28minutes.database.databasedemo.jdbc;

import java.util.List;

import org.springframework.beans.factory.annotation.Autowired;
import org.springframework.jdbc.core.BeanPropertyRowMapper;
import org.springframework.jdbc.core.JdbcTemplate;
import org.springframework.stereotype.Repository;

import com.in28minutes.database.databasedemo.entity.Person;

@Repository
public class PersonJbdcDao {

	@Autowired
	JdbcTemplate jdbcTemplate;

	public List<Person> findAll() {
		return jdbcTemplate.query("select * from person", new BeanPropertyRowMapper<Person>(Person.class));
	}

	public Person findById(int id) {
		return jdbcTemplate.queryForObject
				("select * from person where id=?", new Object[] { id },
				new BeanPropertyRowMapper<Person>(Person.class));
	}

	public int deleteById(int id) {
		return jdbcTemplate.update
				("delete from person where id=?", new Object[] { id });
	}


}
DatabaseDemoApplication
		logger.info("User id 10001 -> {}", dao.findById(10001));
		logger.info("Deleting 10002 -> No of Rows Deleted - {}", dao.deleteById(10002));
Step 11 - Implementing insert and update Spring JDBC Update Methods
	public int deleteById(int id) {
		return jdbcTemplate.update("delete from person where id=?", new Object[] { id });
	}

	public int insert(Person person) {
		return jdbcTemplate.update("insert into person (id, name, location, birth_date) " + "values(?,  ?, ?, ?)",
				new Object[] { person.getId(), person.getName(), person.getLocation(),
						new Timestamp(person.getBirthDate().getTime()) });
	}

	public int update(Person person) {
		return jdbcTemplate.update("update person " + " set name = ?, location = ?, birth_date = ? " + " where id = ?",
				new Object[] { person.getName(), person.getLocation(), new Timestamp(person.getBirthDate().getTime()),
						person.getId() });
	}
	logger.info("Deleting 10002 -> No of Rows Deleted - {}",
				dao.deleteById(10002));

		logger.info("Inserting 10004 -> {}",
				dao.insert(new Person(10004, "Tara", "Berlin", new Date())));

		logger.info("Update 10003 -> {}",
				dao.update(new Person(10003, "Pieter", "Utrecht", new Date())));
Step 12 - Creating a custom Spring JDBC RowMapper
Inner class in PersonJbdcDao
static class PersonRowMapper implements RowMapper<Person>{
	@Override
	public Person mapRow(ResultSet rs, int rowNum) throws SQLException {
		Person person = new Person();
		person.setId(rs.getInt("id"));
		person.setName(rs.getString("name"));
		person.setLocation(rs.getString("location"));
		person.setBirthDate(rs.getTimestamp("birth_date"));
		return person;
	}

}

public List<Person> findAll() {
	return jdbcTemplate.query("select * from person", new PersonRowMapper());
}
PersonJbdcDao
Step 13 - Quick introduction to JPA
Step 14 - Defining Person Entity
package com.in28minutes.database.databasedemo.entity;

import java.util.Date;

import jakarta.persistence.Entity;
import jakarta.persistence.GeneratedValue;
import jakarta.persistence.Id;

@Entity
public class Person {

	@Id
	@GeneratedValue
	private int id;

	//No change in rest of the code

}
Step 15 - Implementing findById JPA Repository Method
DatabaseDemoApplication renamed to SpringJdbcDemoApplication
package com.in28minutes.database.databasedemo.jpa;

import jakarta.persistence.EntityManager;
import jakarta.persistence.PersistenceContext;
import jakarta.transaction.Transactional;

import org.springframework.stereotype.Repository;

import com.in28minutes.database.databasedemo.entity.Person;

@Repository
@Transactional
public class PersonJpaRepository {

	//connect to the database
	@PersistenceContext
	EntityManager entityManager;

	public Person findById(int id) {
		return entityManager.find(Person.class, id);//JPA
	}
}
/src/main/resources/application.properties
spring.jpa.show-sql=true
spring.datasource.url=jdbc:h2:mem:testdb
spring.data.jpa.repositories.bootstrap-mode=default
/src/main/resources/data.sql - Comment Everything
/*
*/
JpaDemoApplication
package com.in28minutes.database.databasedemo;

import org.slf4j.Logger;
import org.slf4j.LoggerFactory;
import org.springframework.beans.factory.annotation.Autowired;
import org.springframework.boot.CommandLineRunner;
import org.springframework.boot.SpringApplication;
import org.springframework.boot.autoconfigure.SpringBootApplication;

import com.in28minutes.database.databasedemo.jpa.PersonJpaRepository;

@SpringBootApplication
public class JpaDemoApplication implements CommandLineRunner {

	private final Logger logger = LoggerFactory.getLogger(this.getClass());

	@Autowired
	PersonJpaRepository repository;

	public static void main(String[] args) {
		SpringApplication.run(JpaDemoApplication.class, args);
	}

	@Override
	public void run(String... args) throws Exception {

		logger.info("User id 10001 -> {}", repository.findById(10001));

		/*
		logger.info("All users -> {}", repository.findAll());
		logger.info("Deleting 10002 -> No of Rows Deleted - {}",
				repository.deleteById(10002));

		logger.info("Inserting 10004 -> {}",
				repository.insert(new Person(10004, "Tara", "Berlin", new Date())));

		logger.info("Update 10003 -> {}",
				repository.update(new Person(10003, "Pieter", "Utrecht", new Date())));
		*/
	}
}
Step 16 - Implementing insert and update JPA Repository Methods
Step 17 - Implementing deleteById JPA Repository Method
Step 18 - Implementing findAll using JPQL Named Query
    logger.info("Inserting -> {}",
            repository.insert(new Person("Tara", "Berlin", new Date())));
    repository.deleteById(10002);
@Entity
@NamedQuery(name="find_all_persons", query="select p from Person p")
public class Person { }
package com.in28minutes.database.databasedemo.jpa;

import java.util.List;

import jakarta.persistence.EntityManager;
import jakarta.persistence.PersistenceContext;
import jakarta.persistence.TypedQuery;
import jakarta.transaction.Transactional;

import org.springframework.stereotype.Repository;

import com.in28minutes.database.databasedemo.entity.Person;

@Repository
@Transactional
public class PersonJpaRepository {

	// connect to the database
	@PersistenceContext
	EntityManager entityManager;

	public List<Person> findAll() {
		var namedQuery = entityManager.createNamedQuery("find_all_persons", Person.class);
		return namedQuery.getResultList();
	}

	public Person findById(int id) {
		return entityManager.find(Person.class, id);// JPA
	}

	public Person update(Person person) {
		return entityManager.merge(person);
	}

	public Person insert(Person person) {
		return entityManager.merge(person);
	}

	public void deleteById(int id) {
		var person = findById(id);
		entityManager.remove(person);
	}

}
Step 19 - Introduction to Spring Data JPA
JpaDemoApplication - comment out @SpringBootApplication
package com.in28minutes.database.databasedemo.springdata;

import org.springframework.data.jpa.repository.JpaRepository;
import org.springframework.stereotype.Repository;

import com.in28minutes.database.databasedemo.entity.Person;

@Repository
public interface PersonSpringDataRepository
				extends JpaRepository<Person, Integer>{
}
package com.in28minutes.database.databasedemo;

import java.util.Date;

import org.slf4j.Logger;
import org.slf4j.LoggerFactory;
import org.springframework.beans.factory.annotation.Autowired;
import org.springframework.boot.CommandLineRunner;
import org.springframework.boot.SpringApplication;
import org.springframework.boot.autoconfigure.SpringBootApplication;

import com.in28minutes.database.databasedemo.entity.Person;
import com.in28minutes.database.databasedemo.springdata.PersonSpringDataRepository;

@SpringBootApplication
public class SpringDataDemoApplication implements CommandLineRunner {

	private final Logger logger = LoggerFactory.getLogger(this.getClass());

	@Autowired
	PersonSpringDataRepository repository;

	public static void main(String[] args) {
		SpringApplication.run(SpringDataDemoApplication.class, args);
	}

	@Override
	public void run(String... args) throws Exception {

		logger.info("User id 10001 -> {}", repository.findById(10001));

		logger.info("Inserting -> {}",
				repository.save(new Person("Tara", "Berlin", new Date())));

		logger.info("Update 10003 -> {}",
				repository.save(new Person(10003, "Pieter", "Utrecht", new Date())));

		repository.deleteById(10002);

		logger.info("All users -> {}", repository.findAll());
	}
}
Step 20 - Connecting to Other Databases
Connecting to My SQL and Other Databases
Spring Boot makes it easy to switch databases! Yeah, really simple.
Steps
- Install MySQL and Setup Schema
- Remove H2 dependency from pom.xml
- Add MySQL (or your database) dependency to pom.xml ```xml
- Configure application.properties

```properties
spring.jpa.hibernate.ddl-auto=none
spring.datasource.url=jdbc:mysql://localhost:3306/person_example
spring.datasource.username=personuser
spring.datasource.password=YOUR_PASSWORD
- Restart the app and You are ready!
Spring Boot can set up the database for you using Hibernate
Things to Note About Spring Boot JPA Schema Management
- Spring Boot chooses a default value for
spring.jpa.hibernate.ddl-autobased on whether your database is embedded or not:- Embedded database → default is
create-drop - Non-embedded database → default is
none
- Embedded database → default is
spring.jpa.hibernate.ddl-autocontrols automatic schema management in Hibernate:none– No action will be performedcreate-only– Database creation will be generateddrop– Database dropping will be generatedcreate– Database will be dropped and then createdvalidate– Validates the database schemaupdate– Updates the database schema to match the entities
- Reference: Hibernate User Guide – Schema Management
application.properties
#none, validate, update, create, create-drop
spring.jpa.hibernate.ddl-auto=create
Installing and Setting Up MySQL
- Install MySQL:
- Official documentation: Installing MySQL
- Detailed tutorial: MySQL Tutorial
- Troubleshooting guide: MySQL Troubleshooting
-
Start the MySQL server (as a service)
- Create a database and user:
- Open Command Prompt (Windows) or Terminal (macOS/Linux)
- Execute the following commands:
-- Example commands
CREATE DATABASE my_database;
CREATE USER 'my_user'@'localhost' IDENTIFIED BY 'my_password';
GRANT ALL PRIVILEGES ON my_database.* TO 'my_user'@'localhost';
FLUSH PRIVILEGES;
mysql --user=user_name --password db_name
create database person_example;
create user 'personuser'@'localhost' identified by 'YOUR_PASSWORD';
grant all on person_example.* to 'personuser'@'localhost';
- Execute following sql queries to create the table and insert the data
Table
create table person
(
	id integer not null,
	birth_date timestamp,
	location varchar(255),
	name varchar(255),
	primary key (id)
);
Data
INSERT INTO PERSON (ID, NAME, LOCATION, BIRTH_DATE ) VALUES(10001,  'Ranga', 'Hyderabad',CURRENT_DATE());
INSERT INTO PERSON (ID, NAME, LOCATION, BIRTH_DATE ) VALUES(10002,  'James', 'New York',CURRENT_DATE());
INSERT INTO PERSON (ID, NAME, LOCATION, BIRTH_DATE ) VALUES(10003,  'Pieter', 'Amsterdam',CURRENT_DATE());
Notes
JdbcTemplate AutoConfiguration
=========================
AUTO-CONFIGURATION REPORT
=========================

DataSourceAutoConfiguration matched:
   - @ConditionalOnClass found required classes 'javax.sql.DataSource', 'org.springframework.jdbc.datasource.embedded.EmbeddedDatabaseType'; @ConditionalOnMissingClass did not find unwanted class (OnClassCondition)

DataSourceTransactionManagerAutoConfiguration matched:
   - @ConditionalOnClass found required classes 'org.springframework.jdbc.core.JdbcTemplate', 'org.springframework.transaction.PlatformTransactionManager'; @ConditionalOnMissingClass did not find unwanted class (OnClassCondition)

H2ConsoleAutoConfiguration matched:
   - @ConditionalOnClass found required class 'org.h2.server.web.WebServlet'; @ConditionalOnMissingClass did not find unwanted class (OnClassCondition)
   - found ConfigurableWebEnvironment (OnWebApplicationCondition)
   - @ConditionalOnProperty (spring.h2.console.enabled=true) matched (OnPropertyCondition)

JdbcTemplateAutoConfiguration matched:
   - @ConditionalOnClass found required classes 'javax.sql.DataSource', 'org.springframework.jdbc.core.JdbcTemplate'; @ConditionalOnMissingClass did not find unwanted class (OnClassCondition)
   - @ConditionalOnSingleCandidate (types: javax.sql.DataSource; SearchStrategy: all) found a primary bean from beans 'dataSource' (OnBeanCondition)

JdbcTemplateAutoConfiguration.JdbcTemplateConfiguration#jdbcTemplate matched:
   - @ConditionalOnMissingBean (types: org.springframework.jdbc.core.JdbcOperations; SearchStrategy: all) did not find any beans (OnBeanCondition)
Bonus Section – Basic Web Application
This section covers the fundamentals of building a web application using Spring MVC, JSP, and Servlets.
Topics Covered
- Understand the basics of HTTP
- HTTP Requests – GET/POST, request parameters
- HTTP Responses – Status codes: 200, 404, 500, etc.
- Introduction to JSP, Servlets, Scriptlets, and EL (Expression Language)
- HTML Forms – Method, action, and form data
- Basics of using Maven, Tomcat, and Eclipse
- Using request attributes to pass data (model) between Servlet and view
Spring MVC Steps
- Step 11 – Configure the application to use Spring MVC
- Step 12 – First Spring MVC Controller (
@Controller,@ResponseBody) - Step 13 – Redirect to Login JSP (
LoginController, view resolver,@ResponseBody) - Step 14 – DispatcherServlet configuration and Log4j integration
- Step 15 – Show user ID and password on the welcome page (
ModelMap,@RequestParam) - Step 16 – Create
LoginServiceand remove all legacy JEE Servlets code - Step 17 – Spring autowiring and dependency management (
@Autowired,@Service)
Step 01 – Up and Running with a Web Application in Tomcat
In this step, we will quickly set up a running web application.
Tip: This is one of the few steps where you copy code directly! The goal is to ensure that your web application runs correctly without errors.
Run the project:
- Use Eclipse →
Run As→Maven Build→tomcat7:run
You can copy code from
\pom.xml
<project xmlns="http://maven.apache.org/POM/4.0.0" xmlns:xsi="http://www.w3.org/2001/XMLSchema-instance"
	xsi:schemaLocation="http://maven.apache.org/POM/4.0.0 http://maven.apache.org/xsd/maven-4.0.0.xsd">
	<modelVersion>4.0.0</modelVersion>
	<groupId>com.in28minutes</groupId>
	<artifactId>in28Minutes-first-webapp</artifactId>
	<version>0.0.1-SNAPSHOT</version>
	<packaging>war</packaging>
	<dependencies>
		<dependency>
			<groupId>javax</groupId>
			<artifactId>javaee-web-api</artifactId>
			<version>8.0.1</version>
			<scope>provided</scope>
		</dependency>
	</dependencies>
	<build>
		<pluginManagement>
			<plugins>
				<plugin>
					<groupId>org.apache.maven.plugins</groupId>
					<artifactId>maven-compiler-plugin</artifactId>
					<version>3.2</version>
					<configuration>
						<verbose>true</verbose>
						<source>1.7</source>
						<target>1.7</target>
						<showWarnings>true</showWarnings>
					</configuration>
				</plugin>
				<plugin>
					<groupId>org.apache.tomcat.maven</groupId>
					<artifactId>tomcat7-maven-plugin</artifactId>
					<version>2.2</version>
					<configuration>
						<path>/</path>
						<contextReloadable>true</contextReloadable>
					</configuration>
				</plugin>
			</plugins>
		</pluginManagement>
	</build>
</project>
\src\main\java\webapp\LoginServlet.java
package webapp;

import java.io.IOException;
import java.io.PrintWriter;

import javax.servlet.annotation.WebServlet;
import javax.servlet.http.HttpServlet;
import javax.servlet.http.HttpServletRequest;
import javax.servlet.http.HttpServletResponse;

/*
 * Browser sends Http Request to Web Server
 *
 * Code in Web Server => Input:HttpRequest, Output: HttpResponse
 * JEE with Servlets
 *
 * Web Server responds with Http Response
 */


@WebServlet(urlPatterns = "/login.do")
public class LoginServlet extends HttpServlet {

	@Override
	protected void doGet(HttpServletRequest request, HttpServletResponse response) throws IOException {
		PrintWriter out = response.getWriter();
		out.println("<html>");
		out.println("<head>");
		out.println("<title>Yahoo!!!!!!!!</title>");
		out.println("</head>");
		out.println("<body>");
		out.println("My First Servlet");
		out.println("</body>");
		out.println("</html>");

	}

}
\src\main\webapp\WEB-INF\web.xml
<!-- webapp/WEB-INF/web.xml -->
<web-app xmlns="http://java.sun.com/xml/ns/javaee" xmlns:xsi="http://www.w3.org/2001/XMLSchema-instance"
	xsi:schemaLocation="http://java.sun.com/xml/ns/javaee http://java.sun.com/xml/ns/javaee/web-app_3_0.xsd"
	version="3.0">

	<display-name>To do List</display-name>

	<welcome-file-list>
		<welcome-file>login.do</welcome-file>
	</welcome-file-list>

</web-app>
Java Platform, Enterprise Edition (Java EE) JEE6
Servlet is a Java programming language class used to extend the capabilities of servers that host applications accessed by means of a request-response programming model.
Notes
extends javax.servlet.http.HttpServlet- All servlets should extend HttpServlet class@WebServlet(urlPatterns = "/login.do")- Provide the url pattern to access the servletdoGet(HttpServletRequest request, HttpServletResponse response)- To handle the RequestMethod GET we need to implement doGet method.
Configuring welcome-file-list in web.xml will ensure that url http://localhost:8080/ redirects to http://localhost:8080/login.do
<welcome-file-list>
	<welcome-file>login.do</welcome-file>
</welcome-file-list>
Step 02 : First JSP
Notes
- Create LoginServlet again
- Redirect to a view - JSP
Code Snippets and Examples
Redirect to a view - JSP
\src\main\java\webapp\LoginServlet.java
request
 .getRequestDispatcher("/WEB-INF/views/login.jsp")
 .forward(request, response);
\src\main\webapp\WEB-INF\views\login.jsp
<html>
<head>
<title>Yahoo!!</title>
</head>
<body>
My First JSP!!!
</body>
</html>
Step 03 : Adding a Get Parameter name
Notes
- Passing a Request Parameter Name
Code Snippets and Examples
We read the request parameter and set it as a request attribute. Request attributes can be accessed from the view (jsp).
\src\main\java\webapp\LoginServlet.java
request.setAttribute("name",
		request.getParameter("name"));
\src\main\webapp\WEB-INF\views\login.jsp
My First JSP!!! My name is ${name}
Step 04 : Adding another Get Parameter Password
Code Snippets and Examples
\src\main\java\webapp\LoginServlet.java
request.setAttribute("password",
                  request.getParameter("password"));
\src\main\webapp\WEB-INF\views\login.jsp
My First JSP!!! My name is ${name} and password is ${password}
Step 05 : Let’s add a form
Code Snippets and Examples
\src\main\java\webapp\LoginServlet.java
@Override
protected void doGet(HttpServletRequest request, HttpServletResponse response)
		throws IOException, ServletException {
	request
		.getRequestDispatcher("/WEB-INF/views/login.jsp")
		.forward(request, response);
}
\src\main\webapp\WEB-INF\views\login.jsp
<html>
<head>
<title>Yahoo!!</title>
</head>
<body>
	<form action="/login.do" method="POST">
		Name : <input type="text" /> <input type="submit" />
	</form>
</body>
</html>
\src\main\webapp\WEB-INF\views\welcome.jsp
<html>
<head>
<title>Yahoo!!</title>
</head>
<body>
Welcome ${name}
</body>
</html>
Step 06 : New Form and doPost
\src\main\java\webapp\LoginServlet.java
@Override
protected void doPost(HttpServletRequest request, HttpServletResponse response)
		throws IOException, ServletException {
	request.setAttribute("name", request.getParameter("name"));
	request.getRequestDispatcher("/WEB-INF/views/welcome.jsp").forward(request, response);
}
\src\main\webapp\WEB-INF\views\welcome.jsp
<html>
<head>
<title>Yahoo!!</title>
</head>
<body>
Welcome ${name}
</body>
</html>
Step 07 : Adding Password and Validation of User Id
Code Snippets and Examples
\src\main\java\webapp\LoginService.java
public class LoginService {
	public boolean validateUser(String user, String password) {
		return user.equalsIgnoreCase("in28Minutes") && password.equals("dummy");
	}

}
\src\main\java\webapp\LoginServlet.java
@Override
protected void doPost(HttpServletRequest request, HttpServletResponse response)
		throws IOException, ServletException {
	String name = request.getParameter("name");
	String password = request.getParameter("password");

	boolean isValidUser = service.validateUser(name, password);

	if (isValidUser) {
		request.setAttribute("name", name);
		request.getRequestDispatcher("/WEB-INF/views/welcome.jsp")
				.forward(request, response);
	} else {
		request.setAttribute("errorMessage", "Invalid Credentials!!");
		request.getRequestDispatcher("/WEB-INF/views/login.jsp")
				.forward(request, response);
	}
}
\src\main\webapp\WEB-INF\views\login.jsp
<html>
<head>
<title>Yahoo!!</title>
</head>
<body>
	<p><font color="red">${errorMessage}</font></p>
	<form action="/login.do" method="POST">
		Name : <input name="name" type="text" /> Password : <input name="password" type="password" /> <input type="submit" />
	</form>
</body>
</html>
Step 11 : Configure application to use Spring MVC
What we will do
Before we start with the Flows, we need to configure application to use Spring MVC
- Lets do a little bit of Refactoring. Mini Step 1: Rename package webapp to com.in28minutes.jee
- We need Spring MVC Framework and its dependencies. Mini Step 2 : Add required jars to the project
- Spring MVC uses Front Controller Pattern -> Dispatcher Servlet. Mini Step 3 : Add Dispatcher Servlet to web.xml
- DispatcherServlet needs an Spring Application Context to launch. We will create an xml (/WEB-INF/todo-servlet.xml). Mini Step 4: Add Spring Context
Useful Snippets
pom.xml
    <dependency>
        <groupId>org.springframework</groupId>
        <artifactId>spring-webmvc</artifactId>
        <version>6.0.6</version>
    </dependency>
web.xml
    <servlet>
        <servlet-name>dispatcher</servlet-name>
        <servlet-class>
            org.springframework.web.servlet.DispatcherServlet
        </servlet-class>
        <init-param>
            <param-name>contextConfigLocation</param-name>
            <param-value>/WEB-INF/todo-servlet.xml</param-value>
        </init-param>
        <load-on-startup>1</load-on-startup>
    </servlet>

    <servlet-mapping>
        <servlet-name>dispatcher</servlet-name>
        <url-pattern>/spring-mvc/*</url-pattern>
    </servlet-mapping>
todo-servlet.xml
	<beans xmlns="http://www.springframework.org/schema/beans"
	    xmlns:context="http://www.springframework.org/schema/context"
	    xmlns:mvc="http://www.springframework.org/schema/mvc"
	    xmlns:xsi="http://www.w3.org/2001/XMLSchema-instance"
	    xsi:schemaLocation="http://www.springframework.org/schema/beans http://www.springframework.org/schema/beans/spring-beans.xsd
	    http://www.springframework.org/schema/mvc http://www.springframework.org/schema/mvc/spring-mvc.xsd
	    http://www.springframework.org/schema/context http://www.springframework.org/schema/context/spring-context.xsd">

	    <context:component-scan base-package="com.in28minutes" />

	    <mvc:annotation-driven />

	</beans>
Flows:
- Flow 1. Login Servlet -> GET -> login.jsp
- Flow 2. Login Servlet -> POST (Success) -> welcome.jsp
- Flow 3. Login Servlet -> POST (Failure) -> login.jsp (with error message)
Files List
\src\main\webapp\WEB-INF\views\login.jsp Deleted
\pom.xml Deleted
\src\main\java\webapp\LoginService.java Deleted
\src\main\java\webapp\LoginServlet.java Deleted
\src\main\webapp\WEB-INF\views\welcome.jsp Deleted
\src\main\webapp\WEB-INF\web.xml Deleted
/pom.xml New
<project xmlns="http://maven.apache.org/POM/4.0.0" xmlns:xsi="http://www.w3.org/2001/XMLSchema-instance"
	xsi:schemaLocation="http://maven.apache.org/POM/4.0.0 http://maven.apache.org/xsd/maven-4.0.0.xsd">
	<modelVersion>4.0.0</modelVersion>
	<groupId>com.in28minutes</groupId>
	<artifactId>in28Minutes-springmvc</artifactId>
	<version>0.0.1-SNAPSHOT</version>
	<packaging>war</packaging>

	<dependencies>
		<dependency>
			<groupId>javax</groupId>
			<artifactId>javaee-web-api</artifactId>
			<version>8.0.1</version>
			<scope>provided</scope>
		</dependency>

		<dependency>
			<groupId>org.springframework</groupId>
			<artifactId>spring-webmvc</artifactId>
			<version>6.0.6</version>
		</dependency>
	</dependencies>

	<build>
		<pluginManagement>
			<plugins>
				<plugin>
					<groupId>org.apache.maven.plugins</groupId>
					<artifactId>maven-compiler-plugin</artifactId>
					<version>3.2</version>
					<configuration>
						<verbose>true</verbose>
						<source>1.8</source>
						<target>1.8</target>
						<showWarnings>true</showWarnings>
					</configuration>
				</plugin>
				<plugin>
					<groupId>org.apache.tomcat.maven</groupId>
					<artifactId>tomcat7-maven-plugin</artifactId>
					<version>2.2</version>
					<configuration>
						<path>/</path>
						<contextReloadable>true</contextReloadable>
					</configuration>
				</plugin>
			</plugins>
		</pluginManagement>
	</build>
</project>
/src/main/java/com/in28minutes/jee/LoginService.java New
package com.in28minutes.jee;

public class LoginService {
	public boolean validateUser(String user, String password) {
		return user.equalsIgnoreCase("in28Minutes") && password.equals("dummy");
	}

}
/src/main/java/com/in28minutes/jee/LoginServlet.java New
package com.in28minutes.jee;

import java.io.IOException;

import jakarta.servlet.ServletException;
import jakarta.servlet.annotation.WebServlet;
import jakarta.servlet.http.HttpServlet;
import jakarta.servlet.http.HttpServletRequest;
import jakarta.servlet.http.HttpServletResponse;

@WebServlet(urlPatterns = "/login.do")
public class LoginServlet extends HttpServlet {

	private LoginService service = new LoginService();

	@Override
	protected void doGet(HttpServletRequest request,
			HttpServletResponse response) throws IOException, ServletException {
		request.getRequestDispatcher("/WEB-INF/views/login.jsp").forward(
				request, response);
	}

	@Override
	protected void doPost(HttpServletRequest request,
			HttpServletResponse response) throws IOException, ServletException {
		String name = request.getParameter("name");
		String password = request.getParameter("password");

		boolean isValidUser = service.validateUser(name, password);

		if (isValidUser) {
			request.setAttribute("name", name);
			request.getRequestDispatcher("/WEB-INF/views/welcome.jsp").forward(
					request, response);
		} else {
			request.setAttribute("errorMessage", "Invalid Credentials!!");
			request.getRequestDispatcher("/WEB-INF/views/login.jsp").forward(
					request, response);
		}
	}

}
/src/main/webapp/WEB-INF/todo-servlet.xml New
<beans xmlns="http://www.springframework.org/schema/beans"
    xmlns:context="http://www.springframework.org/schema/context"
    xmlns:mvc="http://www.springframework.org/schema/mvc"
    xmlns:xsi="http://www.w3.org/2001/XMLSchema-instance"
    xsi:schemaLocation="http://www.springframework.org/schema/beans http://www.springframework.org/schema/beans/spring-beans.xsd
    http://www.springframework.org/schema/mvc http://www.springframework.org/schema/mvc/spring-mvc.xsd
    http://www.springframework.org/schema/context http://www.springframework.org/schema/context/spring-context.xsd">

    <context:component-scan base-package="com.in28minutes" />

    <mvc:annotation-driven />

</beans>
/src/main/webapp/WEB-INF/views/login.jsp New
<html>
<head>
<title>Yahoo!!</title>
</head>
<body>
    <p><font color="red">${errorMessage}</font></p>
    <form action="/login.do" method="POST">
        Name : <input name="name" type="text" /> Password : <input name="password" type="password" /> <input type="submit" />
    </form>
</body>
</html>
/src/main/webapp/WEB-INF/views/welcome.jsp New
<html>
<head>
<title>Yahoo!!</title>
</head>
<body>
Welcome ${name}
</body>
</html>
/src/main/webapp/WEB-INF/web.xml New
<web-app xmlns="http://java.sun.com/xml/ns/javaee" xmlns:xsi="http://www.w3.org/2001/XMLSchema-instance"
    xsi:schemaLocation="http://java.sun.com/xml/ns/javaee http://java.sun.com/xml/ns/javaee/web-app_3_0.xsd"
    version="3.0">

    <display-name>To do List</display-name>

    <servlet>
        <servlet-name>dispatcher</servlet-name>
        <servlet-class>
            org.springframework.web.servlet.DispatcherServlet
        </servlet-class>
        <init-param>
            <param-name>contextConfigLocation</param-name>
            <param-value>/WEB-INF/todo-servlet.xml</param-value>
        </init-param>
        <load-on-startup>1</load-on-startup>
    </servlet>

    <servlet-mapping>
        <servlet-name>dispatcher</servlet-name>
        <url-pattern>/spring-mvc/*</url-pattern>
    </servlet-mapping>
</web-app>
Step 12 : First Spring MVC Controller, @ResponseBody, @Controller
First Spring MVC Controller
- @RequestMapping(value = “/login”, method = RequestMethod.GET)
- http://localhost:8080/spring-mvc/login
- web.xml -
/spring-mvc/* - Why @ResponseBody?
- Importance of RequestMapping method
- Can I have multiple urls rendered from Same Controller?
package com.in28minutes.springmvc;

import org.springframework.stereotype.Controller;
import org.springframework.web.bind.annotation.RequestMapping;
import org.springframework.web.bind.annotation.ResponseBody;

@Controller
public class LoginController {

	@RequestMapping(value = "/login")
	@ResponseBody
	public String sayHello() {
		return "Hello World dummy";
	}
}
Step 13 : Redirect to Login JSP - LoginController, @ResponseBody - and View Resolver
/src/main/java/com/in28minutes/springmvc/login/LoginController.java New
package com.in28minutes.springmvc.login;

import org.springframework.stereotype.Controller;
import org.springframework.web.bind.annotation.RequestMapping;
import org.springframework.web.bind.annotation.RequestMethod;

@Controller
public class LoginController {
	@RequestMapping(value = "/login", method = RequestMethod.GET)
	public String showLoginPage() {
		return "login";
	}
}
/src/main/webapp/WEB-INF/todo-servlet.xml Modified
New Lines
    <bean
        class="org.springframework.web.servlet.view.InternalResourceViewResolver">
        <property name="prefix">
            <value>/WEB-INF/views/</value>
        </property>
        <property name="suffix">
            <value>.jsp</value>
        </property>
    </bean>
Redirect to Log in JSP
- View Resolver in
todo-servlet.xml - Update LoginController
- Remove @ResponseBody
- More about View Resolver
Snippets
  <bean
        class="org.springframework.web.servlet.view.InternalResourceViewResolver">
        <property name="prefix">
            <value>/WEB-INF/views/</value>
        </property>
        <property name="suffix">
            <value>.jsp</value>
        </property>
    </bean>
Step 14 : DispatcherServlet and Log4j
/pom.xml Modified
New Lines
<dependency>
	<groupId>log4j</groupId>
	<artifactId>log4j</artifactId>
	<version>1.2.17</version>
</dependency>
/src/main/resources/log4j.properties New
log4j.rootLogger=TRACE, Appender1, Appender2

log4j.appender.Appender1=org.apache.log4j.ConsoleAppender
log4j.appender.Appender1.layout=org.apache.log4j.PatternLayout
log4j.appender.Appender1.layout.ConversionPattern=%-7p %d [%t] %c %x - %m%n
/src/main/webapp/WEB-INF/views/login.jsp Modified
New Lines
<form action="/spring-mvc/login" method="POST">
/src/main/webapp/WEB-INF/views/welcome.jsp Modified
New Lines
Welcome ${name}.
Understanding DispatcherServlet and Spring MVC Request Flow
What We Want to Do
- Understand the importance of
DispatcherServletin Spring MVC. - Add Log4j for logging to better understand the request flow.
Spring MVC Request Flow
DispatcherServletreceives the HTTP request.- It identifies the appropriate controller based on the URL.
- Controller executes the business logic.
- Controller returns:
- Model (data)
- View Name (logical view)
DispatcherServletresolves the view using the ViewResolver.DispatcherServletmakes the model available to the view and executes it.DispatcherServletreturns the HTTP response back to the client.
Flow diagram reference: Spring MVC Flow
Step 15 – Show UserID and Password on the Welcome Page (ModelMap and @RequestParam)
- Display user ID and password on the welcome page (without using Spring Security).
- Use
ModelMapto pass data from controller to view. - Use
@RequestParamto capture request parameters.
Example Controller
@Controller
public class WelcomeController {

    @RequestMapping(value = "/welcome", method = RequestMethod.POST)
    public String showWelcomePage(@RequestParam String name,
                                  @RequestParam String password,
                                  ModelMap model) {
        model.addAttribute("name", name);
        model.addAttribute("password", password);
        return "welcome"; // Returns welcome.jsp
    }
}
/src/main/java/com/in28minutes/springmvc/login/LoginController.java Modified
New Lines
	@RequestMapping(value = "/login", method = RequestMethod.POST)
	public String handleUserLogin(ModelMap model, @RequestParam String name,
			@RequestParam String password) {
		model.put("name", name);
		model.put("password", password);
		return "welcome";
	}
/src/main/webapp/WEB-INF/views/welcome.jsp Modified
New Lines
Welcome ${name}. You entered ${password}
Step 16 : LoginService and Remove all JEE Servlets based code
- Use LoginService to validate userid and password.
- Remove all the old controller code and lets use only Spring MVC here on.
- For now : We are not using Spring Autowiring for LoginService.
- Change URL to http://localhost:8080/login
/src/main/java/com/in28minutes/jee/LoginService.java Deleted
/src/main/java/com/in28minutes/jee/LoginServlet.java Deleted
/src/main/java/com/in28minutes/springmvc/login/LoginController.java Deleted
/src/main/java/com/in28minutes/login/LoginController.java New
package com.in28minutes.login;

import org.springframework.stereotype.Controller;
import org.springframework.ui.ModelMap;
import org.springframework.web.bind.annotation.RequestMapping;
import org.springframework.web.bind.annotation.RequestMethod;
import org.springframework.web.bind.annotation.RequestParam;

import com.in28minutes.login.LoginService;

@Controller
public class LoginController {

	private LoginService loginService = new LoginService();

	@RequestMapping(value = "/login", method = RequestMethod.GET)
	public String showLoginPage() {
		return "login";
	}

	@RequestMapping(value = "/login", method = RequestMethod.POST)
	public String handleUserLogin(ModelMap model, @RequestParam String name,
			@RequestParam String password) {

		if (!loginService.validateUser(name, password)) {
			model.put("errorMessage", "Invalid Credentials");
			return "login";
		}

		model.put("name", name);
		return "welcome";
	}
}
/src/main/java/com/in28minutes/login/LoginService.java New
package com.in28minutes.login;

public class LoginService {
	public boolean validateUser(String user, String password) {
		return user.equalsIgnoreCase("in28Minutes") && password.equals("dummy");
	}

}
/src/main/webapp/WEB-INF/views/login.jsp Modified
New Lines
<form action="/login" method="POST">
/src/main/webapp/WEB-INF/views/welcome.jsp Modified
New Lines
Welcome ${name}. You are now authenticated.
/src/main/webapp/WEB-INF/web.xml Modified
New Lines
<url-pattern>/</url-pattern>
Step 17 – Spring Auto-wiring and Dependency Management (@Autowired and @Service)
In this step, we will learn about Spring’s dependency injection and how auto-wiring simplifies wiring of beans.
Key Concepts
- Dependency Management: Spring manages object creation and wiring, reducing boilerplate code.
@Service: Marks a class as a service layer component (Spring-managed bean).@Autowired: Automatically injects dependent beans into a class.
/src/main/java/com/in28minutes/login/LoginController.java Modified
New Lines
import org.springframework.beans.factory.annotation.Autowired;
	@Autowired
	private LoginService loginService;
/src/main/java/com/in28minutes/login/LoginService.java Modified
New Lines
import org.springframework.stereotype.Service;
@Service
public class LoginService { }
Other Introduction Sections
| Title | Category | Github | |——————–|:————:|—————————————————————————————————————————————————————| | Eclipse in 5 Steps | Introduction | Project Folder on Github | | Maven in 5 Steps | Introduction | Project Folder on Github | | JUnit in 5 Steps | Introduction | Project Folder on Github | | Mockito in 5 Steps | Introduction | Project Folder on Github | | IntelliJ IDEA | Introduction | Reference Link |
Just Released