
This guide will help you create a simple web application with Spring Boot. We will develop an application that includes login functionality and the ability to display a list of todos. The application will follow the MVC pattern, using JSP as the view.

You will learn
- How to bootstrap a simple Spring Boot project using Spring Initializr.
- How to initialize a basic web application with Spring Boot.
- How to add JSP pages to your web application.
- How to implement basic login functionality.
- How to display a list of todos.
- How to auto-wire components using the Spring Framework.
- Next steps if you want to explore further.
Tools You Will Need
- Maven 3.0+ as your build tool
- Your preferred IDE (Eclipse or IntelliJ IDEA recommended)
- JDK 17 or higher
Overview of the Web Application
We will build a simple To-Do list page (unformatted) with a basic login feature.
Project Files
The screenshot below shows the Eclipse project with all the files we will create.
Brief Overview of All Files
-
LoginServiceandTodoService
Contain the business logic.LoginServiceprovides simple hardcoded validation for user ID and password.TodoServicecontains a method to retrieve a list of todos. -
login.jsp,welcome.jsp,list-todos.jsp
The names clearly indicate the content of each view. -
LoginControllerandTodoController
Act as controllers in the MVC pattern.LoginControllerhandles login flow: if the user enters a valid ID and password, they are redirected to the welcome page; otherwise, the login page is shown with an error message. -
pom.xml
Contains important dependencies such as Spring Boot Starter Web andtomcat-embed-jasper. -
application.properties
Typically used to configure frameworks in Spring Boot. In this example, it is used to configure the view resolver.
Screenshots of the application
Login Page

Login Page if user enters invalid userid and password

Welcome Page

List Todos Page

Bootstrapping a Web Application with Spring Initializr
Creating a web application with Spring Initializr is a cakewalk. We will use Spring Web MVC as our web framework.
Spring Initializr http://start.spring.io/ is a great tool to bootstrap your Spring Boot projects.

As shown in the image above, follow these steps:
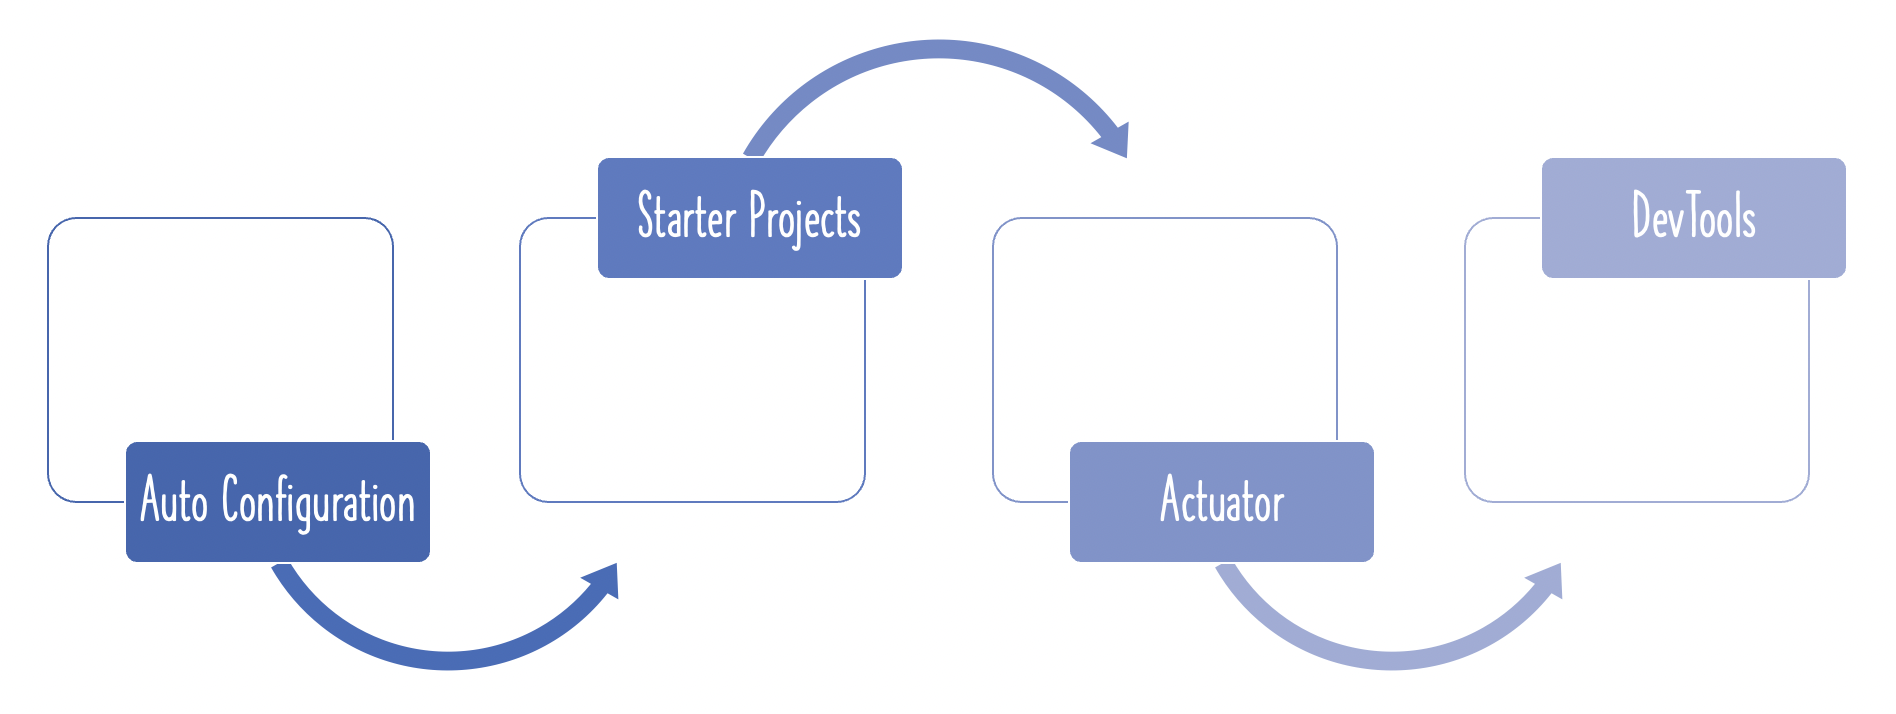
- Launch Spring Initializr and choose the following:
- Group:
com.in28minutes.springboot - Artifact:
student-services - Dependencies:
- Web
- Actuator
- DevTools
- Group:
- Click Generate Project.
- Import the project into Eclipse or IntelliJ IDEA.
- To understand all the files included in this project, you can refer here.
Project Dependencies
Spring Boot Starter Web provides all the necessary dependencies and auto-configuration required to develop web applications. This is the first dependency we will use in our project.
<dependency>
    <groupId>org.springframework.boot</groupId>
    <artifactId>spring-boot-starter-web</artifactId>
</dependency>
We want to use JSP as the view. The default embedded servlet container for Spring Boot Starter Web is Tomcat. To enable JSP support, we need to add a dependency on tomcat-embed-jasper.
<dependency>
    <groupId>org.apache.tomcat.embed</groupId>
    <artifactId>tomcat-embed-jasper</artifactId>
    <scope>provided</scope> // default for IntelliJ IDE
</dependency>
Spring Boot Starter Web Dependencies
The following screenshot shows the dependencies that are automatically added to our application by including Spring Boot Starter Web.

Dependencies can be categorized as follows:
- Spring – core, beans, context, AOP
- Web MVC – Spring MVC
- Jackson – for JSON binding
- Validation – Hibernate Validator, Validation API
- Embedded Servlet Container – Tomcat
- Logging – Logback, SLF4J
Any typical web application would use all these dependencies. Spring Boot Starter Web comes pre-packaged with them. As a developer, you don’t need to worry about these dependencies or their compatible versions.
Auto Configuration
Spring Boot Starter Web also auto-configures the basic components required for a web application. To see the features it provides, run StudentServicesApplication.java as a Java application and review the log.
Mapping servlet: 'dispatcherServlet' to [/]

Mapped "{[/error]}" onto public org.springframework.http.ResponseEntity<java.util.Map<java.lang.String, java.lang.Object>> org.springframework.boot.autoconfigure.web.BasicErrorController.error(javax.servlet.http.HttpServletRequest)

Mapped URL path [/webjars/**] onto handler of type [class org.springframework.web.servlet.resource.ResourceHttpRequestHandler]
Spring Boot Starter Web auto-configures the following components:
- Dispatcher Servlet
- Error Page
- Web Jars to manage static dependencies
- Embedded Servlet Container – Tomcat is used by default
Configuring a View Resolver
Our JSP files will be located in /WEB-INF/jsp/. We need to configure a view resolver with the appropriate prefix and suffix to map view names to these JSP files.
spring.mvc.view.prefix=/WEB-INF/jsp/
spring.mvc.view.suffix=.jsp
Login Controller
public String showLoginPage(ModelMap model): Mapped to the\loginGET method; displays the login page.@Autowired LoginService service: InjectsLoginService, which contains the validation logic.showWelcomePage(ModelMap model, @RequestParam String name, @RequestParam String password): Mapped to the\loginPOST method; validates the user ID and password, and redirects to the welcome page if login is successful.
package com.in28minutes.springboot.web.controller;

import org.springframework.beans.factory.annotation.Autowired;
import org.springframework.stereotype.Controller;
import org.springframework.ui.ModelMap;
import org.springframework.web.bind.annotation.RequestMapping;
import org.springframework.web.bind.annotation.RequestMethod;
import org.springframework.web.bind.annotation.RequestParam;
import org.springframework.web.bind.annotation.SessionAttributes;

import com.in28minutes.springboot.web.service.LoginService;

@Controller
@SessionAttributes("name")
public class LoginController {

    @Autowired
    LoginService service;

    @RequestMapping(value="/login", method = RequestMethod.GET)
    public String showLoginPage(ModelMap model){
        return "login";
    }

    @RequestMapping(value="/login", method = RequestMethod.POST)
    public String showWelcomePage(ModelMap model, @RequestParam String name, @RequestParam String password){

        boolean isValidUser = service.validateUser(name, password);

        if (!isValidUser) {
            model.put("errorMessage", "Invalid Credentials");
            return "login";
        }

        model.put("name", name);
        model.put("password", password);

        return "welcome";
    }

}
Login Service
Contains the basic authentication logic. Uses hardcoded credentials for simplicity.
package com.in28minutes.springboot.web.service;

import org.springframework.stereotype.Component;
import org.springframework.stereotype.Service;

@Service
public class LoginService {

    public boolean validateUser(String userid, String password) {
        // in28minutes, dummy
        return userid.equalsIgnoreCase("in28minutes")
                && password.equalsIgnoreCase("dummy");
    }

}
Login View - JSP
A simple login page with fields for userid and password.
If an error message is set in the model, ${errorMessage} will display the authentication failure message.
<html lang="en">

<head>
<title>First Web Application</title>
</head>

<body>
    <font color="red">${errorMessage}</font>
    <form method="post">
        Name : <input type="text" name="name" />
        Password : <input type="password" name="password" />
        <input type="submit" />
    </form>
</body>

</html>
Welcome-View - JSP
This page is displayed upon successful authentication.
It shows the name of the logged-in user and provides a link to manage the todo list.
<html lang="en">

<head>
<title>First Web Application</title>
</head>

<body>
    Welcome ${name}!! <a href="/list-todos">Click here</a> to manage your todo's.
</body>

</html>
Todo Model and Business Service
The Todo model contains the following fields: id, user, description, and targetDate.
The TodoService provides basic business logic to manage and retrieve todo items.
package com.in28minutes.springboot.web.model;

import java.util.Date;

public class Todo {
    private int id;
    private String user;
    private String desc;
    private Date targetDate;
    private boolean isDone;

	//Getters, Setters, Constructors, toString, equals and hash code
}
TodoService uses a simple ArrayList to store todos in memory. It provides a method to retrieve the list of todos.
package com.in28minutes.springboot.web.service;

import java.util.ArrayList;
import java.util.Date;
import java.util.Iterator;
import java.util.List;

import org.springframework.stereotype.Service;

import com.in28minutes.springboot.web.model.Todo;

@Service
public class TodoService {
    private static List<Todo> todos = new ArrayList<>();
    private static int todoCount = 3;

    static {
        todos.add(new Todo(1, "in28Minutes", "Learn Spring MVC", new Date(),
                false));
        todos.add(new Todo(2, "in28Minutes", "Learn Struts", new Date(), false));
        todos.add(new Todo(3, "in28Minutes", "Learn Hibernate", new Date(),
                false));
    }

    public List<Todo> retrieveTodos(String user) {
        List<Todo> filteredTodos = new ArrayList<>();
        for (Todo todo : todos) {
            if (todo.getUser().equals(user)) {
                filteredTodos.add(todo);
            }
        }
        return filteredTodos;
    }
}
List Todos JSP
The List Todos page displays all the todos. This page is currently unformatted. In subsequent steps of the course, we will enhance this page by styling it and adding functionality to add, delete, and update todos.
<html>

<head>
<title>First Web Application</title>
</head>

<body>
    Here are the list of your todos:
    ${todos}
    <BR/>
    Your Name is : ${name}
</body>

</html>
Todo Controller
The TodoController has a simple method that retrieves the list of todos and adds them to the model. It then redirects to the list-todos view.
package com.in28minutes.springboot.web.controller;

import org.springframework.beans.factory.annotation.Autowired;
import org.springframework.stereotype.Controller;
import org.springframework.ui.ModelMap;
import org.springframework.web.bind.annotation.RequestMapping;
import org.springframework.web.bind.annotation.RequestMethod;
import org.springframework.web.bind.annotation.RequestParam;
import org.springframework.web.bind.annotation.SessionAttributes;

import com.in28minutes.springboot.web.service.LoginService;
import com.in28minutes.springboot.web.service.TodoService;

@Controller
@SessionAttributes("name")
public class TodoController {

    @Autowired
    TodoService service;

    @RequestMapping(value="/list-todos", method = RequestMethod.GET)
    public String showTodos(ModelMap model){
        String name = (String) model.get("name");
        model.put("todos", service.retrieveTodos(name));
        return "list-todos";
    }
}
Running the Application
We use a Spring Boot application class to launch our web application.
package com.in28minutes.springboot.web;

import org.springframework.boot.SpringApplication;
import org.springframework.boot.autoconfigure.SpringBootApplication;
import org.springframework.context.annotation.ComponentScan;

@SpringBootApplication
@ComponentScan("com.in28minutes.springboot.web")
public class SpringBootFirstWebApplication {

    static void main(String[] args) {
        SpringApplication.run(SpringBootFirstWebApplication.class, args);
    }
}
Complete code is available on the GitHub repository: https://github.com/in28minutes/SpringBootWebApplicationStepByStep. You can download Step12.zip and import it as a Maven project to run it.
Run the application as a simple Java application. Upon startup, you will see the application initializing in the logs. All request mappings will be properly configured.
You can access the application at http://localhost:8080/login and log in using the credentials:
- UserID: in28Minutes
- Password: dummy
  .   ____          _            __ _ _
 /\\ / ___'_ __ _ _(_)_ __  __ _ \ \ \ \
( ( )\___ | '_ | '_| | '_ \/ _` | \ \ \ \
 \\/  ___)| |_)| | | | | || (_| |  ) ) ) )
  '  |____| .__|_| |_|_| |_\__, | / / / /
 =========|_|==============|___/=/_/_/_/
 :: Spring Boot ::        (v4.0.0-M2)

2017-01-30 10:02:01.775  INFO 6070 --- [  restartedMain] s.b.c.e.t.TomcatEmbeddedServletContainer : Tomcat initialized with port(s): 8080 (http)
2017-01-30 10:02:01.798  INFO 6070 --- [  restartedMain] o.apache.catalina.core.StandardService   : Starting service Tomcat
2017-01-30 10:02:01.800  INFO 6070 --- [  restartedMain] org.apache.catalina.core.StandardEngine  : Starting Servlet Engine: Apache Tomcat/8.5.6
2017-01-30 10:02:02.498  INFO 6070 --- [ost-startStop-1] o.a.c.c.C.[Tomcat].[localhost].[/]       : Initializing Spring embedded WebApplicationContext
2017-01-30 10:02:02.498  INFO 6070 --- [ost-startStop-1] o.s.web.context.ContextLoader            : Root WebApplicationContext: initialization completed in 3747 ms
2017-01-30 10:02:02.803  INFO 6070 --- [ost-startStop-1] o.s.b.w.servlet.ServletRegistrationBean  : Mapping servlet: 'dispatcherServlet' to [/]
2017-01-30 10:02:03.557  INFO 6070 --- [  restartedMain] s.w.s.m.m.a.RequestMappingHandlerMapping : Mapped "{[/login],methods=[GET]}" onto public java.lang.String com.in28minutes.springboot.web.controller.LoginController.showLoginPage(org.springframework.ui.ModelMap)
2017-01-30 10:02:03.559  INFO 6070 --- [  restartedMain] s.w.s.m.m.a.RequestMappingHandlerMapping : Mapped "{[/login],methods=[POST]}" onto public java.lang.String com.in28minutes.springboot.web.controller.LoginController.showWelcomePage(org.springframework.ui.ModelMap,java.lang.String,java.lang.String)
2017-01-30 10:02:03.559  INFO 6070 --- [  restartedMain] s.w.s.m.m.a.RequestMappingHandlerMapping : Mapped "{[/list-todos],methods=[GET]}" onto public java.lang.String com.in28minutes.springboot.web.controller.TodoController.showTodos(org.springframework.ui.ModelMap)
2017-01-30 10:02:03.564  INFO 6070 --- [  restartedMain] s.w.s.m.m.a.RequestMappingHandlerMapping : Mapped "{[/error]}" onto public org.springframework.http.ResponseEntity<java.util.Map<java.lang.String, java.lang.Object>> org.springframework.boot.autoconfigure.web.BasicErrorController.error(javax.servlet.http.HttpServletRequest)
2017-01-30 10:02:03.565  INFO 6070 --- [  restartedMain] s.w.s.m.m.a.RequestMappingHandlerMapping : Mapped "{[/error],produces=[text/html]}" onto public org.springframework.web.servlet.ModelAndView org.springframework.boot.autoconfigure.web.BasicErrorController.errorHtml(javax.servlet.http.HttpServletRequest,javax.servlet.http.HttpServletResponse)
2017-01-30 10:02:03.615  INFO 6070 --- [  restartedMain] o.s.w.s.handler.SimpleUrlHandlerMapping  : Mapped URL path [/webjars/**] onto handler of type [class org.springframework.web.servlet.resource.ResourceHttpRequestHandler]
2017-01-30 10:02:03.616  INFO 6070 --- [  restartedMain] o.s.w.s.handler.SimpleUrlHandlerMapping  : Mapped URL path [/**] onto handler of type [class org.springframework.web.servlet.resource.ResourceHttpRequestHandler]
2017-01-30 10:02:03.682  INFO 6070 --- [  restartedMain] o.s.w.s.handler.SimpleUrlHandlerMapping  : Mapped URL path [/**/favicon.ico] onto handler of type [class org.springframework.web.servlet.resource.ResourceHttpRequestHandler]
2017-01-30 10:02:04.108  INFO 6070 --- [  restartedMain] o.s.j.e.a.AnnotationMBeanExporter        : Registering beans for JMX exposure on startup
2017-01-30 10:02:04.288  INFO 6070 --- [  restartedMain] s.b.c.e.t.TomcatEmbeddedServletContainer : Tomcat started on port(s): 8080 (http)
2017-01-30 10:02:04.307  INFO 6070 --- [  restartedMain] c.i.s.web.SpringBootFirstWebApplication  : Started SpringBootFirstWebApplication in 7.204 seconds (JVM running for 9.191)
Complete code is available on the GitHub repository: https://github.com/in28minutes/SpringBootWebApplicationStepByStep. You can download Step12.zip and import it as a Maven project to run the application.
Just Released