

This guide helps you create a Java full stack application with all the CRUD (Create, Read, Update and Delete) features using Vue as Front end framework and Spring Boot as the backend REST API. We will be using JavaScript as the front end language and Java as the backend language.

You will learn
- What is a full stack application?
- Why do we create full stack applications?
- How do you use Vue as a Frontend Framework?
- How do you use Spring to create Backend REST Service API?
- How do you call Spring Boot REST API from Vue using the axios framework?
- How and When to use different REST API Request Methods - GET, POST, PUT and DELETE?
- How do you perform CRUD (Create, Read, Update and Delete) operations using Vue as Frontend framework and Spring Boot as the backend REST API?
- How do you create a form in Vue?
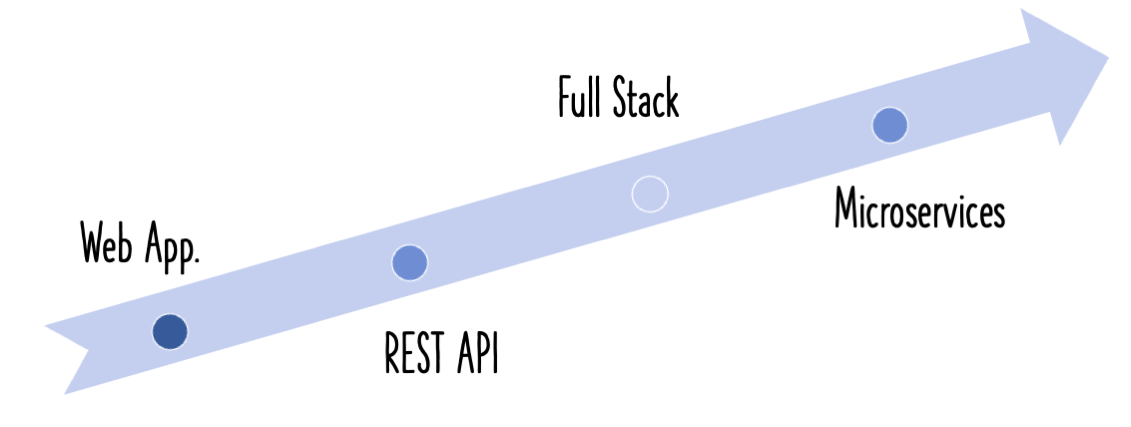
Step 0: Get an overview of the Full Stack Application
Understanding Basic Features of the Application
Following screen shot shows the application we would like to build:
It is a primary instructor portal allowing instructors to maintain their courses.

Understanding Full Stack Architecture
Following Screen shot shows the architecture of the application we would create:
Important points to note:
- REST API is exposed using Spring Boot
- REST API is consumed from Vue Frontend to present the UI
- The Database, in this example, is a hardcoded in-memory static list.
Getting an overview of Spring Boot REST API Resources
In this guide, we will create these services using proper URIs and HTTP methods:
@GetMapping("/instructors/{username}/courses"): Get Request Method exposing the list of courses taught by a specific instructor@GetMapping("/instructors/{username}/courses/{id}"): Get Request Method exposing the details of a specific course taught by a specific instructor@DeleteMapping("/instructors/{username}/courses/{id}"): Delete Request Method to delete a course belonging to a specific instructor@PutMapping("/instructors/{username}/courses/{id}"): Put Request Method to update the course details of a specific course taught by a specific instructor@PostMapping("/instructors/{username}/courses"): Post Request Method to create a new course for a specific instructor
The REST API can be enhanced to interact with other microservices infrastructure components and act as microservices.
Downloading the Complete Maven Project With Code Examples
Following GitHub repository hosts the complete frontend and backend projects - https://github.com/in28minutes/spring-boot-vuejs-fullstack-examples/tree/master/spring-boot-crud-full-stack
Our Github repository has all the code examples - https://github.com/in28minutes/spring-boot-vuejs-fullstack-examples
Understanding Spring Boot REST API Project Structure
Following screenshot shows the structure of the Spring Boot project we create.

A few details:
CourseResource.java- Rest Resource exposing all the service methods discussed above.Course.java, CoursesHardcodedService.java- Business Logic for the application. CoursesHardcodedService exposes a few methods we would invoke from our Rest Resource.SpringBootFullStackCrudFullStackWithMavenApplication.java- Launcher for the Spring Boot Application. To run the application, launch this file as Java Application.pom.xml- Contains all the dependencies needed to build this project. We use Spring Boot Starter Web and Spring Boot DevTools.
Understanding Vue Frontend Project Structure
Following screenshot shows the structure of the Vue JS project we create.

A few details:
App.vue: Vue Component representing the high-level structure of the application.routes.js: Route Component for the applicationCourses.vue- Vue Component for listing all the courses for an instructor.Courses.vue- Vue Component for editing Course Details and creating a new courseCourseDataService.js- Service using axios framework to make the Backend REST API Calls.AuthenticationService.js- Service using axios framework to make the Backend REST API Calls.
Understanding the tools you need to build this project
- Maven 3.0+ for building Spring Boot API Project
- npm, webpack for building frontend
- Your favorite IDE. We use Eclipse for Java and Visual Studio Code for Frontend - JavaScript, TypeScript, Angular, Vue JS and React.
- JDK 1.8+
- Node v8+
- Embedded Tomcat, built into Spring Boot Starter Web


Installing Node Js (npm) & Visual Studio Code
- Click to see video Playlist
- Step 01 - Installing NodeJs and NPM - Node Package Manager
- Step 02 - Quick Introduction to NPM
- Step 03 - Installing Visual Studio Code - Front End JavaScript Editor
Installing Java, Eclipse & Embedded Maven
- Click to see video Playlist
- 0 - Overview - Installation Java, Eclipse and Maven
- 1 - Installing Java JDK
- 2 - Installing Eclipse IDE
- 3 - Using Embedded Maven in Eclipse
- 4 - Troubleshooting Java, Eclipse and Maven
Creating Full Stack CRUD application with Vue and Spring Boot - Step By Step Approach
We will use a step by step approach to creating the full stack application
- Create a Spring Boot Application with Spring Boot Initializr
- Create a Vue application using Vue CLI
- Create the Retrieve Courses REST API and Enhance the Vue Front end to retrieve the courses using the axios framework
- Add feature to delete a course in Vue front end and Spring Boot REST API
- Add functionality to update course details in Vue front end and Spring Boot REST API
- Add feature to create a course in Vue front end and Spring Boot REST API
You can get an introduction to REST down here - Introduction to REST API
Step 1: Bootstrapping Spring Boot REST API with Spring Initializr
Creating a REST service with Spring Initializr is a cake walk. We will use Spring Web MVC as our web framework.
Spring Initializr http://start.spring.io/ is great tool to bootstrap your Spring Boot projects.

As shown in the image above, the following steps have to be done
- Launch Spring Initializr and choose the following
- Choose
com.in28minutes.fullstack.springboot.maven.crudas Group - Choose
spring-boot-fullstack-crud-full-stack-with-mavenas Artifact - Choose following dependencies
- Web
- DevTools
- Choose
- Click Generate Project.
- Import the project into Eclipse. File -> Import -> Existing Maven Project. For more details about creating Spring Boot Projects, you can read - Creating Spring Boot Projects
If you are new to Spring Boot, we recommend watching this video - Spring Boot in 10 Steps
Step 2 - Bootstrapping Vue JS Frontend with Vue CLI
Vue CLI is an amazing tool to bootstrap your Vue applications.
Creating Vue Frontend Applications with Vue CLI is very simple.
Launch up your terminal/command prompt. Make sure that you have node installed.
npm install -g @vue/cli
# OR
yarn global add @vue/cli

vue create frontend-spring-boot-vue-crud-full-stack
This command will ask you for the structure and features for the project you need. Just select default for now.
Launching up Vue Frontend
You would need to cd to the project we created and execute npm start
cd frontend-spring-boot-vue-crud-full-stack
npm run serve
You would see the screen below:

When you launch up the application in the browser at http://localhost:8080/, you would see the following welcome screen.

Note: Vue application runs on default port 8080, to change it go to package.json, under scripts change serve command to vue-cli-service serve --port 8081. Here onwards your Vue application will start at port 8081.
Cool! You are all set to rock and roll with Vue.
Step 3 - Creating REST API for Retrieve All Courses and Connecting Vue Frontend
We would want to start building the screen shown below:
Let’s start with building the course listing screen.
To be able to do that, we need to
- Create REST API for retrieving a list of courses.
- Connect the Vue JS Frontend to the backend REST API
Create REST API for retrieving a list of courses
Web Services, REST and Designing REST API, are pretty deep concepts. We would recommend to check this out for more - Designing Great REST API
We will create
- A model object
Course.java - A Hardcoded Business Service
CoursesHardcodedService.java - A Resource to expose the REST API
CourseResource.java
We will start with creating a model object Course.java. The snippet below shows the content of the model class. For the complete listing, refer course/Course.java in the complete code example at the end of this article.
public class Course {
  private Long id;
  private String username;
  private String description;
  //no arg constructor
  //constructor with 3 args
  //getters and setters
  //hashcode and equals
Next, let’s create a Business Service. In this article, we will use hardcoded data.
@Service
public class CoursesHardcodedService {

  private static List<Course> courses = new ArrayList<>();
  private static long idCounter = 0;

  static {
    courses.add(new Course(++idCounter, "in28minutes", "Learn Full stack with Spring Boot and Angular"));
    courses.add(new Course(++idCounter, "in28minutes", "Learn Full stack with Spring Boot and React"));
    courses.add(new Course(++idCounter, "in28minutes", "Master Microservices with Spring Boot and Spring Cloud"));
    courses.add(new Course(++idCounter, "in28minutes",
        "Deploy Spring Boot Microservices to Cloud with Docker and Kubernetes"));
  }

  public List<Course> findAll() {
    return courses;
  }
}
Few things to note
- Data is hardcoded
- findAll returns the complete list of courses
- You can see that the API of the Service is modelled around the Spring Data Repository interfaces. If you are familiar with JPA and Spring Data, you can easily replace this with a Service talking to a database.
Next, let create the REST Resource to retrieve the list of courses for an instructor.
@RestController
public class CourseResource {

  @Autowired
  private CoursesHardcodedService courseManagementService;

  @GetMapping("/instructors/{username}/courses")
  public List<Course> getAllCourses(@PathVariable String username) {
    return courseManagementService.findAll();
  }
}
Few things to note:
@RestController : Combination of @Controller and @ResponseBody- Beans returned are converted to/from JSON/XML.@Autowired private CoursesHardcodedService courseManagementService- Autowire the CoursesHardcodedService so that we can retrieve details from business service.
If you launch up the Spring boot application and go to http://localhost:8080/instructors/in28minutes/courses in the browser, you would see the response from the API.
[
   {
      "id": 1,
      "username": "in28minutes",
      "description": "Learn Full stack with Spring Boot and Angular"
   },
   {
      "id": 2,
      "username": "in28minutes",
      "description": "Learn Full stack with Spring Boot and React"
   },
   {
      "id": 3,
      "username": "in28minutes",
      "description": "Master Microservices with Spring Boot and Spring Cloud"
   },
   {
      "id": 4,
      "username": "in28minutes",
      "description": "Deploy Spring Boot Microservices to Cloud with Docker and Kubernetes"
   }
]
We have the REST API up and running. Its time to focus on the Frontend.
Enhancing Vue App to consume the REST API
To be able to enhance the Vue Application to consume the REST API, we would need to
- Create an Application Component - to represent the structure of the complete application and include it in
App.vue-InstructorApp.vue - Add the frameworks need to call the REST API - axios and support routing - vue-router
- Create a view component for showing a list of course details and include it in the Application Component -
Courses.vue - Invoking Retrieve Courses REST API from Vue Component - To enable this we will create a service to call the REST API using the axios framework -
CourseDataService.js.Courses.vuewill make use ofCourseDataService.js
Let’s start with creating an Application Component - InstructorApp.vue
/src/components/InstructorApp.vue
<template>
    <div>
        This is instructors test!
    </div>
</template>

<script>
export default {
    name: "InstructorApp"
}
</script>

<style scoped>

</style>
Few things to note:
- One of the first things you would need to understand about Vue is the concept of the component. Vue component is consist of
template,scriptandstyle. templateis nothing but the HTML template with Vue directivesscriptis javascript code to write for the Vue modulestyleis CSS for the Vue module
Let’s update the App.vue to display the InstructorApp component.
src/App.vue
<template>
  <div class="container">
    <InstructorApp />
  </div>
</template>

<script>
import InstructorApp from './components/InstructorApp.vue'

export default {
  name: 'In28Minutes',
  components: {
    InstructorApp
  }
}
</script>

<style>
@import url(https://unpkg.com/[email protected]/dist/css/bootstrap.min.css)
</style>
Few things to note:
import InstructorApp from './components/InstructorApp'- Importing the InstructorApp component<InstructorApp />- Display the Instructor App component.@import url(https://unpkg.com/[email protected]/dist/css/bootstrap.min.css)- Add styling to application
When you launch the Vue app in the browser, it will appear as shown below:

Adding Frameworks to Vue Application
In this project, we will make use of axios to execute REST APIs, vue-router to do the Routing between pages. Let’s stop the front end app running in the command prompt and execute these commands.
npm add axios
npm add vue-router
When commands execute successfully, you would see new entries in package.json
    "axios": "^0.19.0",
    "vue-router": "^3.1.3"
You can run ‘npm start’ to relaunch the front end app loading up all the new frameworks.
Creating a List Courses Component
Let’s create a new component for showing the List of courses - ListCoursesComponent.vue. For now, let’s hardcode a course into the course list.
/src/components/ListCoursesComponent.vue
<template>
  <div class="container">
    <h3>All Courses</h3>
    <div class="container">
      <table class="table">
        <thead>
          <tr>
            <th>Id</th>
            <th>Description</th>
          </tr>
        </thead>
        <tbody>
          <tr>
            <td>1</td>
            <td>Learn Full stack with Spring Boot and Vue</td>
          </tr>
        </tbody>
      </table>
    </div>
  </div>
</template>

<script>
export default {
  name: "CoursesList"
};
</script>

<style>
</style>
Things to Note:
- It’s a simple component. Returning a hardcoded table displaying a list of courses.
Let’s update the InstructorApp component to display the ListCoursesComponent.
/src/components/InstructorApp.vue
<template>
  <div>
    <h1>Instructor Application</h1>
    <ListCoursesComponent></ListCoursesComponent>
  </div>
</template>

<script>
import ListCoursesComponent from "./ListCoursesComponent";
export default {
  name: "InstructorApp",
  components: {
    ListCoursesComponent
  }
};
</script>

<style scoped>
</style>
We are importing the ListCoursesComponent and displaying it in the InstructorApp.
When you launch the Vue JS app in the browser, it will appear as shown below:

Invoking Retrieve Courses REST API from Vue JS Component
We had created the REST API for retrieving the list of courses earlier. To call the REST API we would need to use a framework called axios.
Axios is a Promise based HTTP client for the browser and node.js
Axios is a frontend framework that helps you make
- REST API calls with different request methods including GET, POST, PUT, DELETE etc
- Intercept Front end REST API calls and add headers and request content
Let’s create a data service method to call the REST API.
/src/service/CourseDataService.js
import axios from "axios";

const INSTRUCTOR = "in28minutes";
const COURSE_API_URL = "http://localhost:8080";
const INSTRUCTOR_API_URL = `${COURSE_API_URL}/instructors/${INSTRUCTOR}`;

class CourseDataService {
  retrieveAllCourses() {
    return axios.get(`${INSTRUCTOR_API_URL}/courses`);
  }
}

export default new CourseDataService();
Important points to note:
const INSTRUCTOR_API_URL = `${COURSE_API_URL}/instructors/${INSTRUCTOR}`- We are forming the URL to call in a reusable way.axios.get(`${INSTRUCTOR_API_URL}/courses`)- Call the REST API with the GET method.export default new CourseDataService()- We are creating an instance of CourseDataService and making it available for other components.
To make the REST API call, we would need to call the CourseDataService - retrieveAllCourses method from the ListCoursesComponent
Important snippets are shown below:
<script>
import CourseDataService from '../service/CourseDataService';
export default {
  name: "CoursesList",
  data() {
    return {
      INSTRUCTOR: "in28minutes"
    };
  },
  methods: {
    refreshCourses() {
      CourseDataService.retrieveAllCourses(this.INSTRUCTOR) //HARDCODED
        .then(response => {
          console.log(response.data);
        });
    }
  },
  created() {
    this.refreshCourses();
  }
};
</script>
Things to note:
created()- Vue defines a component lifecycle. created will be called as soon as the component is mounted. We are calling refreshCourses as soon as a component is mounted.methods: { refreshCourses() {}}- Any method in a vue component should be under methods. -CourseDataService.retrieveAllCourses(INSTRUCTOR).then- This would make the call to the REST API. You can define how to process the response in the then method.
When you run the vue app in the browser right now, you would see the following errors in the console
[Error] Access to XMLHttpRequest at 'http://localhost:8080/instructors/in28minutes/courses' from origin 'http://localhost:8081' has been blocked by CORS policy: No 'Access-Control-Allow-Origin' header is present on the requested resource.
[Error] Uncaught (in promise) Error: Network Error
    at createError (createError.js?2d83:16)
    at XMLHttpRequest.handleError (xhr.js?b50d:81)
The Backend Spring Boot REST API is running on http://localhost:8080, and it is not allowing requests from other servers - http://localhost:8081, in this example.
Let’s configure Rest Resource to allow access from specific servers.
@CrossOrigin(origins = { "http://localhost:3000", "http://localhost:4200", "http://localhost:8081" })
@RestController
public class CourseResource {
An important thing to note
- @CrossOrigin(origins = { “http://localhost:3000”, “http://localhost:4200”, “http://localhost:8081” }) - Allow requests from specific origins
- We will use 3000 to run React, and 8081 to run Vue JS apps, and we use 4200 to run Angular apps. Hence we are allowing requests from all ports.
If you refresh the page again, you would see the response from server printed in the console.
We would need to use the data from the response and show it on the component.
In Vue, we use the state to do that.
Following snippet highlights the significant changes
<script>
import CourseDataService from '../service/CourseDataService';
export default {
  name: "CoursesList",
  data() {
    return {
      courses: [],
      message: null,
      INSTRUCTOR: "in28minutes"
    };
  },
  methods: {
    refreshCourses() {
      CourseDataService.retrieveAllCourses(this.INSTRUCTOR) //HARDCODED
        .then(response => {
          this.courses = response.data;
        });
    }
  },
  created() {
    this.refreshCourses();
  }
};
</script>
Important things to note:
courses: [], message: null,- To display courses, we need to make them available to the component. We add courses to the state of the component and initialize it in the constructor.response => {this.courses = response.data;}- When the response comes back with data, we update the state.
We have data in the state. How do we display it?
We need to update the template.
<template>
  <div class="container">
    <h3>All Courses</h3>
    <div class="container">
      <table class="table">
        <thead>
          <tr>
            <th>Id</th>
            <th>Description</th>
          </tr>
        </thead>
        <tbody>
          <tr v-for="course in courses" v-bind:key="course.id">
            <td>{{course.id}}</td>
            <td>{{course.description}}</td>
          </tr>
        </tbody>
      </table>
    </div>
  </div>
</template>
Important things to note
v-for="course in courses"- Allow you to loop around a list of items and define how each item should be displayed.v-bind:key="course.id"- A key is used to uniquely identify a row.<td>{{course.id}}</td>- Decide how column is displayed<td>{{course.description}}</td>- Decide how column is displayed
When you launch the Vue app in the browser, it will appear as shown below:

Congratulations! You have successfully integrated Vue with a REST API. Time to celebrate!
Step 4: Adding Delete Feature to List Courses Page
To be able to do this
- We need a REST API in Spring Boot Backend for deleting a course
- We would need to update Vue frontend to use the API
Adding Delete Method in the Backend REST API
It should be easy.
Snippets below show how we create a simple deleteById method in CoursesHardcodedService and expose it from CourseResource.
@Service
public class CoursesHardcodedService {

  public Course deleteById(long id) {
    Course course = findById(id);

    if (course == null)
      return null;

    if (courses.remove(course)) {
      return course;
    }

    return null;
  }
public class CourseResource {

  @DeleteMapping("/instructors/{username}/courses/{id}")
  public ResponseEntity<Void> deleteCourse(@PathVariable String username, @PathVariable long id) {

    Course course = courseManagementService.deleteById(id);

    if (course != null) {
      return ResponseEntity.noContent().build();
    }

    return ResponseEntity.notFound().build();
  }
Important things to note:
@DeleteMapping("/instructors/{username}/courses/{id}")- We are mapping the Delete Request Method with two path variables@PathVariable String username, @PathVariable long id- Defining the variables for Path VariablesResponseEntity.noContent().build()- If Request is successful, return no content backResponseEntity.notFound().build()- If delete failed, return error - resource not found.
Enhancing Vue app with Delete Course Feature
Let’s add deleteCourse method to CourseDataService. As you can see it execute the delete request to specific course api url.
deleteCourse(name, id) {
    return axios.delete(`${INSTRUCTOR_API_URL}/courses/${id}`);
}
We can add a delete button corresponding to each of the courses:
<td>
  <button class="btn btn-warning" v-on:click="deleteCourseClicked(course.id)">
    Delete
  </button>
</td>
On click of the button we are calling the deleteCourseClicked method passing the course id. The implementation for deleteCourseClicked is shown below:
When we get a successful response for delete API call, we set a message into state and refresh the courses list.
methods: {
  ...
  deleteCourseClicked(id) {
    CourseDataService.deleteCourse(this.INSTRUCTOR, id).then(response => {
      this.message = `Delete of course ${id} Successful`;
      this.refreshCourses();
    });
  }
}
We display the message just below the header
<h3>All Courses</h3>
<div v-if="message" class="alert alert-success">
  {{message}}
</div>
Complete ListCoursesComponent, at this stage, is shown below:
<template>
  <div class="container">
    <h3>All Courses</h3>
    <div v-if="message" class="alert alert-success">
      {{message}}
    </div>
    <div class="container">
      <table class="table">
        <thead>
          <tr>
            <th>Id</th>
            <th>Description</th>
          </tr>
        </thead>
        <tbody>
          <tr v-for="course in courses" v-bind:key="course.id">
            <td>{{course.id}}</td>
            <td>{{course.description}}</td>
            <td>
              <button
                class="btn btn-warning"
                v-on:click="deleteCourseClicked(course.id)"
              >
                Delete
              </button>
            </td>
          </tr>
        </tbody>
      </table>
    </div>
  </div>
</template>

<script>
  import CourseDataService from "../service/CourseDataService";
  export default {
    name: "CoursesList",
    data() {
      return {
        courses: [],
        message: null,
        INSTRUCTOR: "in28minutes"
      };
    },
    methods: {
      refreshCourses() {
        CourseDataService.retrieveAllCourses(this.INSTRUCTOR) //HARDCODED
          .then(response => {
            this.courses = response.data;
          });
      },
      deleteCourseClicked(id) {
        CourseDataService.deleteCourse(this.INSTRUCTOR, id).then(response => {
          this.message = `Delete of course ${id} Successful`;
          this.refreshCourses();
        });
      }
    },
    created() {
      this.refreshCourses();
    }
  };
</script>

<style></style>
When you launch the Vue app in the browser, it will appear as shown below:

When you click the delete button, the course will be deleted.
Updating Course Details
To be able to update the course details, we would need to create a new component to represent the todo form.
Let’s start with creating a simple component.
/src/components/CourseComponent.vue
<template>
  <div>
    <h1>Course Details</h1>
  </div>
</template>

<script>
export default {
  name: "courseDetails",
};
</script>

<style>
</style>
Implementing Routing
When the user clicks the update course button on the course listing page, we would want to route to the course page. How do we do it? That’s where Routing comes into the picture.
/src/routes.js
import Vue from "vue";
import Router from "vue-router";

Vue.use(Router);

const router = new Router({
  mode: "history", // Use browser history
  routes: [
    {
      path: "/",
      name: "Home",
      component: () => import("./components/Courses")
    },
    {
      path: "/courses",
      name: "Courses",
      component: () => import("./components/Courses")
    },
    {
      path: "/courses/:id",
      name: "Course Details",
      component: () => import("./components/Course")
    }
  ]
});

export default router;
/src/App.vue
<template>
  <div class="container">
    <router-view/>
  </div>
</template>

<script>
export default {
  name: "app"
};
</script>

<style>
@import url(https://unpkg.com/[email protected]/dist/css/bootstrap.min.css);
</style>
/src/main.js
import Vue from "vue";
import App from "./App.vue";
import router from "./routes";

Vue.config.productionTip = false;

new Vue({
  router,
  render: h => h(App)
}).$mount("#app");
We are defining a Router around all the components and configuring paths to each of them.
http://localhost:8081/takes you to home pagehttp://localhost:8081/coursestakes you to course listing pagehttp://localhost:8081/courses/2takes you to course page
When you launch the Vue app in the browser using this URL http://localhost:8081/courses/2, it will appear as shown below:

Adding Update Button to Course Listing Page
Let’s add update button to the course listing page.
/src/components/ListCoursesComponent.vue
<template>
  <table class="table">
    <thead>
      <tr>
        ...
        <th>Update</th>
        <th>Delete</th>
      </tr>
    </thead>
    <tbody>
      <tr v-for="course in courses" v-bind:key="course.id">
        ...
        <td><button class="btn btn-success" v-on:click="updateCourseClicked(course.id)">Update</button></td>
        <td><button class="btn btn-warning" v-on:click="deleteCourseClicked(course.id)">Delete</button></td>
      </tr>
    </tbody>
  </table>
  ....
</template>
We can create the add updateCourseClicked method to redirect to Course Component and add the binding in the constructor method.
methods: {
  ...
  updateCourseClicked(id) {
    this.$router.push(`/courses/${id}`);
  },
}
Adding Add button to Course Listing Page
Let’s add an Add button at the bottom of Course Listing Page.
/src/components/ListCoursesComponent.vue
<!-- At the end of table -->
<div class="row">
    <button class="btn btn-success" v-on:click="addCourseClicked()">Add</button>
</div>
Let’s add the appropriate method to handle click of Add button.
methods: {
  ...
  addCourseClicked() {
    this.$router.push(`/course/-1`);
  },
}
When you launch the Vue app in the browser using this URL http://localhost:8081, it will appear as shown below:

Clicking any of the Update or Add buttons would take you to the Course Component.
Create API to Retrieve Specific Course Details
Now that we have the course component beinging rendered on the click of update button, let’s start focusing on getting the course details from the REST API.
Let’s add findById method to CoursesHardcodedService. It retrieves the details of a specific course based on it.
public Course findById(long id) {
  for (Course course: courses) {
    if (course.getId() == id) {
      return course;
    }
  }
  return null;
}
Let’s add getCourse method to CourseResource class. It exposes the GET method to get the details of a specific course based on id.
@GetMapping("/instructors/{username}/courses/{id}")
public Course getCourse(@PathVariable String username, @PathVariable long id) {
  return courseManagementService.findById(id);
}
Invoking the API from Course Component
How do we invoke the retrieve course details from the Vue frontend?
Let’s add retrieveCourse method to CourseDataService
retrieveCourse(name, id) {
    return axios.get(`${INSTRUCTOR_API_URL}/courses/${id}`);
}
We would want to call the retrieveCourse method in CourseDataService on the load of CourseComponent.
How do we do it?
Yes.
createdis the right solution.
Before we get to it we would need to be able to get the course id from the URL. In the course details page, we are redirecting to the url /courses/${id}. From the path parameter, we would want to capture the id. We can use this.$route.params.id to get the id from path parameters.
The code listing below shows the updated CourseComponent.
<template>
  <div>
      <h3>Course</h3>
      <div>{{id}}</div>
      <div>{{description}}</div>
  </div>
</template>

<script>
import CourseDataService from '../service/CourseDataService';
export default {
  name: "courseDetails",
  data() {
    return {
      description: "",
      INSTRUCTOR: "in28minutes",
      errors: []
    };
  },
  computed: {
    id() {
      return this.$route.params.id;
    }
  },
  methods: {
    refreshCourseDetails() {
        CourseDataService.retrieveCourse(this.INSTRUCTOR, this.id).then(res => {
          this.description = res.data.description;
        });
    },
  },
  created() {
    this.refreshCourseDetails();
  }
};
</script>

<style>
</style>
We are setting the details of the course into data.
Note the data can be computed at runtime using computed function. Here id is taken from url params
computed: {
  id() {
    return this.$route.params.id;
  }
},
In created - refreshCourseDetails, we are calling the CourseDataService.retrieveCourse to get the details for a course. Once we have the details, we are updating the state.
CourseDataService.retrieveCourse(this.INSTRUCTOR, this.id).then(res => {
  this.description = res.data.description;
});
We are updating the template to show the course details from component.
<div>
    <h3>Course</h3>
    <div>{{id}}</div>
    <div>{{description}}</div>
</div>
When you try to update a course, you would see the screen below.

When you try to create a course, you would see the screen below.

Create a Form
Now that we have loaded up the details of a specific course, let’s shift out our attention to editing them and saving them back to the database.
Let’s now create a simple form.
<template>
  <div>
    <h3>Course</h3>
    <div class="container">
      <form>
        <fieldset class="form-group">
          <label>Id</label>
          <input type="text" class="form-control" v-model="id" disabled>
        </fieldset>
        <fieldset class="form-group">
          <label>Description</label>
          <input type="text" class="form-control" v-model="description">
        </fieldset>
        <button class="btn btn-success" type="submit">Save</button>
      </form>
    </div>
  </div>
</template>
Following are some of the important details:
- Form creation in Vue is similar as creating form in HTML
v-modelis binding input to the data, same is with description, it will automaticall display initial values.<input type="text" class="form-control" v-model="id" disabled>- Creating a disabled text element for id. v-model value should match data.<input type="text" class="form-control" v-model="description">- Creating a text element for description.<button class="btn btn-success" type="submit">Save</button>- Adding a submit button.
When you try to update a course, you would see the screen below.

Adding Handling of Submit Event
Let’s try to handle the Submit event now.
Let’s create an onSubmit method to log the values
methods: {
  ...
  validateAndSubmit(e) {
    console.log({
      id: this.id,
      description: this.description
    })
  }
}
It’s time to tie up the form with the submit method. The key snippet is @submit="validateAndSubmit".
<form @submit="validateAndSubmit">
When you click Submit, the form details are now printed to the console.
{id: "1", description: "Learn Full stack with Spring Boot and Vue"}
Adding Validation using Formik
What’s a form without validation?
Let’s add validations.
validate(values) {
    e.preventDefault();
    this.errors = [];
    if(!this.description) {
        this.errors.push("Enter valid values");
    } else if(this.description.length < 5) {
        this.errors.push("Enter atleast 5 characters in Description");
    }
}
We are adding two validations:
- check for empty description
- check for a minimum length of 5
You can add other validations as you need.
If you run the page right now and submit invalid description, you would see that validations prevent the form from getting submitted.
How do we see validation messages on the screen?
Let’s add error message to the field:
<form @submit="validateAndSubmit">
  <div v-if="errors.length">
    <div class="alert alert-warning" v-bind:key="index" v-for="(error, index) in errors"></div>
  </div>
  ...
</form>
When you try to update a course, you would see the screen below.

Updating Course Details on click of submit
Now that the form is ready, we would want to call the backend API to save the course details.
Let’s quickly create the API to Update and Create Courses.
Create API to Update Course
Let’s add a save method to CoursesHardcodedService to handle creation and updation of course.
public Course save(Course course) {
  if (course.getId() == -1 || course.getId() == 0) {
    course.setId(++idCounter);
    courses.add(course);
  } else {
    deleteById(course.getId());
    courses.add(course);
  }
  return course;
}
Let’s add a method to the Resource class to update the course. We are using PUT method to update the course. On course updation, we are returning 200 status with updaated course details in the body.
  @PutMapping("/instructors/{username}/courses/{id}")
  public ResponseEntity<Course> updateCourse(@PathVariable String username, @PathVariable long id,
      @RequestBody Course course) {

    Course courseUpdated = courseManagementService.save(course);

    return new ResponseEntity<Course>(courseUpdated, HttpStatus.OK);
  }
Adding API to Create Course
Let’s add a method to the Resource class to create the course. We are using POST method to create the course. On course updation, we are returning a status of CREATED.
  @PostMapping("/instructors/{username}/courses")
  public ResponseEntity<Void> createCourse(@PathVariable String username, @RequestBody Course course) {

    Course createdCourse = courseManagementService.save(course);

    // Location
    // Get current resource url
    /// {id}
    URI uri = ServletUriComponentsBuilder.fromCurrentRequest().path("/{id}").buildAndExpand(createdCourse.getId())
        .toUri();

    return ResponseEntity.created(uri).build();
  }
Invoking Update and Create APIs from Course Screen
Now that the REST API is ready, let’s create the frontend methods to call them.
Let’s create respective methods in the CourseDataService. updateCourse uses a put and createCourse uses post.
class CourseDataService {
  updateCourse(name, id, course) {
      return axios.put(`${INSTRUCTOR_API_URL}/courses/${id}`, course);
  }

  createCourse(name, course) {
      return axios.post(`${INSTRUCTOR_API_URL}/courses/`, course);
  }
Let’s update the CourseComponent to invoke the right service on the click of the submit button.
    validateAndSubmit(e) {
        e.preventDefault();
        this.errors = [];
        if(!this.description) {
            this.errors.push("Enter valid values");
        } else if(this.description.length < 5) {
            this.errors.push("Enter atleast 5 characters in Description");
        }

        if(this.errors.length === 0) {
            if (this.id === -1) {
                CourseDataService.createCourse(this.INSTRUCTOR, {
                    description: this.description
                })
                .then(() => {
                    this.$router.push('/courses');
                });
            } else {
                CourseDataService.updateCourse(this.INSTRUCTOR, this.id, {
                    id: this.id,
                    description: this.description
                })
                .then(() => {
                    this.$router.push('/courses');
                });
            }
        }
    }
We are creating a course object with the updated details and calling the appropriate method on the CourseDataService. Once the request is successful, we are redirecting the user to the course listing page using this.$router.push('/courses').
Congratulations! You are reading an article from a series of 50+ articles on Spring Boot and Vue. We also have 20+ projects on our Github repository. For the complete set of 50+ articles and code examples, click here.
Downloading the Complete Maven Project With Code Examples
Following GitHub repository hosts the complete frontend and backend projects - https://github.com/in28minutes/spring-boot-vuejs-fullstack-examples/tree/master/spring-boot-crud-full-stack
Our Github repository has all the code examples - https://github.com/in28minutes/spring-boot-vuejs-fullstack-examples
Next Steps
You can pursue our amazing courses on Full Stack Development and Microservices.

Just Released