Spring Boot Starter Security
This guide will help you understand the different features that Spring Boot Starter Security brings in, using two examples:
- A REST Service
- A Simple Web Application Page
Spring Boot Starter Security makes it very easy to secure your applications by providing:
- Default authentication and authorization
- Integration with common security standards (basic auth, form login, OAuth2, JWT, etc.)
- Auto-configuration that works out-of-the-box, but can be customized as needed.

You will learn
- What is Spring Boot Starter Security?
- What features are provided by Spring Boot Starter Security?
- How do you enable Spring Security on a web application?
- How do you enable Spring Security on a REST Web Service?
- How do you invoke a REST Service using Basic Authentication?
- Example: securing a simple Web Application
- Example: securing a REST Service with Basic Authentication
Tools you will need
- Maven 3.0+ as your build tool
- Your favorite IDE (Eclipse or IntelliJ IDEA recommended)
- JDK 17+
Complete Maven Project With Code Examples
Our GitHub repository has all the code examples - https://github.com/in28minutes/in28minutes.github.io/tree/master/code-zip-files
- Spring Security Example
Website-SpringSecurityStarterWebApplication_Final.zip
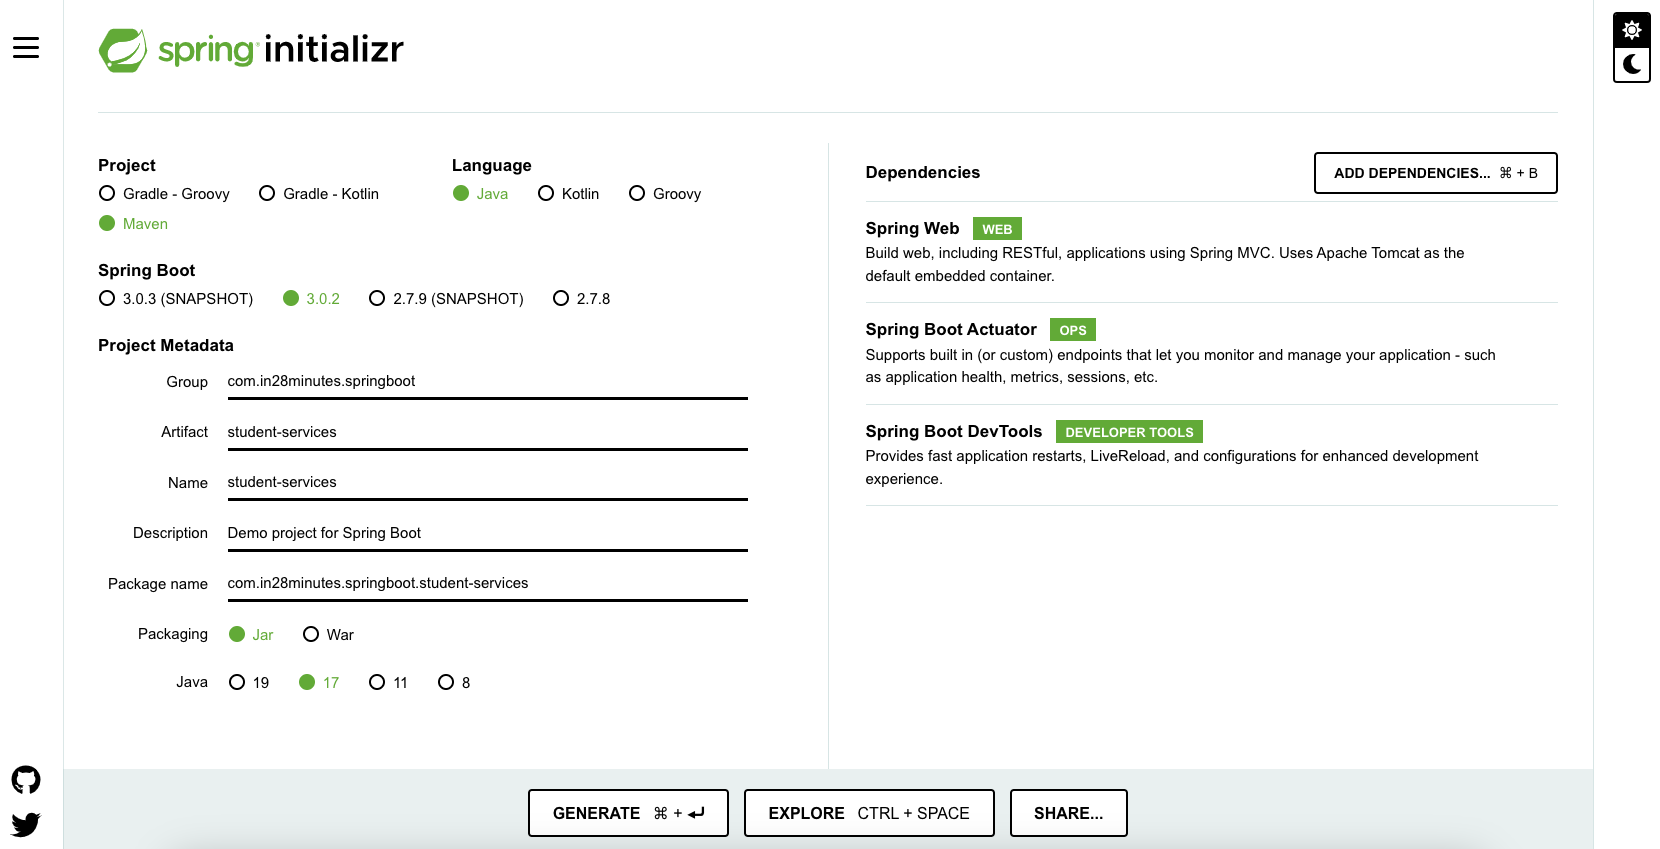
Bootstrapping Web Application with Spring Initializr
Using Spring Initializr to create a Web application is very simple.
For both the web page and the REST service, we will use Spring Web MVC as our web framework.
Spring Initializr: http://start.spring.io/ is a great tool to bootstrap your Spring Boot projects.

As shown in the image above, following steps have to be done
Steps to Launch Spring Initializr
- Launch Spring Initializr and choose the following:
- Group:
com.in28minutes.springboot - Artifact:
student-services - Dependencies:
- Web
- Group:
- Click Generate Project.
- Import the project into Eclipse or IntelliJ IDEA (or your favorite IDE).
- If you want to understand all the files that are part of this project, you can go here.
Setting up a Simple Web Application
Let’s rapidly secure a basic web application with Spring Security.
We’ll create a simple Controller that redirects to the welcome view – just a basic JSP.
JSP Support
As the view, we intend to use JSP.
Since Tomcat is the default embedded servlet container for Spring Boot Starter Web,
we need to add a dependency on tomcat-embed-jasper to enable JSP support.
<dependency>
    <groupId>org.apache.tomcat.embed</groupId>
    <artifactId>tomcat-embed-jasper</artifactId>
    <scope>provided</scope>
    // default for IntelliJ IDE
</dependency>
Adding Login Controller
We will create a LoginController to handle the root URL /.
- The
showLoginPage()function will be mapped to/. - The
Modelwill be pre-populated with a hardcoded name. - It will return a view with the name
"welcome", which maps towelcome.jsp.
package com.in28minutes.springboot.web.controller;

import org.springframework.stereotype.Controller;
import org.springframework.ui.ModelMap;
import org.springframework.web.bind.annotation.RequestMapping;
import org.springframework.web.bind.annotation.RequestMethod;

@Controller
public class LoginController {

    @RequestMapping(value = "/", method = RequestMethod.GET)
    public String showLoginPage(ModelMap model) {
        model.put("name", "in28Minutes");
        return "welcome";
    }

}
Adding welcome.jsp
welcome.jsp is a simple JSP page that displays a welcome message to the user.
<div class="container">
    Welcome ${name}!!
</div>
Configure a View Resolver
welcome.jsp is placed under src/main/webapp/WEB-INF/jsp/.
To map the view name (like "welcome") returned from the controller to the actual JSP file, we configure a view
resolver in application.properties.
spring.mvc.view.prefix=/WEB-INF/jsp/
spring.mvc.view.suffix=.jsp
Run the Web Application
Start the StudentServicesApplication.java program as a Spring Boot Application.
Once started, the application will run on the default port 8080.
You can access it at:
At this point, the LoginController will redirect you to the welcome.jsp page, displaying the welcome message.

Add a Simple REST Service
Let’s also provide a basic REST Service. We will include:
- Model Objects:
CourseandStudent.- A student may enroll in many courses.
- Business Service:
StudentService- Handles the business logic.
- Uses hardcoded data stored in a static
ArrayList.
- REST Controller:
StudentController- Exposes one REST endpoint to fetch the list of courses for which a student is registered.
REST Endpoint Example
@GetMapping("/students/{studentId}/courses")
Retrieves all courses a given student is enrolled in.
Model and Business Logic
The following excerpts are taken from the model objects Course and Student.
- A Course represents a subject with details such as
id,name, anddescription. - A Student represents a learner and includes information along with the list of courses they are enrolled in.
The business logic is handled by the StudentService class.
- It uses a static
ArrayListto store student data. - The data is hardcoded for simplicity.
- Its primary function is to retrieve the list of courses for a specific student.
public class Course {
    private String id;
    private String name;
    private String description;
    private List<String> steps;
}
public class Student {
    private String id;
    private String name;
    private String description;
    private List<Course> courses;
}
StudentService provides a method public List<Course> retrieveCourses(String studentId) to retrieve the courses a
student registered for.
@Component
public class StudentService {

    private static List<Student> students = new ArrayList<>();

    static {
        // Initialize Data
        Course course1 = new Course("Course1", "Spring", "10 Steps",
                List.of("Learn Maven", "Import Project", "First Example",
                        "Second Example"));
        Course course2 = new Course("Course2", "Spring MVC", "10 Examples",
                List.of("Learn Maven", "Import Project", "First Example",
                        "Second Example"));

        Student ranga = new Student("Student1", "Ranga Karanam",
                "Hiker, Programmer and Architect", new ArrayList<>(
                List.of(course1, course2)));

        students.add(ranga);
    }

    public Student retrieveStudent(String studentId) {
        for (Student student : students) {
            if (student.getId().equals(studentId)) {
                return student;
            }
        }
        return null;
    }

    public List<Course> retrieveCourses(String studentId) {
        Student student = retrieveStudent(studentId);

        return student == null > null :student.getCourses();

    }
}
Creating REST Service
Rest Service StudentController exposes a simple Get service at URI mapping “/students/{studentId}/courses”. The
StudentService is auto-wired in.
package com.in28minutes.springboot.controller;

import java.util.List;

import org.springframework.beans.factory.annotation.Autowired;
import org.springframework.web.bind.annotation.GetMapping;
import org.springframework.web.bind.annotation.PathVariable;
import org.springframework.web.bind.annotation.RestController;

import com.in28minutes.springboot.model.Course;
import com.in28minutes.springboot.service.StudentService;

@RestController
public class StudentController {

    @Autowired
    private StudentService studentService;

    @GetMapping("/students/{studentId}/courses")
    public List<Course> retrieveCoursesForStudent(@PathVariable String studentId) {
        return studentService.retrieveCourses(studentId);
    }
}
Executing REST Service
Running the REST Service is simple.
Open the URL http://localhost:8080/students/Student1/courses in your browser or use your favorite REST client (e.g.,
Postman).

Add Spring Boot Starter Security
Next, let’s add the Spring Boot Starter Security dependency to our project.
This will enable authentication and authorization features for both our web application and REST services.
<dependency>
    <groupId>org.springframework.boot</groupId>
    <artifactId>spring-boot-starter-security</artifactId>
</dependency>
New Dependencies
The screenshot below shows the additional dependencies that are included when we add spring-boot-starter-security.
These libraries provide the core functionality required for securing web applications and REST services.

Auto Configuration
After restarting the application, you will notice the following statements printed in the logs.
These messages indicate that Spring Boot has automatically configured Spring Security for your application.
Mapping filter: 'springSecurityFilterChain' to: [/*]

Using default security password: 25e07e82-720d-4109-ba8d-25177c6347e6

Creating filter chain:
...
...
All this magic happens because of Spring Boot Auto-Configuration:
Mapping filter: 'springSecurityFilterChain' to: [/*]- Spring Security is automatically enabled for all URLs in the application.
- Basic Authentication is applied by default.
Using default security password: 25e07e82-720d-4109-ba8d-25177c6347e6- The default username is user.
- The default password is randomly generated and printed in the startup log.
- In this example, the password is
25e07e82-720d-4109-ba8d-25177c6347e6.
- Several filter chains are auto-configured to enforce security.
Executing the REST Service
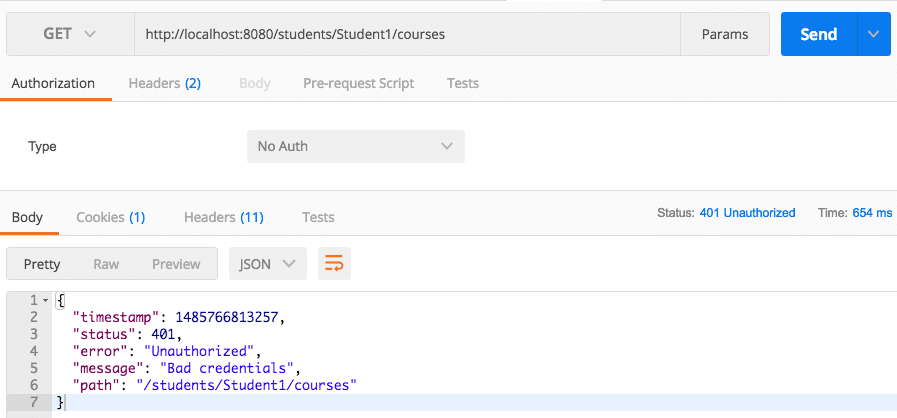
When we execute the REST service at http://localhost:8080/students/Student1/courses, it now returns an *
*authentication failure**.
- The HTTP status is
401 Unauthorized. - The response message is
"Bad credentials". - This happens because the service is now protected by Spring Security.
{
  "timestamp": 1485768623632,
  "status": 401,
  "error": "Unauthorized",
  "message": "Bad credentials",
  "path": "/students/Student1/courses"
}
- Make sure to provide the correct username and password, as the service is now secured with Spring Security.
Executing REST Service with Basic Authentication
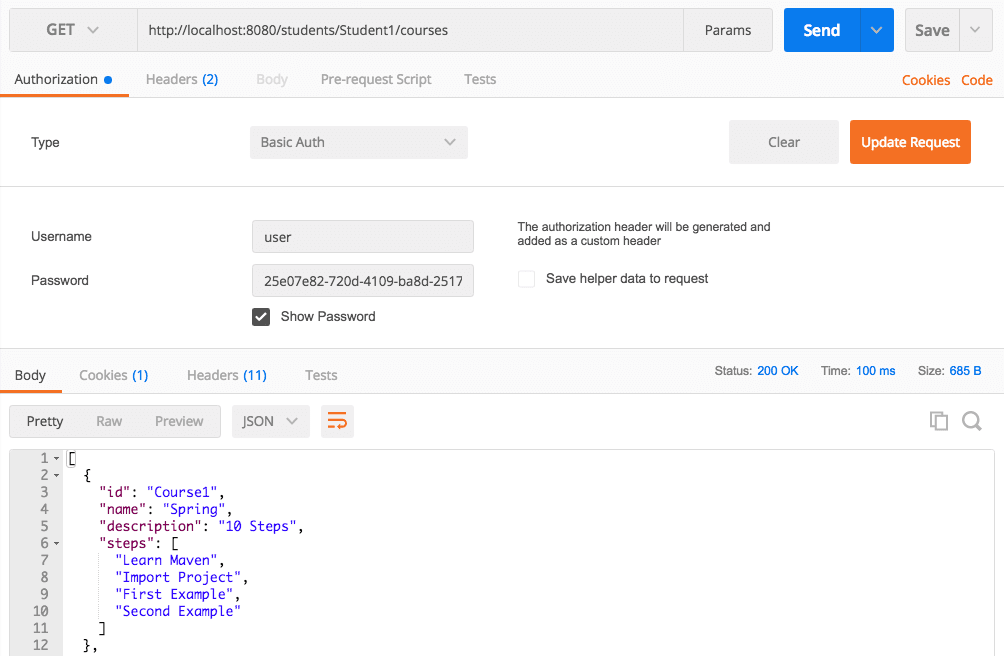
Retrieve the password from the application log by looking for Using default security password:.
The default username is user.
Use this username and password combination to access the service using Basic Authentication, as illustrated in the screenshot below.
Running the Web Application
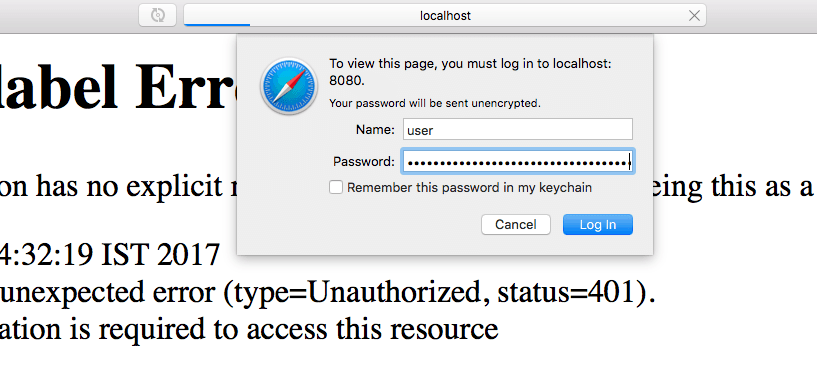
When you open the URL http://localhost:8080 in your browser, a popup will appear requesting a username and password.
Enter the same credentials that you used for the REST Service.
That’s quite a bit of functionality we enabled just by adding the simple dependency Spring Boot Starter Security.
Configuring Custom Users and Roles
Now let’s configure custom users and roles:
- We will define two roles: Admin and User.
- The Admin role will have access to the web application.
- The User role will have access to execute REST services.
- We will create one user for the Admin role with credentials:
admin1 / secret1. - We will create one user for the User role with credentials:
user1 / secret1.
package com.in28minutes.springboot.security;

import org.springframework.context.annotation.Configuration;
import org.springframework.security.config.annotation.authentication.builders.AuthenticationManagerBuilder;
import org.springframework.security.config.annotation.web.builders.HttpSecurity;
import org.springframework.security.config.annotation.web.configuration.WebSecurityConfigurerAdapter;

@Configuration
public class SecurityConfig {

    @Bean
    public SecurityFilterChain filterChain(HttpSecurity http) throws Exception {

        http.authorizeHttpRequests(
                auth -> auth.requestMatchers("/students/**")
                        .permitAll().anyRequest().authenticated());

        http.httpBasic(withDefaults());

        http.csrf().disable();

        return http.build();

    }

    @Bean
    public AuthenticationManager authenticationManager(UserDetailsService userDetailsService) {
        var authenticationProvider = new DaoAuthenticationProvider();
        authenticationProvider.setUserDetailsService(userDetailsService);

        return new ProviderManager(authenticationProvider);
    }

    @Bean
    public UserDetailsService userDetailsService() {
        UserDetails user = User.withUsername("user1")
                .password("{noop}secret1")
                .authorities("read")
                .roles("USER")
                .build();
        UserDetails userOne = User.withUsername("admin1")
                .password("{noop}secret1")
                .authorities("read")
                .roles("ADMIN")
                .build();

        return new InMemoryUserDetailsManager(user, userOne);
    }

}
Executing REST Services
Now you can use the user1 / secret1 credentials to access the REST service.
Launching the Web Application
Use the admin1 / secret1 credentials in the authentication popup to access the web application.
