
In this article, we focus our attention on the Docker. Let’s learn the fundamentals of Docker with a hand example building and running Docker Image for a Java Spring Boot Application.
You will learn
- What is Docker?
- Why Is Docker Popular?
- Understand Docker Architecture
- How to install Docker?
- What is Docker Registry?
- How to create Docker Hello World Rest API Image and Pull from Registry?
- Deploy Hello World Spring Boot Application on Docker
- Docker Commands
What is Docker?
Microservices in microservices architectures are written in multiple languages - Java, Python, JavaScript and more. However, you do not want to have deployment processes to be different for each type of microservices.
How can we have the flexibility of building microservices in multiple languages while having the same runtime and deployment process?
How about creating an application package that contains
- Microservice application package (jar or war or js or python code)
- and the runtime it needs (JRE or Python or NodeJS)
This package contains everything that a microservice needs to run.
What does Docker do?
- Docker provides a common approach and format for building self contained packages for your microservices. Docker calls this package an image.
- Docker provides a runtime for running your image.
What does this enable?
- You can create Docker images for a wide variety of applications irrespective of their language, runtime or operating system.
- You can run Docker images (as containers) where ever Docker runtime is available.
Are you ready to jump into the world of Docker?
Why is Docker Popular?
Docker is popular because of the possibilites it opens for software delivery and deployment. Many common problems and inefficiences are resolved with containers.
The awesome thing about Docker is, you can easily install Docker on Cloud. Most of the cloud providers provide container based services
They provide services where you just need to provide a docker Image and it would automatically run on the cloud.
The Virtual Machine Legacy
Before Docker, virutal machines were very popular.
The image below shows the typical architecture with a Virtual Machine
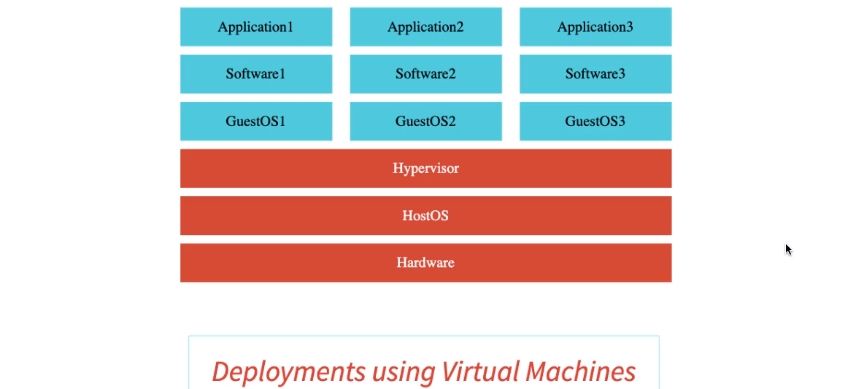
As you can see there are two operating systems present one is Guest OS and another is Host OS.
Due to this, virutal machine architecture becomes heavyweight. Hence you will not be able to benefit from the entire power of your hardware because of virutalization.
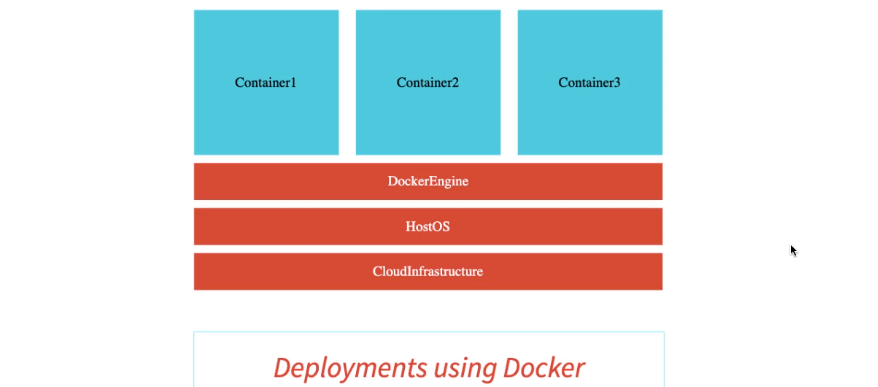
With Docker, all that you need to run containers is a Docker Engine. Other main reasons why Docker is popular is:
Docker Images Are Self Sufficient
The Docker image contains all that is needed to run a container: the libraries, the software are directly part of these containers.
Docker is Light Weight
Because there is just one OS, the host OS, Docker is relatively lightweight and therefore, is very efficient.
Docker Is Convenient For Cloud
All the cloud providers provide a number of container orchestration services around Docker.
- Azure provides a service called Azure Container Service.
- AWS, Amazon Web Services, provides a service called Elastic Container Service and also AWS Fargate.
Kubernetes is a popular container orchestration platform. All Cloud Providers provide services around Kubernetes.
The rise of microservice architecture also one of the reason for Docker popularity.
Understand Docker Architecture
Docker uses a client-server architecture. The Docker client talks to the Docker daemon, which does the heavy lifting of building, running, and distributing your Docker containers. The Docker client and daemon can run on the same system, or you can connect a Docker client to a remote Docker daemon. The Docker client and daemon communicate using a REST API, over UNIX sockets or a network interface.
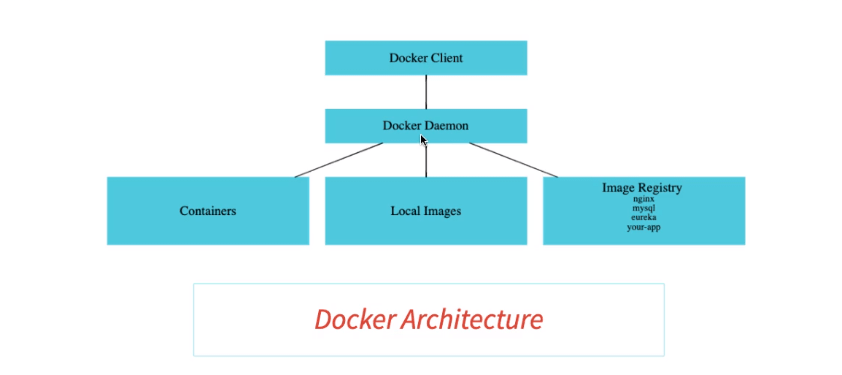
Docker daemon
The Docker daemon(dockerd) listens for Docker API requests and manages Docker objects such as images, containers, networks, and volumes. A daemon can also communicate with other daemons to manage Docker services.
It is responsible for
- Managing Containers
- Managing local Images
- Pulling images from the image registry if you need it
- Pushing a locally created image to an image registry
Docker Client
The Docker client(docker) is the primary way that many Docker users interact with Docker. When you use commands such as docker run, the client sends these commands to dockerd, which carries them out. The docker command uses the Docker API. The Docker client can communicate with more than one daemon.
Docker Registry
A Docker registry stores Docker images. Docker Hub is a public registry that anyone can use, and Docker looks for images on Docker Hub by default.
When you use the docker pull or docker run commands, the required images are pulled from your configured registry. When you use the docker push command, your image is pushed to your configured registry.
How to install Docker?
Docker makes the life of a developers and operations team simple.
Installing Docker today on most of the operating systems is really a cakewalk!
We recommend installing Docker Desktop on Mac and Windows.
- Mac - https://docs.docker.com/docker-for-mac/install/
- Windows - https://docs.docker.com/docker-for-windows/install/
On Linux, you can find instructions for your specific distribution at https://docs.docker.com/install/.
For verify whether it has been installed or not, open command prompt and type following command:
$ docker --version
Docker version 19.03.5, build 633a0ea
What is Docker Registry?
A Docker registry contains a lot of repositories, different versions of various applications. Since Docker Hub is a public registry, anybody can access it.
Typically, when we work in an enterprise, we use private repositories, so that our images can only be accessed by somebody who has the right credentials.
Docker Container for Spring Boot Hello World Application
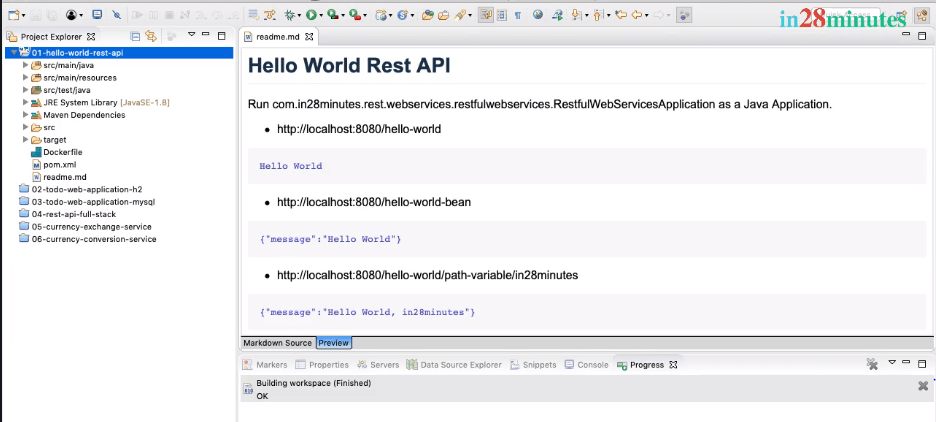
The complete project is located at https://github.com/in28minutes/docker-crash-course/tree/master/01-hello-world-rest-api.
You can clone or download the entire github repository and import this project as a maven project into eclipse.
Here is the screenshot of the project setup in Eclipse.
If you are new to Spring and Spring Boot, you can watch these - Spring in 10 Steps and Spring Boot in 10 Steps to understand how Spring and Spring Boot work together.
Let’s now build a Docker image for the Hello World Rest API. Let’s start with following a manual approach to create the image.
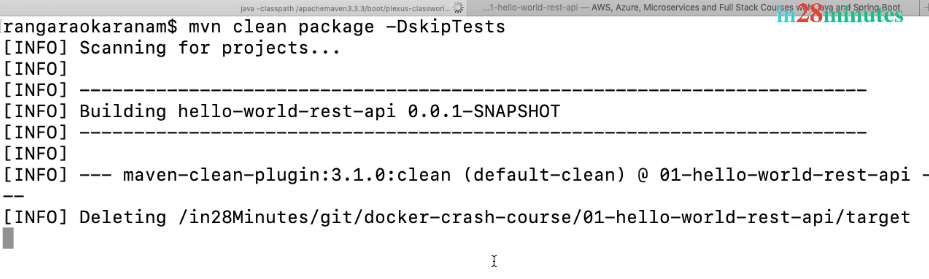
Step 1 : Create a JAR File
The first thing we need to do is build a JAR for the application. This particular application is packaged as a JAR file.
Building a JAR file should be really easy. All that you need to is do a clean Maven build, by say saying mvn clean package.
pom.xml :
		<groupId>com.in28minutes.rest.webservices</groupId>
		<artifactId>01-hello-world-rest-api</artifactId>
		<version>0.0.1-SNAPSHOT</version>
		<packaging>jar</packaging>
		<description>Demo project for Spring Boot</description>
		<name>hello-world-rest-api</name>
		<parent>
			<groupId>org.springframework.boot</groupId>
			<artifactId>spring-boot-starter-parent</artifactId>
			<version>2.1.7.RELEASE</version>
			<relativePath /> <!-- lookup parent from repository -->
		</parent>
This would compile the code, run the unit tests, and finally, a JAR would be packaged.

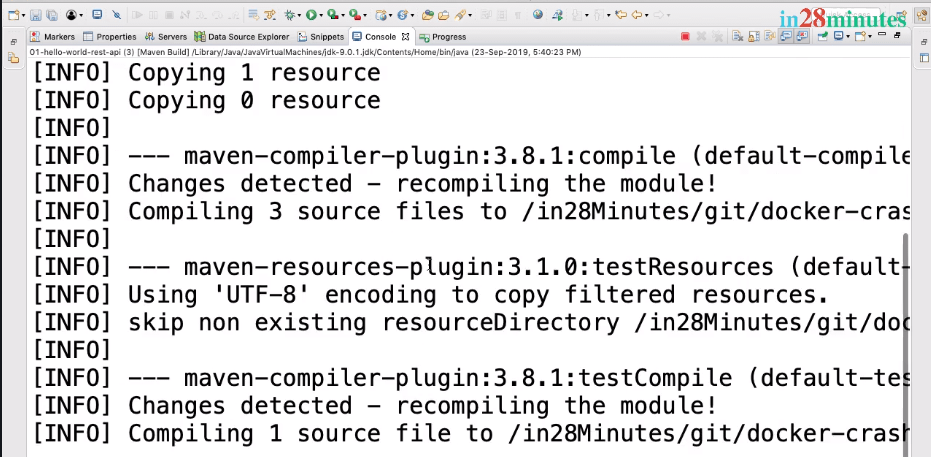
The name of the JAR is hello-world-rest-api.jar, and it is under the target folder.
The name of the JAR is coming in from pom.xml. If you search for something called FinalName in the build, we are configuring a name for this specific JAR, hello-world-rest-api.jar.
pom.xml :
	<build>
		<finalName>hello-world-rest-api</finalName>
		<plugins>
			<plugin>
				<groupId>org.springframework.boot</groupId>
				<artifactId>spring-boot-maven-plugin</artifactId>
			</plugin>
		</plugins>

	</build>
Step 2 : Decide the right base image
The second thing would be to setup the prerequisites for running the JAR file.
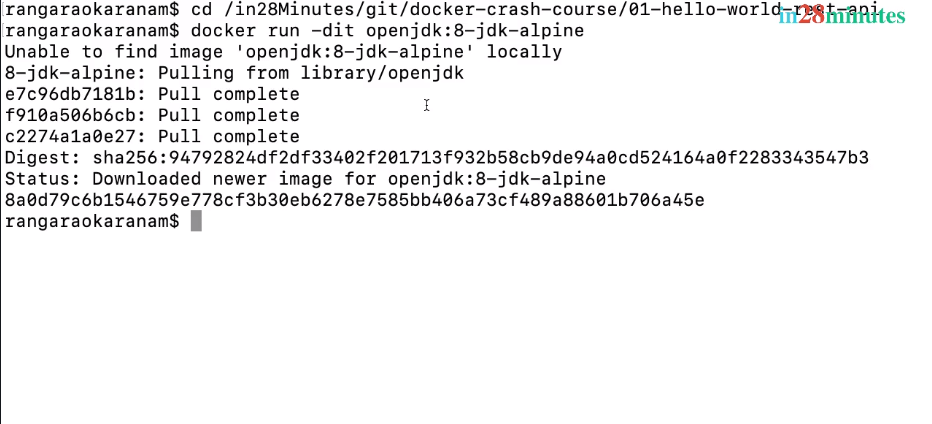
We need Java installed, and we’ll use a OpenJDK image, such as openjdk:8-jdk-alpine. This is the most popular image used to run Java 8.
Alpine images is based on AlpineLinux to keep the size of the image down.
Let’s now run the alpine jdk image.
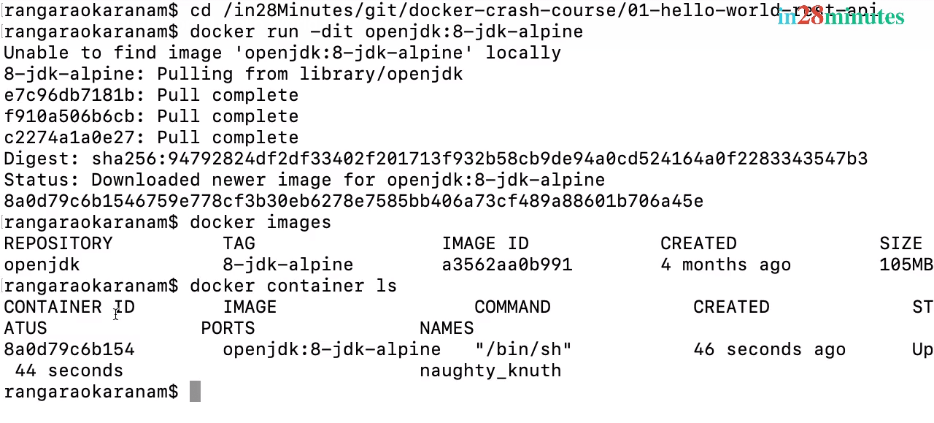
docker run -dit openjdk:8-jdk-alpine.
-dit>-dis actually something which allows us to run the container in a detached mode. The container is running but we want to be able to execute the commands in using an interactive shell. With-it, we are attaching a interactive shell to the running container. This allows us to execute a command against the running container.
openjdk:8-jdk-alpine image will be dowloaded from Docker Hub. It would take a little while as it is a large - 100 MB download.
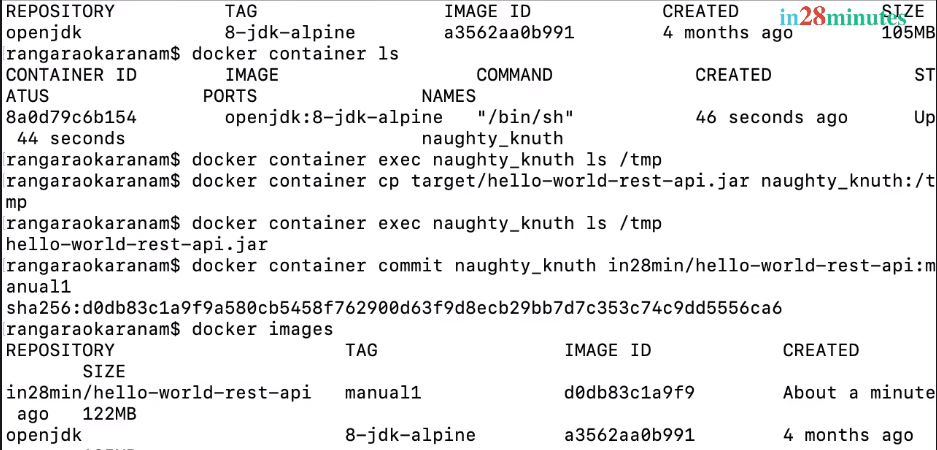
You can run docker images to see the downloaded image.
Run docker container ls to see the running container - naughty_knuth.
Step 3 : Copy the JAR File into Docker Image
The third step is to copy the JAR into the specific image. Then, we would want to be able to run the JAR as part of the container. Let’s get started with all that right now.
Copying The JAR File
Here’s the command to copy a jar file into the container:
docker container cp target/hello-world-rest-api.jar naughty_knuth:/tmp
You can also use the ID of the container.
docker container cp target/hello-world-rest-api.jar 54cf414254e48d5f68c4d468b2dd4cbdd95d17f9e2074fdb9df7f64987697f2b:/tmp
The command successfully executed, which means our JAR file is now copied into the running container.
Let’s see what is inside the container:
docker container exec naughty_knuth ls /tmp.
You will see the jar file - hello-world-rest-api.jar
Step 4 : Running The JAR Within The Container
Now, we would want to run this JAR. Before that, we need to do two simple steps.
Saving The Container Image
The first step is, actually to save the container which we have created, as a image.
Here’s the command:
docker container commit naughty_knuth in28min/hello-world-rest-api:manual1
We are giving a repository name of in28min/hello-world-rest-api and a tag of manual1.
If you run docker images you would see a new image.
Running The Image
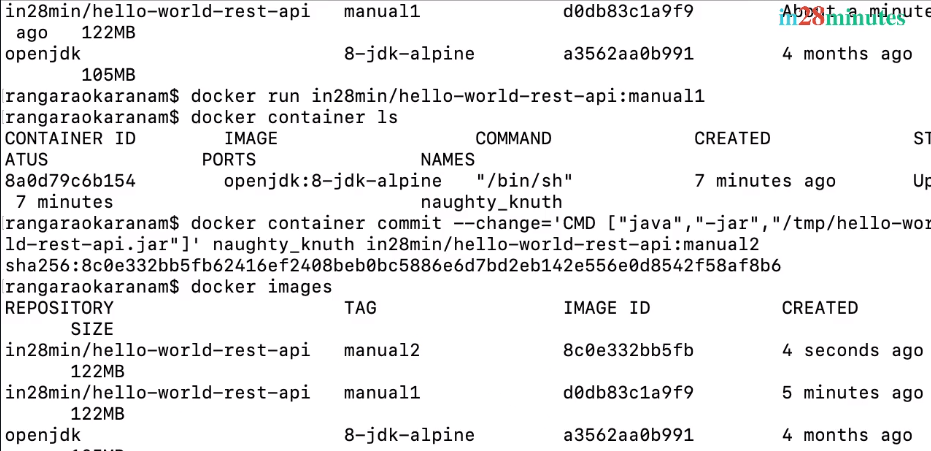
Let’s see if we can run this image.
docker run in28min/hello-world-rest-api:manual1
Let’s see if there are anything running at this point in time.
docker container ls.
You will see that the container which we launched just is not really running at all!
How can we get it to run the application?
Attaching The JAR To Startup
The reason it is not running is we did not attach anything to run at launch of the container.
We would want to launch a java application jar at startup of the container. We copied the JAR file into this image, but did not specify that the JAR file has to be launched at startup.
How can we do that?
docker container commit --change='CMD ["java","-jar","/tmp/hello-world-rest-api.jar"]' naughty_knuth in28min:hello-world-rest-api:manual2
We are adding a startup command by using an option --change.
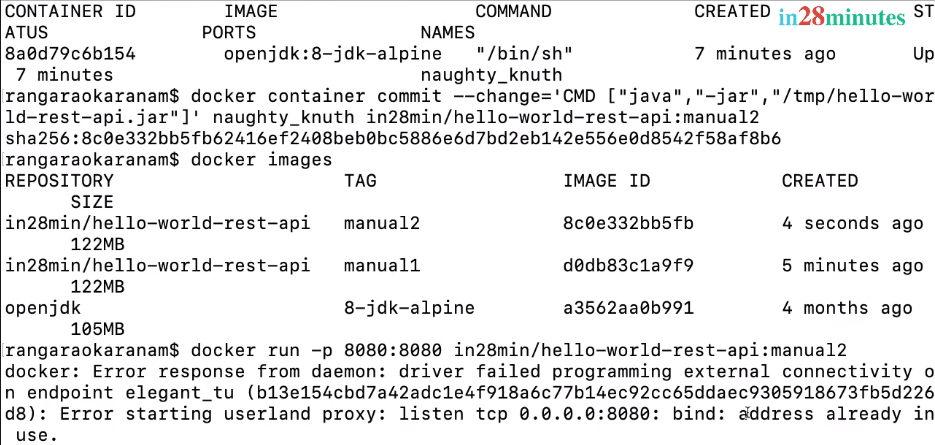
Running The Container Again
Let’s do docker images, and a new image is seen to be created with tag as manual2. Now, we can run it saying docker run in28min/hello-world-rest-api:manual2. We would also want to publish the port, as in 8080:8080.
docker run -p 8080:8080 in28min/hello-world-rest-api:manual2
If you have any container running on 8080, you can stop it.
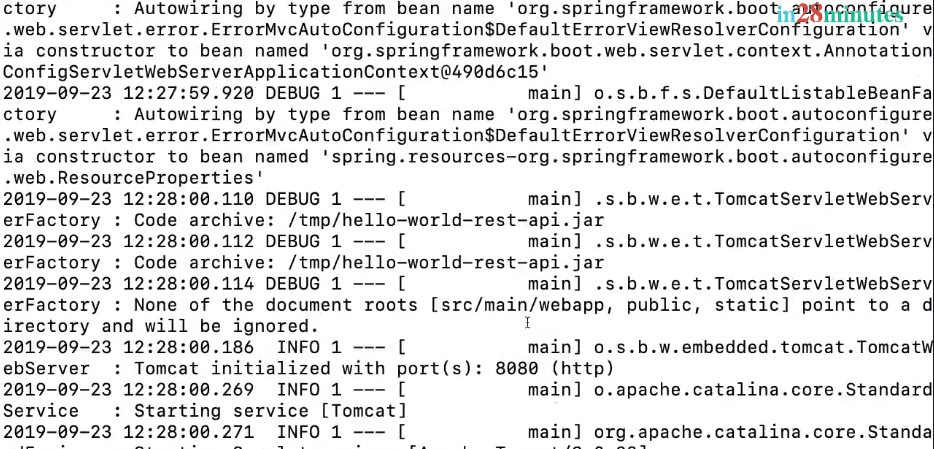
If we go to the browser and refresh, the URL continues to work.
This image we can share with anyone in the world and they can run in all environment they would wish to.
Creating the Image using Dockerfile
The command is shown below:
docker build -t in28min/hello-world-rest-api:dockerfile1 .
Couple of important things to note:
-toption is to specify the repository name and the tag.is used to specify build context
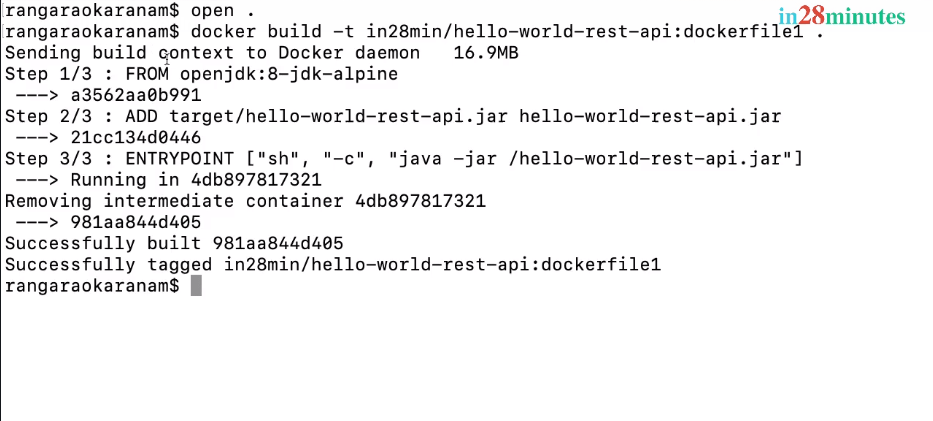
The build context (current folder) is sent to Docker Daemon and after that, different steps are executed. Finally, we have a image built, and the image is also tagged with this specific tag name that we gave it.
Running The Container
Let’s run the command
docker run -p 8080:8080 in28min/hello-world-rest-api:dockerfile1
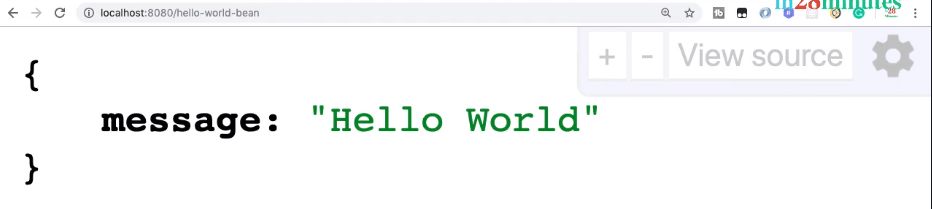
The application is up and running. Let’s see what we have in the browser at the URL localhost:8080/hello-world.

Cool! We have the application up and running in the browser as well.
We have now created a Dockerfile, and used that Dockerfile to build a image.
2. Using Jib Plugin To Create Docker Images
The Dockerfile Maven plugin is from Spotify, and the great thing about it, is it provides a clear separation between what the Dockerfile does, and what the Spotify Dockerfile Maven plugin does.
Building a Docker Image with Spotify Maven plugin
Here are the important steps:
- Instructions are specified in the
Dockerfile - Spotify Dockerfile Maven plugin is responsible for integrating the building of image with the Maven build process
Jib - Alternative To Dockerfile
One of the popular alternatives to Spotify Dockerfile Maven Plugin is JIB.
Homepage of Jib is https://github.com/GoogleContainerTools/jib.
Jib is a Maven plugin for building Docker and OCI images for your Java applications.
Understanding The Open Container Initiative (OCI)
OCI is Open Container Initiative. Just like you have interfaces and you have implementations, OCI is like an interface, and Docker image is an implementation of OCI.
OCI is a specification, and any container image creator can choose to adhere to the OCI standards. Docker has taken active part in creating the OCI specification, and also adheres to the OCI specification.
Getting Started With Jib
The most important point you need to remember about Jib is, you don’t need Dockerfile at all.
Here’s a project ready to use with JIB Plugin - https://github.com/in28minutes/docker-crash-course/blob/master/01-hello-world-rest-api/code-backup/02-jib.md
Important configuration is shown below:
<plugin>
	<groupId>com.google.cloud.tools</groupId>
	<artifactId>jib-maven-plugin</artifactId>
	<version>1.6.1</version>
	<configuration>
		<container>
			<creationTime>USE_CURRENT_TIMESTAMP</creationTime>
		</container>
	</configuration>
	<executions>
		<execution>
			<phase>package</phase>
			<goals>
				<goal>dockerBuild</goal>
			</goals>
		</execution>
	</executions>
</plugin>
A few important things to note:
- In the configuration, we are using
USE_CURRENT_TIMESTAMP. By default, JIB adds a constant timestamp to ensure reproducibility of images. We are overriding it to use the current timestamp. package- We are configuring the JIB plugin to run during the package phase
If we have some source code and generate a image today, and then use the same source code to generate another image one year later, we should get the same image. This is called reproducibility of images. The thing is, if you have different creation timestamp on these images, the final hash for these images will be different. By default, Jib puts a creation date of
1-1-1970. In computer terminology, that’s what is called the “Epoch”, the start of time for computers.
You can now run mvn clean package, and see the magic unfold.
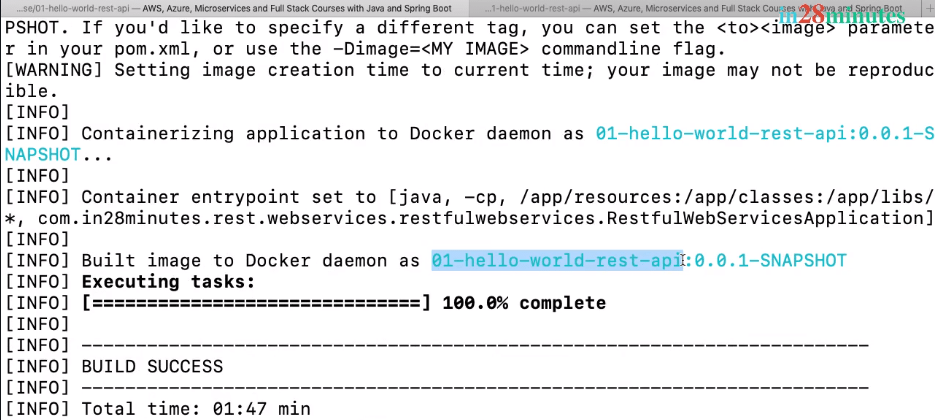
The first time with Jib, the build will be a little slow because it is downloading a lot of stuff.
The artifact id is being used as the repository name, and the version is being used as the tag.
Jib does not need Dockerfile
One interesting thing you’d note in here is, Jib is able to automatically detect that RestfulWebServicesApplication, is the class that we would want to run.
Remember, that we don’t have a Dockerfile configured at all. So, Jib is automatically able to detect the type of project and identify the class to run as ENTRYPOINT.
Examining The Jib generated Image
Now, before we go any further, let’s see actually what’s inside that image. If we do a docker history and use the image name created by Jib, there are multiple images present.
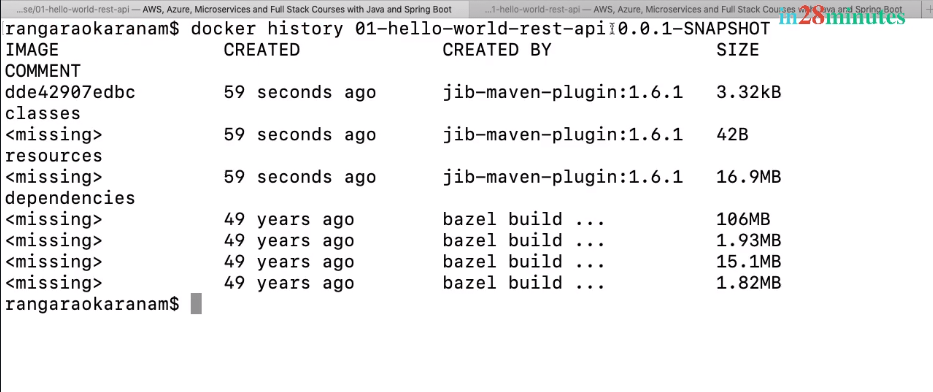
The base image which is viewed by Jib is something called distroless Java. We can change the base image as well, a little later.For now, the important thing to remember is Jib builds the images in multiple layers.
Instead of copying a fat JAR in, JIB explodes the fat JAR, copies the dependencies first, and the classes later:
- The dependencies are being copied in first -
16.9 MB - then the resources - which are the property files
- and after that, the actual classes
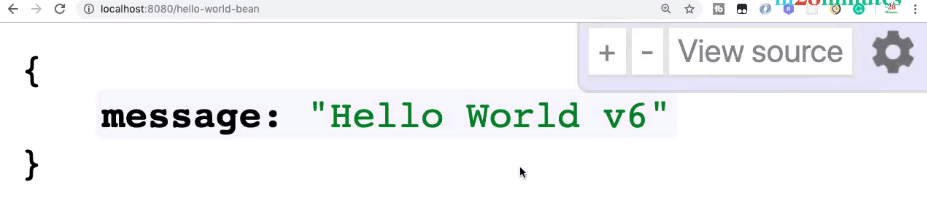
Running The Jib Generated Image
You can also run this image.
docker run -p 8080:8080 webservices/01-hello-world-rest-api
We have seen that Jib makes it very easy to generate your Docker images. All that we needed to do was, add a simple plugin in and that’s it. No Dockerfile is required.
Configurations Supported By Jib
Jib also supports a lot of configuration.
The default base image for Jib is distroless Java. To specify that you want to use openjdk:alpine, you can configure the image name as well. You can configure the tags as well.
It is possible to configure JVM options, and the main class. If the default main class picked up by Jib is not the right one, you can configure the main class as well. You can also configure the container port for the image.
If your needs are very very simple, Jib is an awesome tool. It adheres to all the best practices of generating container images.
Jib Is Java Specific
However, Jib is Java-specific. If you want to build container images for projects outside Java, Jib is not the right option. We would recommend you explore the FAQ around Jib for more information on the Jib plugin.
3. Using Fabric8 Docker Maven Plugin To Create Docker Images
With Spotify Dockerfile Maven plugin, we needed a Dockerfile, and the plugin would integrate the creation of the image with the Maven build process.
With Jib, we don’t really need a Dockerfile at all. The plugin would automatically create the container image based on the best practices.
Introducing The Fabric8 Docker Maven Plugin
The next plugin which we will quickly look at is something called Fabric8 Docker Maven Plugin. The home page is dmp.fabric8.io.
One interesting fact is that this was one of the first Maven plugins integrated well with Docker.
The original intention for the Docker Maven plugin was as a replacement of Dockerfile.
Today, almost everybody uses Dockerfile to specify the instructions to create the image. When this plugin came in in 2015, Dockerfile was not as popular as it is today.
The Options With The Fabric8 Plugin
Here’s a simple configuration of the plugin to use an existing Dockerfile:
		<!-- To build the image - "mvn clean package" -->
			<!-- Successfully tagged webservices/01-hello-world-rest-api -->
			<!-- docker run -p 8080:8080 webservices/01-hello-world-rest-api -->
			<plugin>
				<groupId>io.fabric8</groupId>
				<artifactId>docker-maven-plugin</artifactId>
				<version>0.26.0</version>
				<executions>
					<execution>
						<id>docker-build</id>
						<phase>package</phase>
						<goals>
							<goal>build</goal>
						</goals>
					</execution>
				</executions>
			</plugin>
The complete project is present here:
You can add the plugin and specify that in the package phase, we want to execute the build goal. It then uses the Dockerfile present in the root of the project. When you execute mvn clean package, it would build the image using that Dockerfile.
In that sense, it’s similar to Spotify Docker Maven plugin.
You can also configure the name of the final jar file as a maven property.
<!-- Needed by io.fabric8 docker-maven-plugin-->
<jar>${project.build.directory}/${project.build.finalName}.jar</jar>
Configuring The pom.xml - Options
The other possibility with the Fabric8 Docker Maven plugin is to specify the Dockerfile instructions directly inside your plugin configuration.
This was a popular way of doing it before Dockerfile really became famous, and is not common today.
Here’s an example:
<plugin>
	<groupId>io.fabric8</groupId>
	<artifactId>docker-maven-plugin</artifactId>
	<version>0.26.0</version>
	<extensions>true</extensions>
	<configuration>
		<verbose>true</verbose>
		<images>
			<image>
				<name>${project.artifactId}</name>
				<build>
					<from>java:8-jdk-alpine</from>
					<entryPoint>
						<exec>
							<args>java</args>
							<args>-jar</args>
							<args>/maven/${project.build.finalName}.jar</args>
						</exec>
					</entryPoint>
					<assembly>
						<descriptorRef>artifact</descriptorRef>
					</assembly>
				</build>
			</image>
		</images>
	</configuration>
	<executions>
		<execution>
			<id>docker-build</id>
			<phase>package</phase>
			<goals>
				<goal>build</goal>
			</goals>
		</execution>
	</executions>
</plugin>
Why So Many Plugins?
One question does arise: why do we need these many plugins? The most important thing is, you don’t really need to be an expert in all these plugins.
The documentation of these plugins is quite good. If you face a problem, you should be able to easily fix it by looking at the documentation. It’s very important, at a high-level, to be aware of the important things behind each plugin.
The essential Differences Among Plugins
The Dockerfile Maven plugin provides you a clear separation. You specify all the build instructions in the Dockerfile, and the plugin integrates the build of the Docker image into your Maven’s lifecycle.
Jib, on the other hand, takes complete control. It doesn’t need the Dockerfile at all, and creates the image for you.
The Fabric8 Docker Maven plugin, on the other hand, provides two options. It says, either you can use the Dockerfile, or you can specify XML configuration telling what needs to be done.
If you look at the industry today, most of the people use external Dockerfile configuration.
Using an external Dockerfile gives us complete control over the Docker image that is being created.
The other important thing is, this is language-independent. We can use this Dockerfile whether we are trying to build a Java project, a Python project, or a frontend project.
Docker Commands
| Docker Command | Description | Usage with an Example |
|---|---|---|
docker version |
Show the docker CLI version | $ docker --version Docker version 19.03.5, build 633a0ea |
docker build |
Build an image from a Dockerfile | $ docker build -t in28min/hello-world-rest-api:dockerfile1 . |
docker commit |
Create a new image from a container’s changes | $ docker container commit --change='CMD ["java","-jar","/tmp/hello-world-rest-api.jar"]' unruffled_tereshkova in28min:hello-world-rest-api:manual2 |
docker images |
List images | $ docker images |
docker attach |
Attach local standard input, output, and error streams to a running container | |
docker builder |
Manage builds | |
docker checkpoint |
Create a new image from a container’s changes | |
docker config |
Manage Docker configs | |
docker container |
Manage containers | |
docker run |
Run a command in a new container | $ docker run -p 8080:8080 in28min/hello-world-rest-api:manual OR $ docker run -p 8080:8080 webservices/01-hello-world-rest-api |
docker ps |
Shows list of containers | $ docker ps |
docker pull |
Pull an image or a repository from a docker registry and specify an image | |
docker push |
Push an image or a repository to a hub registry | |
docker rm |
Remove one or more containers by specifying container Id separating by (,) |
$ docker rm <CONTAINERID(S)> |
docker rmi |
Remove one or more images by specifying image id separating by (,) |
$ docker rmi <IMAGEID(S)> |
docker start |
Start one or more stopped containers | $ docker start |
docker stop |
Stop one or more running containers | $ docker stop |
docker inspect |
Displays granular level information about Docker object | $ docker inspect in28min/hello-world-rest-api:dockerfile1 |
docker history |
Show the history of an image | $ docker history in28min/hello-world-rest-api:dockerfile1 |
docker network ls |
List of networks | $ docker network ls |
docker network create |
Create a network | $ docker network create web-application-mysql-network |
docker network inspect |
Display detailed information on one or more networks | $ docker network inspect <NETWORKD ID> |
Before You Go - Our Amazing DevOps Course
If you loved this article, you will love our course on DevOps
- 200+ Videos
- 20+ Hours
- 6 DevOps Tools - Docker, Kubernetes, Azure DevOps, Jenkins, Terraform, and Ansible
- 3 Different Clouds - AWS, Azure and Google Cloud

Just Released